Datto RMM macOS agent: steps after the certificate update
Applies to: Datto RMM agents on macOS, agent version 12497 and later (Datto RMM 15.1.4).
Datto RMM 15.1.4 includes macOS agent version 12497, signed with the updated Kaseya certificate. It fixes the macOS connectivity issue posted on the Kaseya Status Page.
Macs that are online in Datto RMM update to 12497 on their own. This includes:
- Agents on any version earlier than 12497.
- Agent 11994 installed before October 4, 2026.
- Agent 12202 on Zinfandel.
Because macOS treats the updated certificate as a new app, Macs moving to it from the previous certificate need their macOS permissions approved again, once. Macs that went offline need the agent reinstalled.
NOTE Agent 12497 for Windows and Linux is a version update only and contains no new functionality. Nothing changes on those devices.
What you need to do depends on where the Mac is right now. Find your situation in the table, then follow that section.
| Your situation | What you need to do | Go to |
|---|---|---|
| You're installing the agent on a Mac for the first time | Install the agent, then grant permissions. | New install |
| The Mac is online and the agent is on a version earlier than 12497 (including 11994, or 12202 on Zinfandel). | Nothing to install. The agent updates on its own. Approve the permissions the first time someone starts Web Remote. | Online device |
| The Mac is online and the agent was already reinstalled with the updated certificate (11994 installed on or after October 4, 2026) | Nothing to do. The agent updates to 12497 on its own and keeps its existing permissions. | Online device |
| The Mac already has the agent but shows offline in Datto RMM | Install the new agent over the existing one. | Offline device |
| You reinstalled on an offline Mac, but Web Remote still doesn't show up after 8 minutes | Run a short reset in Terminal. | Reinstall didn't work |
| Permissions show as on, but Web Remote shows a black or gray screen or can't control the Mac | Reset the permissions, then approve them again. | Permissions show as on but Web Remote doesn't work |
Before you start: someone with administrative privileges must be at the Mac to click through the macOS prompts, because Web Remote is not available until those prompts are approved. Changing them in System Settings also needs an administrator account, so have the admin user name and password ready.
IMPORTANT Regarding native macOS security (XProtect / Gatekeeper): A subset of impacted Macs meeting specific conditions may trigger a false-positive malware alert from XProtect and Gatekeeper because of the certificate update. Our technical evaluation confirms this is tied to the same underlying issue and is safe. Refer to Malware Blocked error message.
 New install
Use this if the Mac has never had the Datto RMM agent installed.
IMPORTANT Only installers downloaded from Datto RMM on or after October 4, 2026 contain the build with the new certificate. Installers downloaded before that date contain the previous build, so discard any saved copies and download a fresh installer for each new deployment. This includes copies stored in deployment scripts, MDM or imaging tools, or shared drives.
-
In Datto RMM, download the macOS agent installer for the site this Mac belongs to.
-
Run the installer on the Mac and follow the prompts until it finishes.
-
A macOS notification titled App Background Activity will appear. Follow The background activity notification.
-
Follow Granting macOS permissions to approve each prompt.
-
Check the device in Datto RMM. It should show as online.
Online device
Use this if the Mac shows as online in Datto RMM and is running an agent version earlier than 12497. You don't need to download or reinstall anything.
IMPORTANT If the device is showing as online in Datto RMM but Web Remote will not connect to the device, do not restart the device; wait for the agent to update itself. If the device has already been restarted and is now showing offline, refer to Offline device.
IMPORTANT If you use the Agent Browser to attempt to connect to a device that Web Remote cannot reach, the agent may go offline and restart in some cases. If an Agent Browser connection has already been attempted and the device is now showing offline, refer to Offline device.
- Leave the Mac on and connected. The agent checks for the update on its own schedule and updates to version 12497. This can take a few hours after the release reaches your platform.
- After the update, a notification titled App Background Activity appears on the Mac. Follow The background activity notification.
- The first time someone starts a Web Remote session to this Mac, macOS asks for permissions. Follow Granting macOS permissions.
NOTE If the agent was already reinstalled with the updated certificate (11994 installed on or after October 4, 2026), it updates to 12497 without asking for permissions again. Web Remote keeps working as before.
NOTE If Web Remote connects but the desktop displays as a black or gray screen, refer to Datto RMM macOS agent: steps after the certificate update.
Offline device
Use this if the Mac already has the agent but shows as offline in Datto RMM. This often happens after the Mac was restarted while the issue was active, and can result in this error after restart:
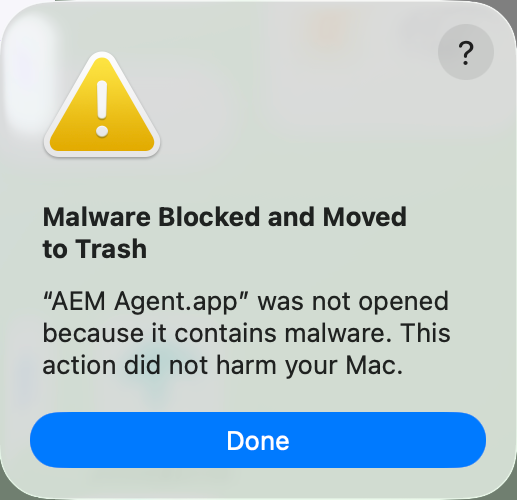
For more information on what causes this error, refer to Malware Blocked error message.
NOTE This applies to any offline Mac, including Zinfandel devices and Macs running 11994 (or 12202) installed before October 4, 2026. An offline agent cannot receive the update, so it has to be reinstalled. Download a new installer file if you are not sure. Refer to Downloading the Agent or sharing the Agent installer.
NOTE You do not need to uninstall the old agent first.
- In Datto RMM, download the macOS agent installer for the site this Mac belongs to. Refer to Downloading the Agent or sharing the Agent installer.
- Run the installer on the Mac and follow the prompts until it finishes.
- The device comes back online in Datto RMM, and a notification titled App Background Activity appears on the Mac. Follow The background activity notification.
- Wait 5 to 8 minutes. During this time the agent updates Web Remote and its other components in the background. Leave the Mac on and connected.
- Start a Web Remote session to the Mac. macOS asks for permissions at this point. Follow Granting macOS permissions.
If Web Remote is still not available for the device after 8 minutes, go to Reinstall didn't work.
Reinstall didn't work
Use this only if you already followed Offline device and the Web Remote option still does not appear for the Mac. You will run three commands in Terminal on the Mac.
IMPORTANT Type these commands exactly as shown. The second command permanently deletes a folder. Copying and pasting them from this article is the safest option.
- On the Mac, open Terminal. You will find it in Applications > Utilities, or press Command + Space, type
Terminal, and press Return. - Go to the agent's folder:
cd /usr/local/share/CentraStage - Delete the AEMAgent folder inside it:
sudo rm -rf AEMAgent/Terminal asks for a password. Type the Mac's administrator password and press Return. Nothing shows on screen while you type, which is normal.
-
Stop the agent service:
sudo launchctl stop com.centrastage.cag -
Wait about 10 seconds.
-
Open Finder, go to Applications, and double-click AEM Agent to start it again.
-
Check the device in Datto RMM. The Web Remote option should now be available.
-
Start a Web Remote session and follow Granting macOS permissions.
Permissions show as on but Web Remote doesn't work
After the certificate update, macOS can keep the old permission entries for AEM Agent. They look switched on in System Settings, but they belong to the previous certificate, so macOS ignores them. Common signs include:
- Web Remote connects but shows a black or gray screen, sometimes with only the menu bar visible.
- Web Remote shows the screen but can't control the mouse or keyboard.
- The macOS permission prompts never appear.
IMPORTANT Turning the AEM Agent switch off and back on does not fix this. The old entry has to be cleared.
Use one of these options.
Option 1: reset in Terminal (recommended)
- On the affected Mac, open Terminal and run:
tccutil reset All com.centrastage.tray
- Start a new Web Remote session. macOS asks for permissions again. Refer to Granting macOS permissions.
Option 2: remove and re-add in System Settings
- Open System Settings and go to Privacy & Security.
- Open the following pages:
- Local Network
- Screen & System Audio Recording
- Accessibility / Device Control and Data Access
- Full Disk Access
- On each page, select AEM Agent and click the minus (-) button to remove it. Enter the administrator password if prompted.
- Start a new Web Remote session and follow Granting macOS permissions. AEM Agent is added back as you approve each prompt. For Full Disk Access, click plus (+) and add AEM Agent from Applications.
Malware Blocked error message
In some cases, macOS may detect the Datto RMM Agent as malware and move it to the trash on the device.
The following chain of events triggers this error:
- The macOS agent has been offline since before the Rosetta changes in macOS 27, and cannot connect to the platform to retrieve updated information.
NOTE For more information on the changes in macOS 27 to Rosetta, and how that affects Datto RMM, refer to Datto RMM Agent not running after upgrading to macOS 27 (Golden Gate).
- While attempting to regain connectivity by reinstalling Rosetta on the affected device, the agent has an out-of-date configuration.
- When the AemAgent process starts, Gatekeeper/XProtect inspects it, sees that the configuration is not valid, and blocks/quarantines the application as malware.
NOTE If you are still getting alerts about DRMM being malware AFTER updating to the latest agent version, please ensure the quarantined DRMM Agent is no longer in the trash by right clicking the AEM Agent > Delete Immediately. You can also open Terminal and use this command: sudo rm -rf ~/.Trash/AEM\ Agent.app
Datto RMM is not a virus, so this is a false positive because the device is offline and did not receive an updated certificate. To resolve this issue, refer to Offline device.
The background activity notification
After the agent installs or updates, macOS shows this notification in the top-right corner of the screen:
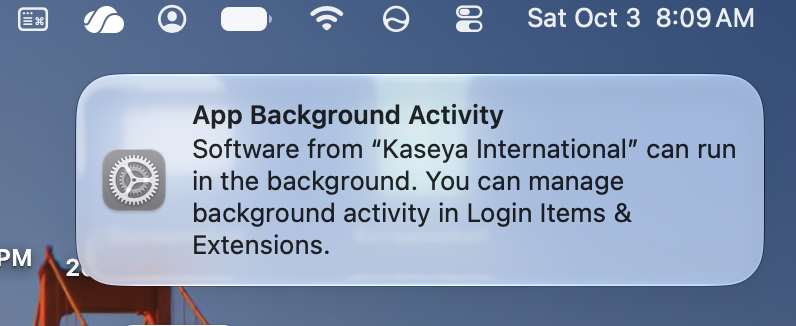
You don't need to click anything. The notification tells you the agent is allowed to run in the background, and it needs to stay that way for the device to stay online.
If someone turned it off, here is how to turn it back on:
- Open System Settings and go to General > Login Items & Extensions.
- Under Allow in the Background, find Kaseya International and make sure its switch is on.
Granting macOS permissions
The agent needs four macOS permissions for Web Remote to work: Local Network, Screen & System Audio Recording, Accessibility, and Full Disk Access. Prompts will appear for the first three. You must turn on Full Disk Access yourself in System Settings.
The prompts show the app name as AEM Agent. That's the Datto RMM agent.
IMPORTANT If AEM Agent already shows as switched on but Web Remote doesn't work, don't toggle it off and on. Follow Permissions show as on but Web Remote doesn't work instead.
Local Network and Screen Recording
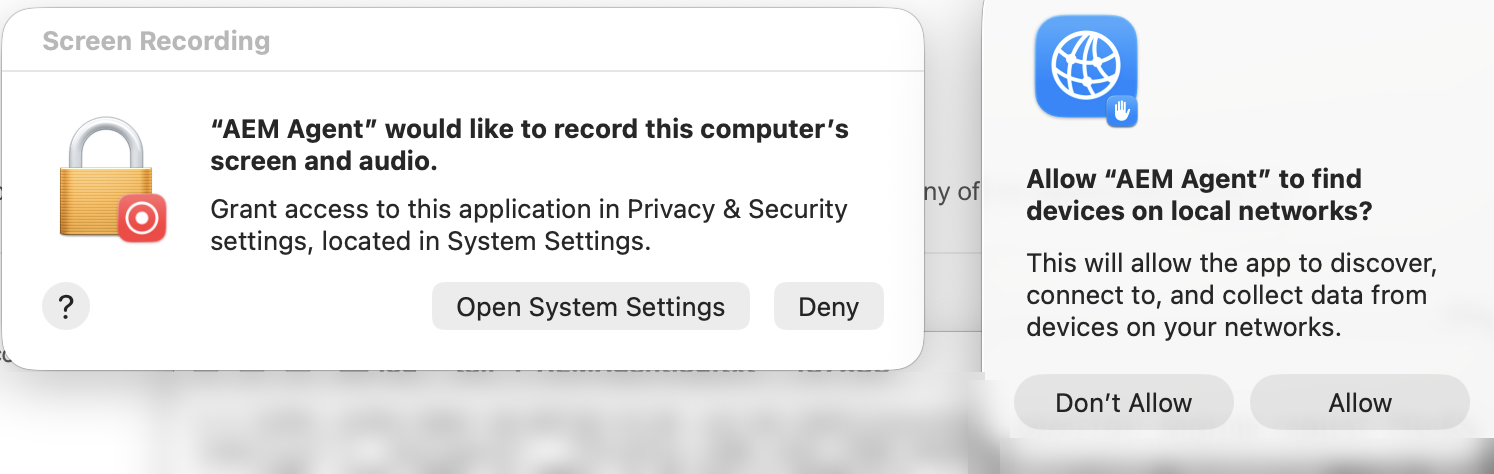
These two prompts usually appear at the same time.
-
On the Local Network prompt, click Allow.
-
On the Screen Recording prompt, click Open System Settings. Don't click Deny.
-
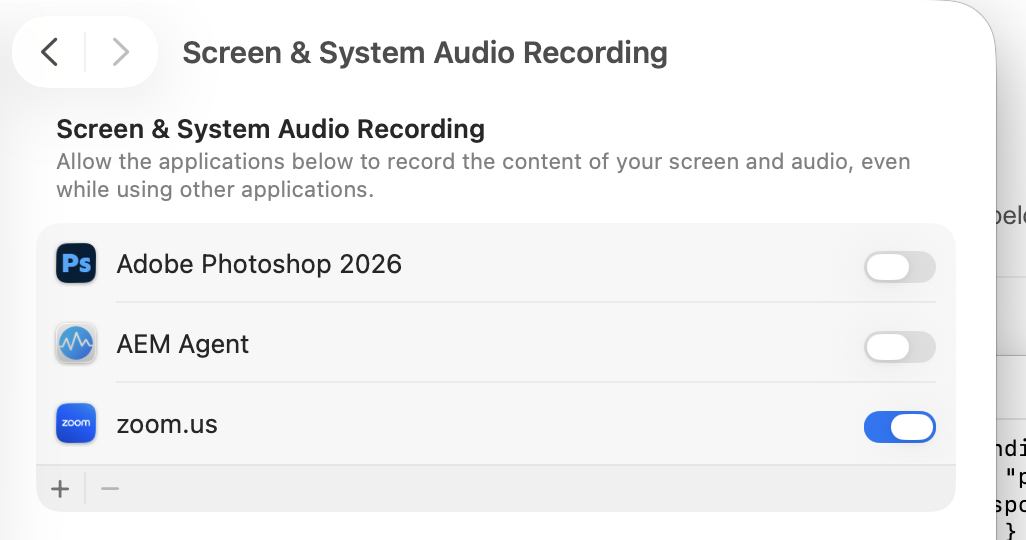
System Settings opens to Screen & System Audio Recording. Find AEM Agent in the list and turn its switch on. Enter the administrator password if macOS asks for it.
-
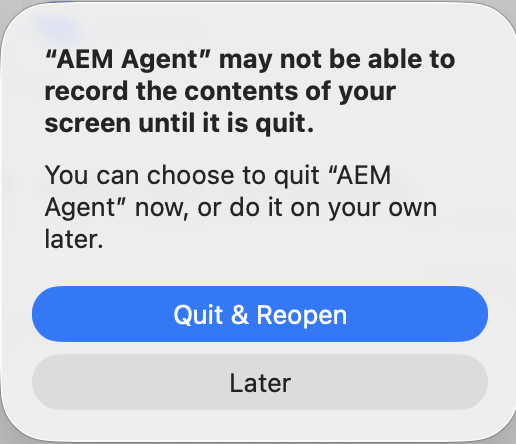
macOS then says AEM Agent may not be able to record the screen until it is quit. Click Quit & Reopen.
Accessibility
This lets Web Remote control the mouse and keyboard.
NOTE In macOS 27 (Golden Gate), Accessibility was renamed to Device Control and Data Access.
-
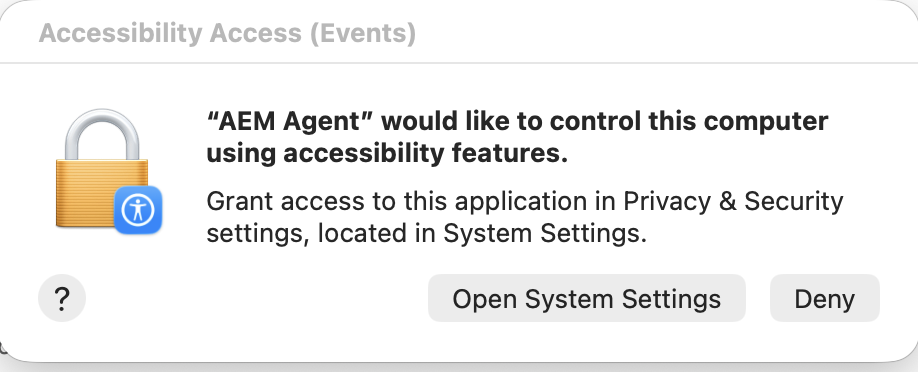
When the Accessibility Access prompt appears, click Open System Settings. Do not click Deny.
-
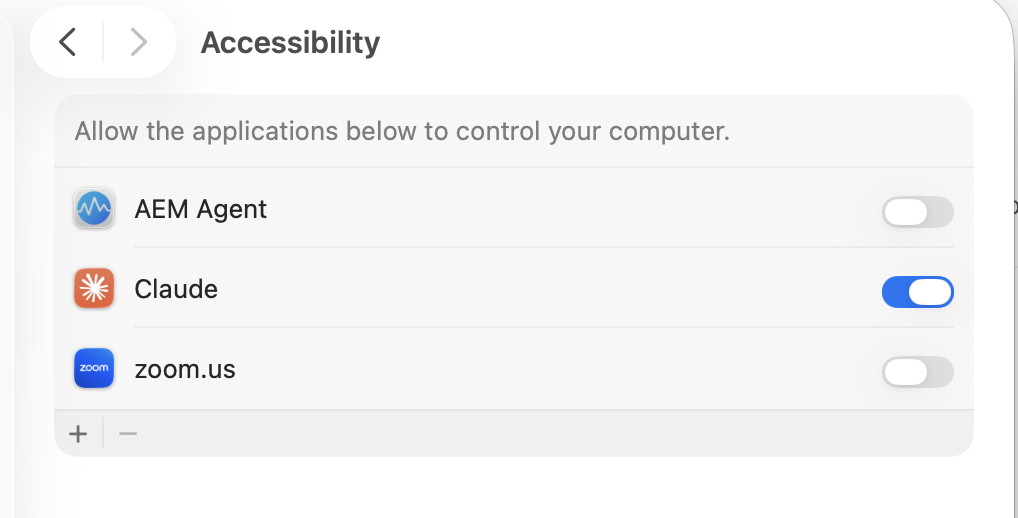
System Settings opens to Accessibility. Find AEM Agent and turn its switch on. Enter the administrator password if macOS asks for it.
Full Disk Access
macOS doesn't show a pop-up for this one, so you have to turn it on yourself.
-
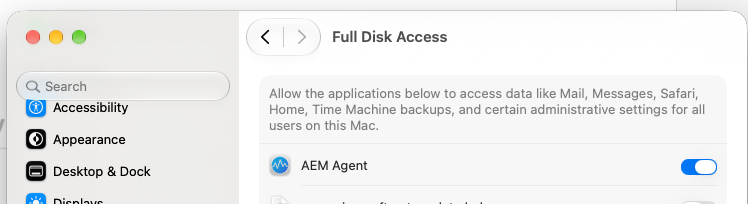
Open System Settings and go to Privacy & Security > Full Disk Access.
-
Find AEM Agent and turn its switch on. Enter the administrator password if macOS asks for it.
Check that everything is on
Open System Settings, go to Privacy & Security, and confirm that AEM Agent is switched on in each of these pages:
- Local Network
- Screen & System Audio Recording
- Accessibility
- Full Disk Access
If one is missing or off, turn it on there. You do not need to wait for the prompt to come back.
Need help?
If a Mac still will not come online or Web Remote will not connect after these steps, contact Kaseya support. Include the affected device names and which sections of this article you followed.
For updates on the original issue, subscribe to the Kaseya Status Page.


