Web Portal ticketing - Legacy UI
PERMISSIONS Refer to ACCOUNT > Support and SITES > Support in Security Level Details - Permissions
Tickets can be created on various pages in the Web Portal, depending on whether you use Datto RMM's standalone ticketing or integrated ticketing. Refer to About tickets (Deprecated) .
Standalone ticketing
NAVIGATION Legacy UI > Account > Support
NAVIGATION Legacy UI > Sites > select a site > Support
NAVIGATION Legacy UI > Sites > select a site > Devices > select a device > Support
Integrated ticketing with Autotask
NAVIGATION Legacy UI > Sites > select a site > Summary/Devices/Monitor/Support
NAVIGATION Legacy UI > Sites > select a site > Devices > select a device > Summary/Audit/Manage/Monitor/Support
Integrated ticketing with ConnectWise PSA
NOTE If you have the ConnectWise integration enabled, the Support tab is disabled. Refer to Round-trip ticketing.
How to...
- Navigate to the appropriate path indicated above.
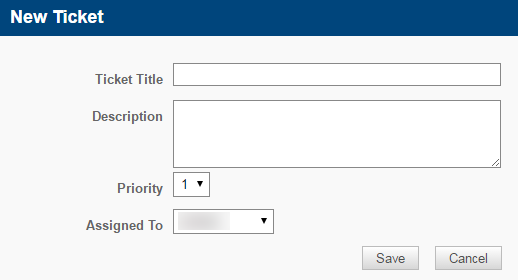
- On the left hand side of the page, click New Ticket.
| Field | Description |
|---|---|
| Ticket Title | Enter a ticket title. NOTE This field has a limit of 255 characters. |
| Description | Enter a ticket description. |
| Priority | Select a ticket priority: • Critical - Priority 1 • High - Priority 2 • Moderate - Priority 3 • Low - Priority 4 • Information - Priority 5 |
| Assigned to | Select a Datto RMM user who will be responsible for resolving the issue. |
- Click Save.
- A dialog box that includes the ticket number will confirm that the ticket has been created. The newly created ticket will appear at the top of the ticket list. For more information, refer to (Deprecated) Managing tickets - Legacy UI.
- To create a ticket, navigate to any of the paths indicated above.
- On the left hand side of the page, click New Ticket.
NOTE The New Ticket button will only be displayed if the site is mapped to an Autotask company and/or the device is synced to an Autotask configuration item.
- The ticket form will open in a new window in Autotask.
If you were already logged in to Autotask or single sign-on is configured for you, you will be directed to the New Ticket page. If you are not logged in to Autotask, you will be required to enter your login credentials first. - If the ticket is created at the site level, the Company Name will be populated in the new Autotask ticket, and it will match the name of the Datto RMM site the ticket is created for.
If the ticket is created at the device level, both the Company Name and the Configuration Item details will be populated in the new Autotask ticket. The Company Name will match the name of the site that the Datto RMM device belongs to, and the Configuration Item will match the Datto RMM device. - Fill in any relevant fields.
For information on what to enter, click the question mark icon in the upper-right corner of the Autotask page. You will automatically be directed to the appropriate topic in the Autotask Help system. - Click Save.
- The new ticket will be listed in both Datto RMM and Autotask. Refer to (Deprecated) Managing tickets - Legacy UI.
You can also configure monitors or monitoring policies to create tickets when alerts are raised. When you create or edit a monitor or a Monitoring policy, you can configure the alert responses that will be triggered when a monitor threshold is breached. One of the possible response options is the automatic creation of a ticket. For information on how to configure the Ticket Details in a monitor or a Monitoring policy in the legacy UI, refer to Create a monitor. For information on how to configure a ticket response in a monitor in the New UI, refer to Create a ticket.
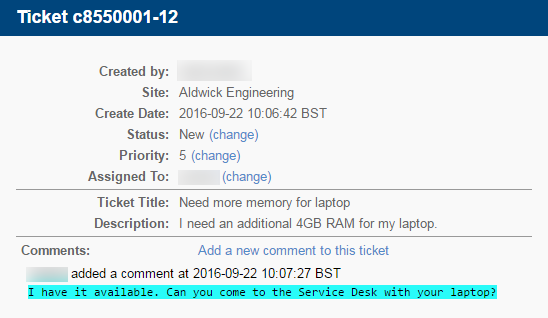
All tickets, even completed ones, can be edited at any time. Depending on the type of ticketing you use, you can update different fields.
- You can edit the Status, Priority, Assigned To, or Comments fields.
NOTE If your ticket was raised by a monitor alert, setting the ticket's status to Closed will resolve the alert as well.
- Click Save or Submit (if you are adding a new comment), and close the window.
- Locate the ticket. Refer to (Deprecated) Managing tickets - Legacy UI.
- Click the ticket number. The ticket will open in a new window in Autotask.
If you were already logged in to Autotask or single sign-on is configured for you, you will be directed to the ticket. If you are not logged in to Autotask, you will be required to enter your login credentials first. - Click Edit and update the ticket as required.
For information on what to enter, click the question mark icon in the upper-right corner of the Autotask page. You will automatically be directed to the appropriate topic in the Autotask Help system. - Click Save.


