Datto RMM API
PERMISSIONS Administrator
NAVIGATION To enable the API: Setup > Global Settings > Access Control > Enable API Access
NAVIGATION To generate API Keys: Setup > Users > click a username > Generate API Keys
About
Datto provides a REST API (Application Programming Interface) to enable programmatic access to information and operations available in Datto RMM. Available requests are documented using Swagger UI.
NOTE The API is available in English only. Datto reserves the right to make changes to the API or suspend it if there is significant load. Use of the API is only recommended if you have software development experience or are integrating with a preexisting third-party tool.
IMPORTANT Support for the API does not cover queries related to code development or implementation.
The Datto RMM API is currently at version 2 (v2).
The API uses OAuth 2.0 for authorization. OAuth 2.0 uses access tokens issued by an authorization server, which are used to access protected API resources subsequently. These API access tokens expire after 100 hours. After this period, a new token must be requested or an HTTP status code of 401 (Unauthorized) will be returned by any requests attempted. For more information on the OAuth 2.0 protocol, refer to OAuth 2.0.
Requests to the API are limited to 600 requests within the past 60 seconds. When 90% of the request quota is exceeded, a one-second delay is introduced in the request response.
EXAMPLE For example, if 100 requests are made in a one-second period, plus a further 500 requests 59 seconds later, the request count at 61 seconds would be 500. As 60 seconds have passed since the original 100 requests were made, they are no longer included in the count.
NOTE The request count is calculated across the Datto RMM account rather than on a per-user basis. If multiple users have API access, the total number of requests for all users is counted against the account rate limit.
If the rate limit is breached, further requests will return an HTTP status code 429 (Too Many Requests) until the count falls below 600 requests within 60 seconds. If this occurs, it is recommended to wait 60 seconds before making further requests to ensure the count has returned to zero.
IMPORTANT Persistent requests made after breaching the rate limit will trigger an HTTP status code 403 (Forbidden), and the originating IP will be blocked temporarily. When this happens, wait 5 minutes before attempting any further requests.
How to...
The API needs to be enabled for the entire Datto RMM account first. An API Key and an API Secret Key must then be generated for each user that requires API access.
NOTE Any active user can have access to the API. If a user account gets inactivated or deleted, the user's previously generated API keys will be invalidated, and the inactive or deleted user will be unable to access the API.
IMPORTANT When making requests to the API, user security level restrictions are ignored. All API keys generated for an account will grant the same access.
- Navigate to Setup > Users, and click the username that you would like to enable API access for.
- Click Generate API Keys to generate an API Key and an API Secret Key for this user.
NOTE The API URL field is added to the individual user page once API keys have been generated for the user.
- The API Key and the API Secret Key will be displayed. These keys will be used for authentication when making requests. Make a note of these somewhere safe.

IMPORTANT The API Secret Key will be hidden for security reasons after navigating away from this page. It will not be possible to retrieve it again. However, you can regenerate API keys at any time by returning to the page and clicking Generate API Keys. This will invalidate any keys previously generated. Similarly, clicking Delete API Keys will revoke access altogether. Regenerating and deleting API keys is irreversible, and you must confirm the action by clicking Confirm in the confirmation dialog box.
- Click Save User.
IMPORTANT You can select API-related columns from the Column Chooser on the Setup > Users page. Refer to Column Chooser - Users.
- Repeat the steps for any other user account that requires API access.
IMPORTANT All further references to API Key, API Secret Key, and API URL in this documentation refer to the values detailed above. When surrounded by square brackets, the appropriate value should be substituted.
EXAMPLE For example, if the API URL value was https://merlot-api.centrastage.net, references to [API URL]/api/swagger-ui/index.html should be translated as https://merlot-api.centrastage.net/api/swagger-ui/index.html.
Postman is a powerful GUI platform for browsing and testing APIs without coding. It is available on Windows, macOS, and Linux.
If you are new to APIs or just want to get familiar with the Datto RMM API, we recommend that you download Postman and follow our guide through an example in this topic. This should give you an idea of what is available in the API, and it will allow you to browse and test without any coding at all.
NOTE You can also use the web version of Postman with a free Postman account.
Using Postman is an optional step in the process but can be useful as a troubleshooting and debugging tool when developing against the API. If you are an experienced API developer, you may want to skip this step completely and move to the next section in the documentation.
NOTE The version of Postman detailed in the following examples is v9.16.0 on Windows. It is recommended that you are running at least this version to avoid web interface discrepancies.
To get started with Postman, follow these steps:
- Download Postman from https://www.postman.com/downloads and launch the application.
- Click the + sign to open a new request.

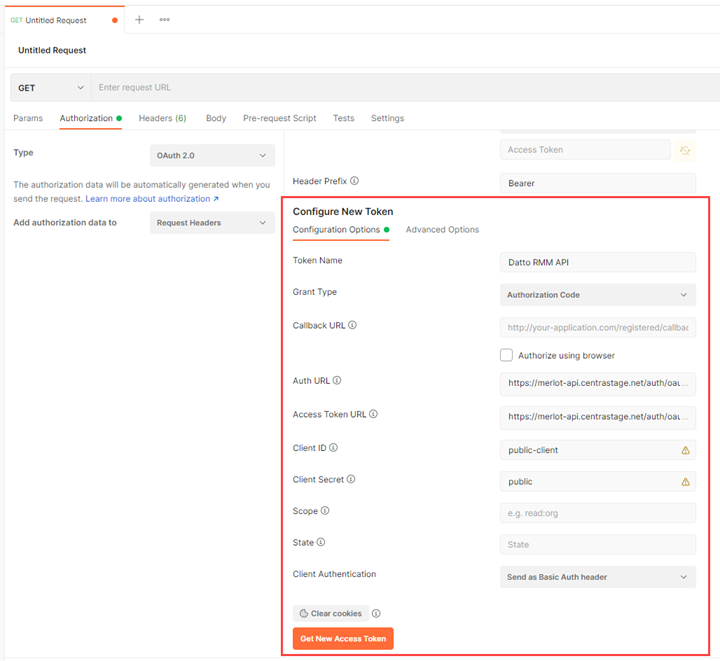
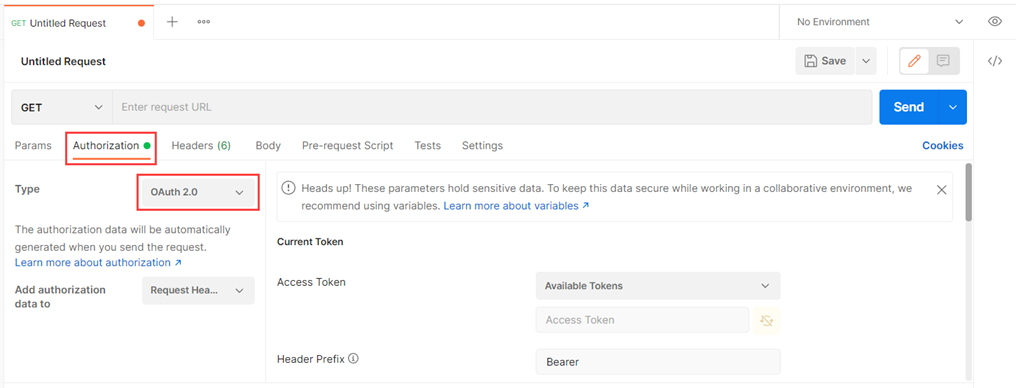
- In the Authorization tab, select OAuth 2.0 from the Type drop-down list.
| Field | Enter... |
|---|---|
| Token Name | (any name) |
| Grant Type | Authorization Code |
| Callback URL | (blank) |
| Auth URL | [API URL]/auth/oauth/authorize |
| Access Token URL | [API URL]/auth/oauth/token |
| Client ID | public-client |
| Client Secret | public |
| Scope | (blank) |
| State | (blank) |
| Client Authentication | Send as Basic Auth header |
- Click Get New Access Token.
- Fill in the Request Token form using your Access key (API Key) and Secret key (API Secret Key), then click Request.

Swagger UI is a framework used to visualize API resources. All supported requests in Datto RMM API are documented under the following URL: [API URL]/api/swagger-ui/index.html.
Use your Datto RMM platform-specific URL:
Swagger UI is generated from OpenAPI Specification. Datto RMM uses Open API Specification version 3.0. The OpenAPI Specification Document used for the Datto RMM API is accessible at the following URL: [API URL]/api/v3/api-docs/Datto-RMM.
Use your Datto RMM platform-specific URL:
| Datto RMM Platform | OpenAPI Specification |
|---|---|
| Pinotage | https://pinotage-api.centrastage.net/api/v3/api-docs/Datto-RMM |
| Merlot | https://merlot-api.centrastage.net/api/v3/api-docs/Datto-RMM |
| Concord | https://concord-api.centrastage.net/api/v3/api-docs/Datto-RMM |
| Vidal | https://vidal-api.centrastage.net/api/v3/api-docs/Datto-RMM |
| Zinfandel | https://zinfandel-api.centrastage.net/api/v3/api-docs/Datto-RMM |
| Syrah | https://syrah-api.centrastage.net/api/v3/api-docs/Datto-RMM |
Swagger UI groups API operations with tags (for example, /v2/account lists operations on accounts). Tags relate to different areas of the product and can be expanded or collapsed to expose varying levels of detail. When expanded, each tag shows the available requests contained within, along with the method (for example, GET, POST, PUT, or DELETE) and request (for example, /v2/account).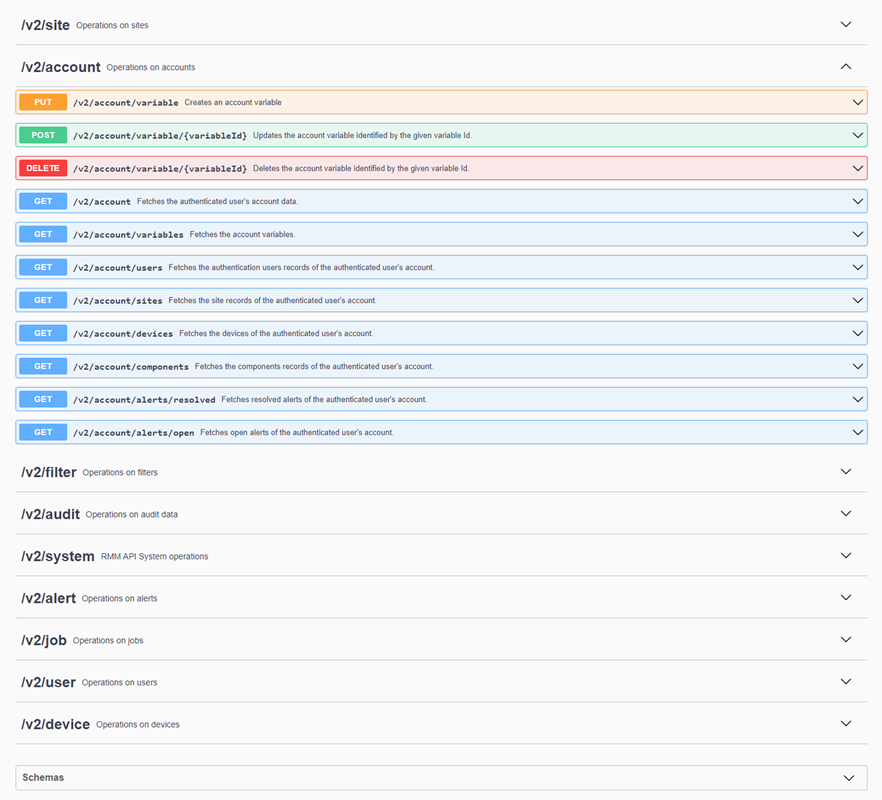
When collapsed, each request shows a brief description (for example, Fetches data of the device identified by the given device Uid.) but can be expanded to show the highest level of detail available.
The expanded request detail may include the following sections:
IMPORTANT When making requests, it is important to use the following base URL before appending the request: [API URL]/api.
EXAMPLE For example, if the required request was /v2/account, the correct format would be [API URL]/api/v2/account.
TIP You can test the requests detailed in Swagger UI using Postman. Refer to Get started with Postman.
Schemas
The Schemas section contains the programmatic description of the input and output JSON blobs.
Examples and use cases
Sample code in a selection of common programming languages is provided to help developers begin making API requests. The principles outlined are universal and portable to other languages not explicitly detailed.
NOTE Sample code is intended to be a foundation for further development. Extensive error checking or other advanced functionality is out of scope for this topic.
The following technologies will be referenced for illustration purposes:
| Technology | Description |
|---|---|
| cURL | cURL is an application library for downloading files or performing requests on the web. cURL is free and open source. (Source: cURL) NOTE cURL examples are provided in Windows batch script format, but the command line structure is compatible with any operating systems listed on the cURL download page, including macOS and Linux. |
| PowerShell | Windows PowerShell is a task-based command-line shell and scripting language built on the .NET Framework. (Source: PowerShell) NOTE PowerShell 3.0 is the minimum required version to use the examples detailed. |
| C# | C# is a multi-paradigm, object-oriented programming language that was developed by Microsoft. (Source: C Sharp (programming language)) NOTE C# examples require the use of Json.NET. This popular high-performance JSON framework for .NET can be downloaded from Newtonsoft. Json.NET is open source under the MIT license and is free for commercial use. NOTE C# examples are designed to be run as console applications. |
The example code detailed in this topic is available to download from Datto RMM APIv2 Example Code.
API responses may contain time stamp information that is always stored in Unix format with millisecond precision. For more information refer to Unix time. In summary, Unix time is defined as the number of seconds that have elapsed since 00:00:00 UTC on January 1st, 1970.
EXAMPLE For example, a Unix time stamp of 1511795853000 would relate to a human-readable time stamp of Mon, 27 Nov 2017 15:17:33 GMT.
API responses can return a maximum of 250 results at a time. If more than 250 results are returned, the results will be split across multiple pages. This is known as pagination, and the results are said to be paginated.
When making requests that can return one or more results, the response will contain a property named pageDetails that describes the number of results on the current page, along with URLs that show if there is a previous or next page that can be navigated to.
NOTE The pageDetails property will be present even if the results do not span multiple pages. If no previous or next page navigation is possible, the corresponding prevPageUrl or nextPageUrl value will be NULL.
IMPORTANT When dealing with paginated results, the nextPageUrl value can be used to check for results on additional pages until a NULL value is encountered. This ensures that results from all available pages have been requested.
When authenticating against the API, the first step is to request an access token. Access tokens take the form of JSON Web Tokens. JSON Web Tokens are an open, industry-standard RFC 7519 method for representing claims securely between two parties. This information can be verified and trusted because it is digitally signed. For more information on JSON Web Tokens, refer to JWT.
When successfully requested, an access token will look like a large string of seemingly random characters. It is in fact an encrypted, URL-safe representation of the JSON Web Token, containing header, payload, and signature verification segments.
NOTE In the following examples, the access token in the format shown above will be referred to as [API Access Token].
Outlined in this section are several methods of requesting an access token using different technologies:
Requesting an access token with cURL can be achieved by using the following code.
NOTE This is included as curl_token.bat in the Downloadable example code.
A successful authorization results in an HTTP status code 200 (OK) and a response in JSON format. This should be parsed to retrieve the access_token property for later use.
An unsuccessful authorization due to an incorrect API Key / API Secret Key combination results in an HTTP status code 400 (Bad Request).
EXAMPLE

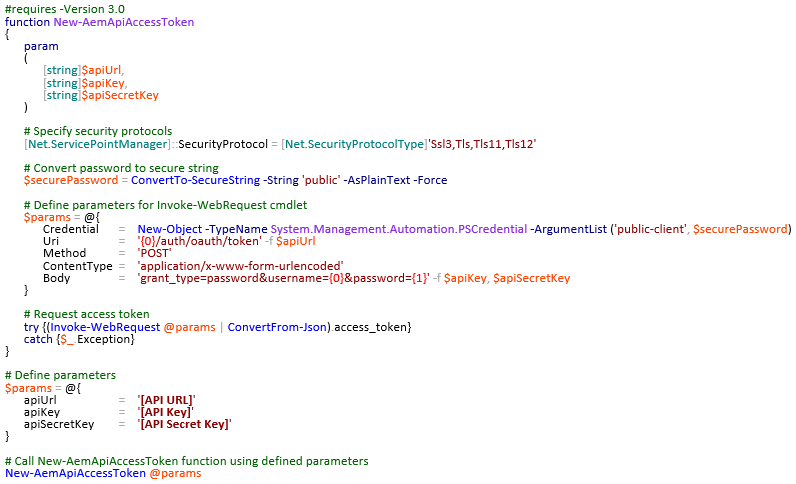
Requesting an access token with PowerShell can be achieved by using a function.
NOTE This is included as powershell_token.ps1 in the Downloadable example code.
A successful authorization results in an HTTP status code 200 (OK) and a response containing an access token.
An unsuccessful authorization due to an incorrect API Key/API Secret Key combination results in an HTTP status code 400 (Bad Request).
EXAMPLE

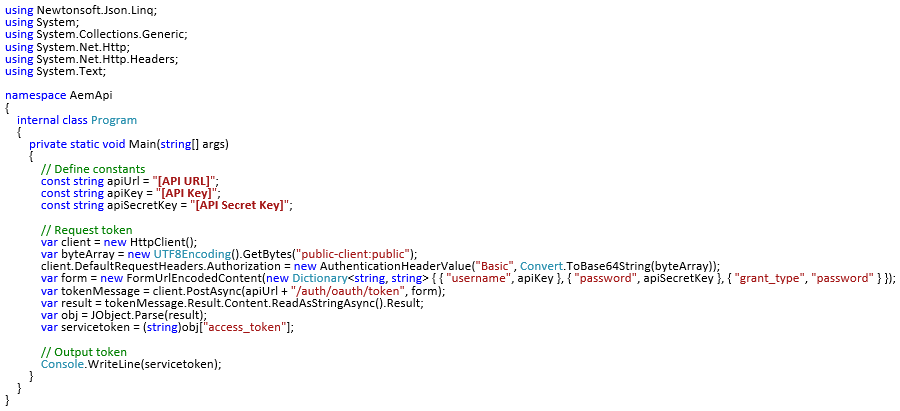
Retrieving an access token with C# can be achieved by using a program running as a console application.
NOTE This is included as csharp_token.cs in the Downloadable example code.
A successful authorization results in an HTTP status code 200 (OK) and a response containing an access token.
No explicit error handling for unsuccessful authorization is present in this example. The output of a failed attempt would be blank. In the background, an HTTP status code 400 (Bad Request) is thrown which can be interrogated with additional code if required.
Requests using the GET method are used for retrieving data from the API.
IMPORTANT In the following examples, the request method (for example, GET) will be referred to as [API Method].
IMPORTANT References to [API Request Body] have been included to support the use of consistent code for all request types detailed in this topic. When performing requests that do not require the request body to be set, the value should be set to NULL or left blank, depending on the technology being used.
EXAMPLE cURL
EXAMPLE PowerShell
EXAMPLE C#
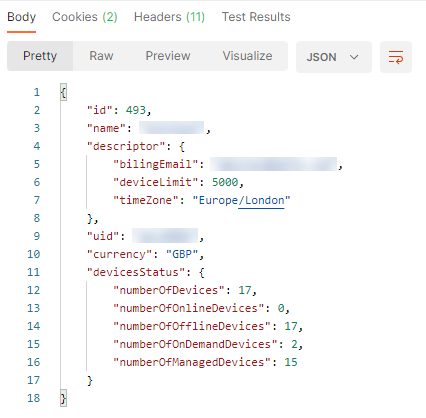
A GET request could be used to show information about the authenticated user's account. Using Swagger UI as reference, it is possible to see under the /v2/account tag that there is an appropriate request for this information.
EXAMPLE

NOTE In this instance, the request would be /v2/account.
IMPORTANT In the following examples, the request will be referred to as [API Request].
Regardless of the technology used to make a request, the response will be in a consistent JSON format. The expected response is summarized in Swagger UI under the appropriate request. For more details refer to Use Swagger UI to explore API requests.
The raw response will be unformatted JSON.
EXAMPLE

Some JSON frameworks such as Json.NET by Newtonsoft contain functionality to automatically convert JSON into a format that aids human readability. This format is more recognizable as the response model detailed in Swagger UI.
Performing a GET request with cURL can be achieved by using the following code.
NOTE This is included as curl_request.bat in the Downloadable example code.
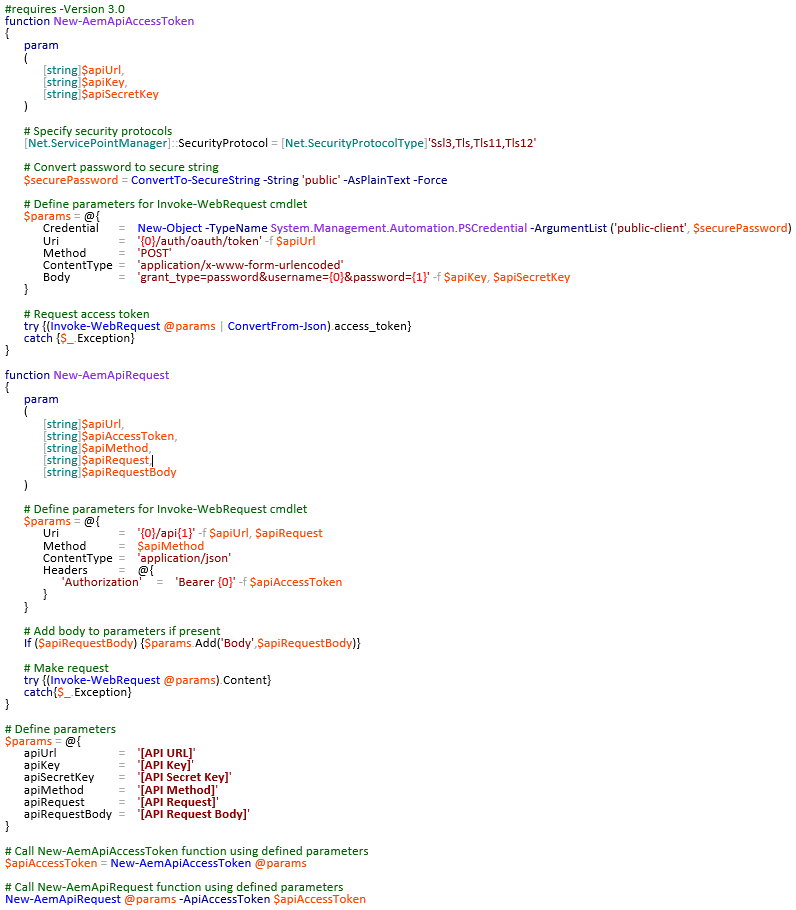
Performing a GET request with PowerShell can be achieved by using the following code.
NOTE This is included as powershell_request.ps1 in the Downloadable example code.
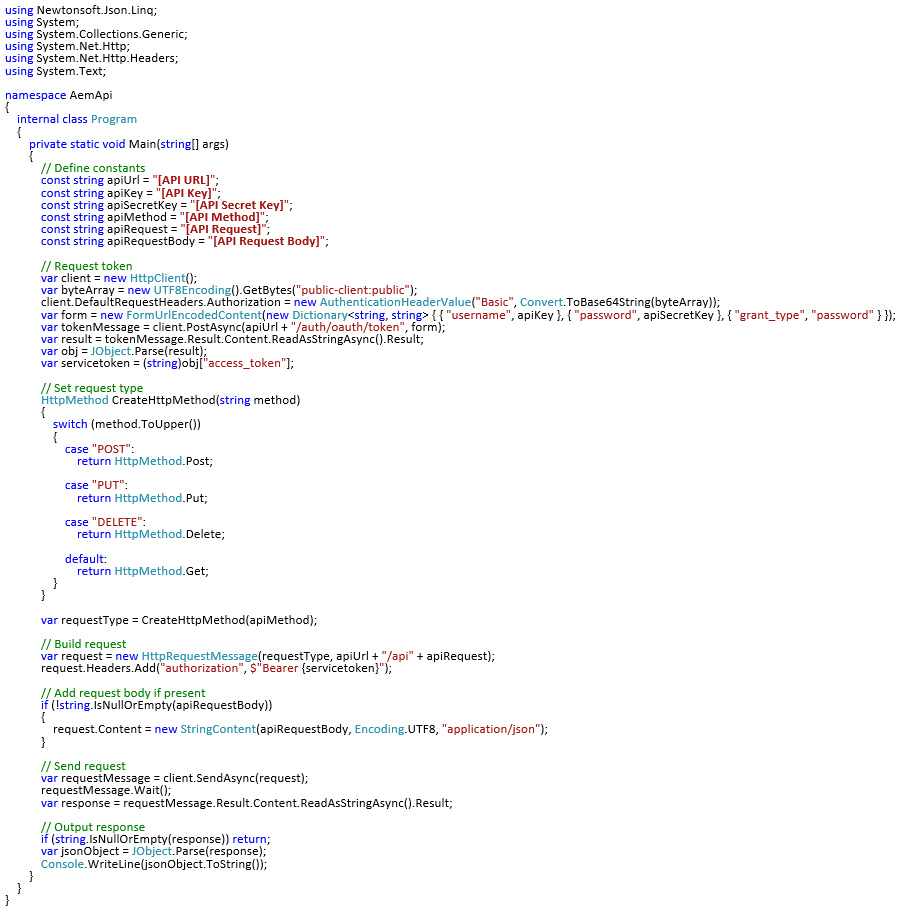
Performing a GET request with C# can be achieved by using the following code.
NOTE This is included as csharp_request.cs in the Downloadable example code.
It is possible to retrieve summary information about one or more devices using the following requests.
| Tag | Method | Request | Description |
|---|---|---|---|
| /v2/account | GET | /v2/account/devices | Fetches the devices of the authenticated user's account. |
| /v2/site | GET | /v2/site/{siteUid}/devices | Fetches the device records of the site identified by the given site Uid. |
| /v2/device | GET | /v2/device/{deviceUid} | Fetches data of the device identified by the given device Uid. |
| /v2/device | GET | /v2/device/{deviceUid} | Fetches data of the device identified by the given device Uid. |
| /v2/device | GET | /v2/device/{deviceUid} | Fetches data of the device identified by the given device Uid. |
Referencing Swagger UI, it can be seen that all of these requests have a similar JSON response model. The difference is that the account and site versions return paginated results.
When requesting additional information about a device, the uid and deviceClass properties from the response should be used.
EXAMPLE

The uid is the value required by the deviceUid parameter detailed in Swagger UI.
NOTE All operations performed by the /v2/audit or /v2/device tag require that the deviceUid is passed as a path parameter. For more details on request parameters refer to Use Swagger UI to explore API requests.
Additionally, /v2/device/macAddress/{macAddress} fetches data of the device(s) identified by the given MAC address in the format XXXXXXXXXXXX.
If detailed device audit data is required, a combination of the device uid and deviceClass should be used with /v2/audit tag requests. See Request device summary data for details on obtaining these values. The deviceClass indicates which request should be performed, and the uid is used to direct the request to the correct device.
| Device Class | Method | Request | Description |
|---|---|---|---|
| device | GET | /v2/audit/device/{deviceUid} | Fetches audit data of the generic device identified by the given device Uid. |
| device | GET | /v2/audit/device/{deviceUid}/software | Fetches audited software of the generic device identified by the given device Uid. |
| esxihost | GET | /v2/audit/esxihost/{deviceUid} | Fetches audit data of the ESXi host identified by the given device Uid. |
| printer | GET | /v2/audit/printer/{deviceUid} | Fetches audit data of the printer identified by the given device Uid. |
Additionally, the device macAddress can be used with /v2/audit tag requests: /v2/audit/device/macAddress/{macAddress}. This request fetches audit data of the generic device(s) identified by the given MAC address in the format XXXXXXXXXXXX.
When querying device alert data, there are two possible requests that can be used under the /v2/device tag to display open or resolved alerts.
| Method | Request | Description |
|---|---|---|
| GET | /v2/device/{deviceUid}/alerts/open | Fetches the open alerts of the device identified by the given device Uid. |
| GET | /v2/device/{deviceUid}/alerts/resolved | Fetches the resolved alerts of the device identified by the given device Uid. |
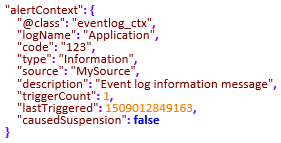
Generic alert information, such as the alertUid and time stamp, is detailed in the request response in Swagger UI, but there is one important property that is not: alertContext. The reason is that the format of alertContext is dynamic and changes per alert type. As follows is an example of the alertContext response format for an Event Log alert.
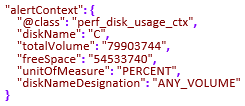
For contrast, as follows is an example of the alertContext response format for a Disk Usage alert.
All alertContext responses contain the @class property which indicates the alert type. The other properties contained within relate to the variables used to populate the alert message in Datto RMM.
IMPORTANT The alertContext does not store the alert message as displayed in Datto RMM but rather the raw information that is used to construct the alert in the web interface.
The different @class values and their associated alert types are as follows:
| @class | Alert |
|---|---|
| antivirus_ctx | Antivirus Status |
| comp_script_ctx | Component |
| custom_snmp_ctx | SNMP |
| disk_health_ctx | ESXi Disk Health |
| eventlog_ctx | Event Log |
| fan_ctx | ESXi Fan |
| fs_object_ctx | File/Folder Size |
| online_offline_status_ctx | Online Status |
| patch_ctx | Patch |
| perf_disk_usage_ctx | Disk Usage |
| perf_mon_ctx | Windows Performance |
| perf_resource_usage_ctx | CPU |
| perf_resource_usage_ctx | Memory |
| perf_resource_usage_ctx | SNMP Throughput |
| ping_ctx | Ping |
| process_resource_usage_ctx | Process (CPU) |
| process_resource_usage_ctx | Process (Memory) |
| process_status_ctx | Process (Status) |
| psu_ctx | ESXi PSU |
| ransomware_ctx | Ransomware |
| sec_management_ctx | Webroot Security Management |
| srvc_resource_usage_ctx | Service (CPU) |
| srvc_resource_usage_ctx | Service (Memory) |
| srvc_status_ctx | Service (Status) |
| sw_action_ctx | Software |
| temperature_ctx | ESXi Temperature |
| wmi_ctx | WMI |
NOTE Detailing the alertContext response format for all alert types is out of scope for this topic.
NOTE It is also possible to retrieve alerts for a site or an entire account by using requests from the /v2/site and /v2/account tags, respectively. The response will return alerts in reverse chronological order (the last alert raised will be returned first). To only retrieve results from a defined period in the past, examine each alert time stamp and stop the request operation when the first alert is found that is older than the desired time period.
Requests using the POST method are used for performing operations using the API. A POST request could be used to resolve an alert. Using Swagger UI as reference, it is possible to see under the /v2/alert tag that there is an appropriate request for this operation.
NOTE When performing a post request, any parameters not defined will be set to a null or default value. For example, a post for /v2/site/{siteUid} will accept name, description, notes, onDemand (true/false), and splashtopAutoInstall (true/false). If the post request only defines siteUid and name, then description and notes values will be defined as an empty string, and onDemand and splashtopAutoInstall will be set to their default value of false.
NOTE To perform the required operation, the alertUid parameter must be populated. For more details on request parameters, refer to Use Swagger UI to explore API requests. See Request device alert data data for details on obtaining this value.
NOTE In this instance, the request URL would be /v2/alert/{alertUid}/resolve.
IMPORTANT In the following examples, the request will be referred to as [API Request].
When making this request, no JSON-formatted response is to be expected as no response model is detailed in Swagger UI. The way to verify a successful operation is to check the returned HTTP status code to be 200 (OK).
Performing a POST request with cURL can be achieved by using the same code detailed under Perform a GET request > cURL and setting the [API Method] to POST.
Performing a POST request with PowerShell can be achieved by using the same code detailed under Perform a GET request > PowerShell and setting the [API Method] to POST.
Performing a POST request with C# can be achieved by using the same code detailed under Perform a GET request > C# and setting the [API Method] to POST.
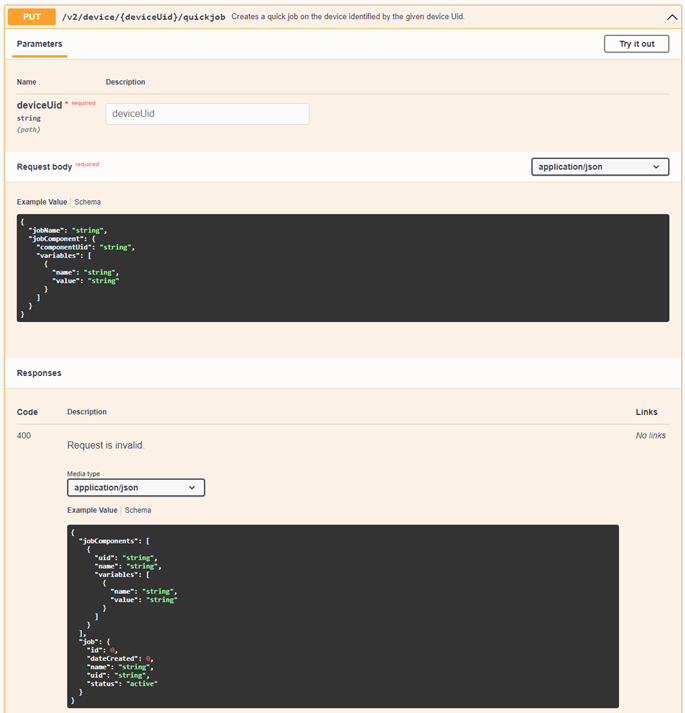
PUT requests are used for performing operations using the API. A PUT request could be used to create a quick job. Using Swagger UI as reference, it is possible to see under the /v2/device tag that there is an appropriate request for this operation.
NOTE To perform the required operation, the deviceUid parameter must be populated. For more details on request parameters, refer to Use Swagger UI to explore API requests. See Request device summary data for details on obtaining this value.
NOTE In this instance, the request would be /v2/device/{deviceUid}/quickjob.
IMPORTANT In the following examples, the request will be referred to as [API Request].
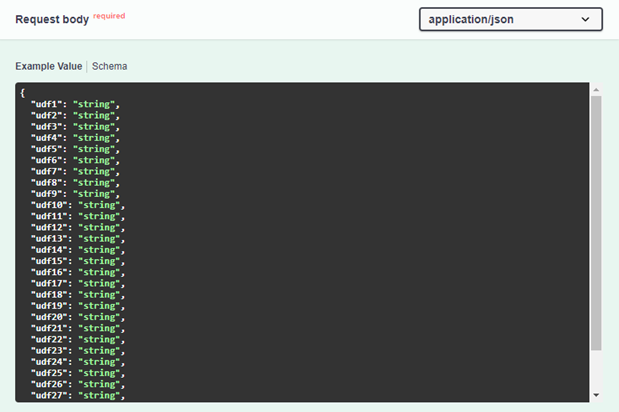
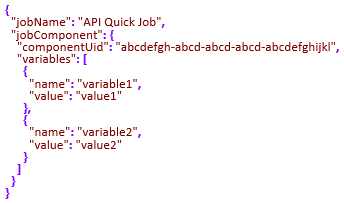
In Swagger UI, it can be seen that a request body is also required. As follows is an example of a valid JSON request body in human-readable format that would schedule a quick job with the name API Quick Job. The scheduled component contains two input variables named variable1 and variable2, which have been assigned the values value1 and value2, respectively.
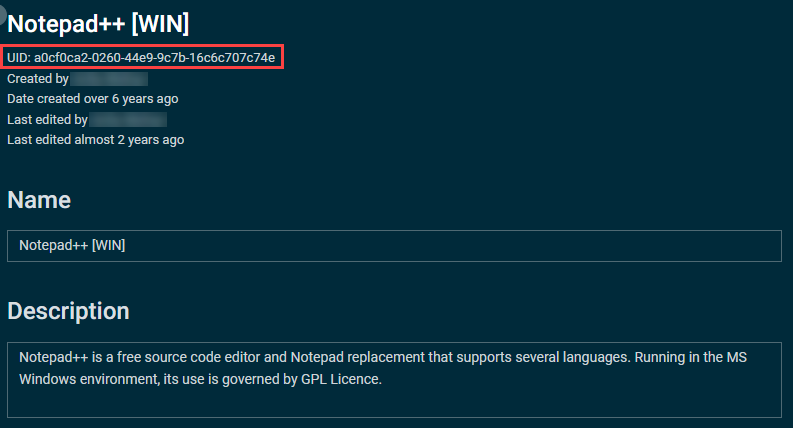
NOTE The componentUid referenced is not available via the API and must be populated with a value retrieved from Datto RMM. The UID field can be found at the top of the page when viewing a component. This is the value required by the componentUid property.
While the human-readable JSON is easier to understand, it is more common to use a compressed version when dealing with JSON in code. Removing whitespace and linefeeds results in the following:
EXAMPLE

Both human-readable and compressed JSON represent the same information and can be used interchangeably. Many free online tools are available to perform the conversion in either direction.
IMPORTANT In the following examples, the request body will be referred to as [API Request Body].
When using certain technologies, it is necessary to use a version of the JSON body with escaped double quotes. The following cURL and C# examples require that the [API Request Body] is provided in this format.
EXAMPLE

NOTE When successfully creating a quick job, the JSON response will contain a uid property which can be used to populate the jobUid path parameter required by all /v2/job tag requests. When using the GET method to call /v2/job/{jobUid}, the response will contain the status property which can have the value active or completed. This value can be used to determine if a job is still in progress or completed. It is not possible from within the API to examine the success or failure result of a completed job schedule or access the StdOut/StdErr.
Performing a PUT request with cURL can be achieved by using the same code detailed under Perform a GET request > cURL and setting the [API Method] to PUT. The [API Request Body] should also be set as detailed above.
NOTE The [API Request Body] should be provided with escaped double quotes.
Performing a PUT request with PowerShell can be achieved by using the same code detailed under Perform a GET request > PowerShell and setting the [API Method] to PUT. The [API Request Body] should also be set as detailed above.
Performing a PUT request with C# can be achieved by using the same code detailed under Perform a GET request > C# and setting the [API Method] to PUT. The [API Request Body] should also be set as detailed above.
NOTE The [API Request Body] should be provided with escaped double quotes.
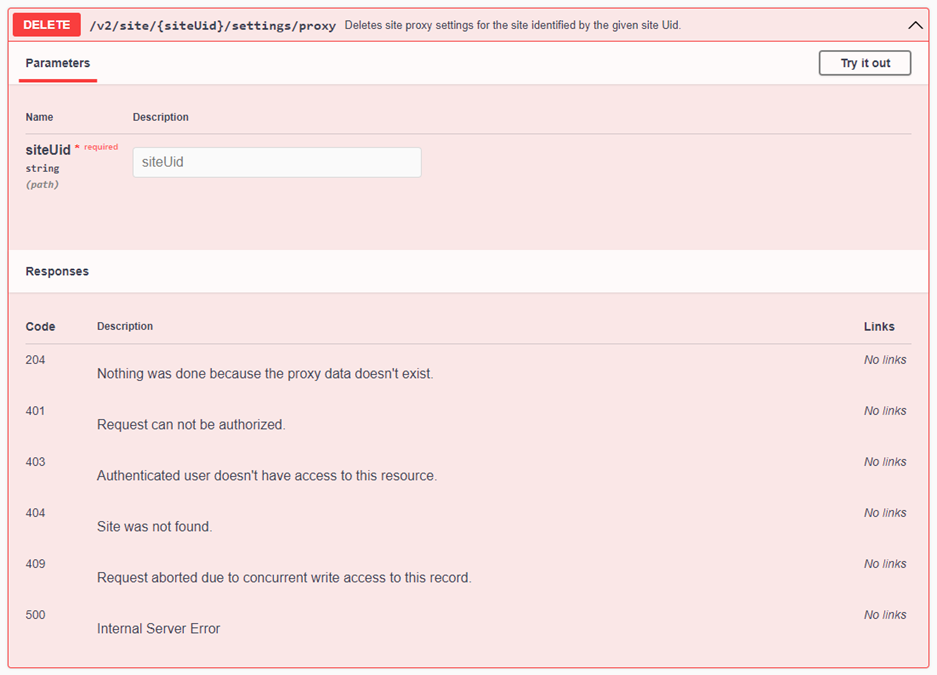
DELETE requests are used for removing data using the API. A DELETE request could be used to remove a site proxy. Using Swagger UI as reference, it is possible to see under the /v2/site tag that there is an appropriate request for this operation.
NOTE To perform the required operation, the siteUid parameter must be populated. For more details on request parameters, refer to Use Swagger UI to explore API requests. This value can be obtained by making a GET request to /v2/account/sites and using the uid property of the response for the required site.
NOTE In this instance, the request would be /v2/site/{siteUid}/settings/proxy.
IMPORTANT In the following examples, the request will be referred to as [API Request].
Performing a DELETE request with cURL can be achieved by using the same code detailed under Perform a GET request > cURL and setting the [API Method] to DELETE.
Performing a DELETE request with PowerShell can be achieved by using the same code detailed under Perform a GET request > PowerShell and setting the [API Method] to DELETE.
Performing a DELETE request with C# can be achieved by using the same code detailed under Perform a GET request > C# and setting the [API Method] to DELETE.
This module is designed to make it easier for you to use the Datto RMM API in your PowerShell scripts. Using this module, you can develop your scripts faster and be more efficient. There is no need to go through a big learning curve spending lots of time working out how to use the API. Simply load the module, enter your API keys, and get results within minutes!
You can install the module from the PowerShell Gallery.
For more information and release notes, refer to this page.
Should you find any issues in the module, you can report them here.

