Deleting a device
PERMISSIONS Refer to Sites > Devices and Sites > Deleted Devices in Permissions.
NAVIGATION Devices > All > select one or more devices (check boxes) > click the Row Actions icon > Delete
NAVIGATION Device summary page > click the More icon > Delete. To view the various navigation paths you can use to access the device summary page, refer to Device summary.
NAVIGATION Sites > All Sites > click the name of a site > select one or more devices (check boxes) > click the Row Actions icon > Delete
NAVIGATION A targeted list of devices > select one or more devices (check boxes) > click the Row Actions icon > Delete. To view the navigation paths for the various targeted lists of devices, refer to Targeted lists of devices in Devices.
NAVIGATION Global > Deleted Devices
NAVIGATION Sites > All Sites > click the name of a site > Deleted Devices (left navigation menu)
Overview
You may need to remove a device or multiple devices from your sites in Datto RMM because you no longer support them or they no longer exist.
Note the following conditions when it comes to marking devices for deletion:
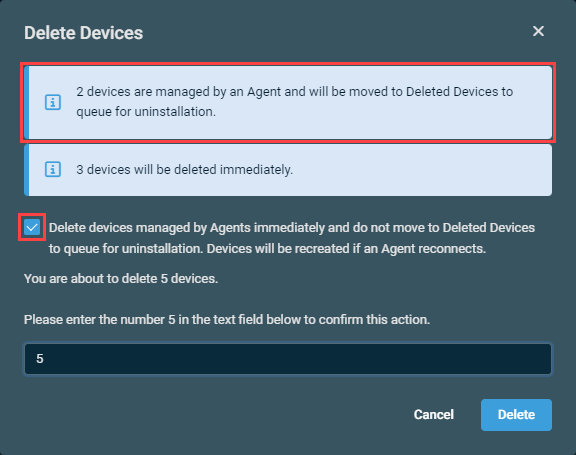
- Devices not managed by an Agent will be immediately removed from the platform.

- By default, devices managed by an Agent will be moved to the queue for deleted devices with a flag set on the database to uninstall the Agent from the device. For details, refer to Queue for deleted devices.

- Via a check box, you can select to immediately remove devices managed by an Agent from the platform rather than move them to the queue for deleted devices.
- Datto Networking and Datto Continuity devices cannot be deleted from within Datto RMM. If any Datto Networking or Datto Continuity devices are selected, you will be notified in a confirmation dialog that these devices cannot be deleted.
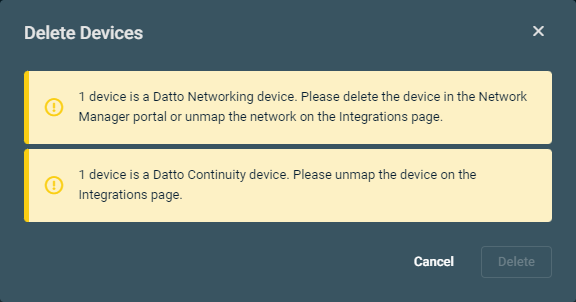
If any Datto Networking or Datto Continuity devices are selected along with Datto RMM devices, only the selected Datto RMM devices will be deleted.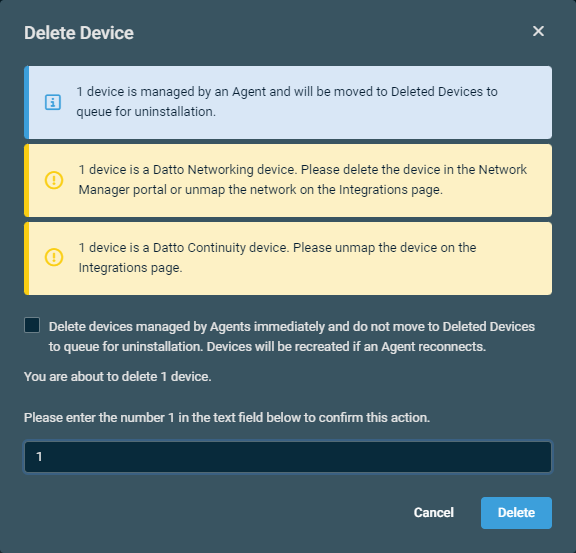
- You have the option to delete a Network Node. Upon selecting to do so, you will be notified in a confirmation dialog box that devices associated with the deleted Network Node will lose audit and monitoring capabilities.
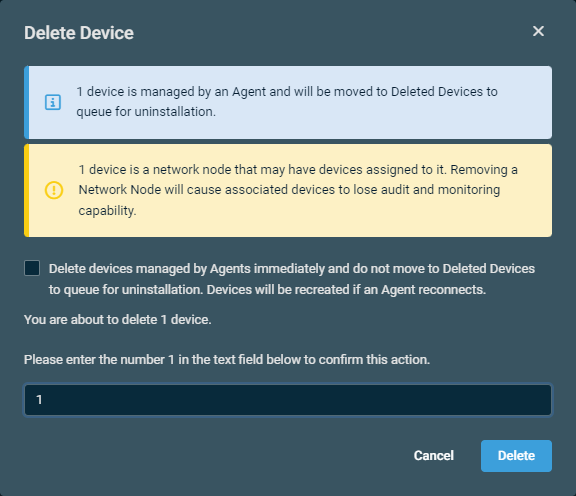
- If a device is deleted from Datto RMM, all alerts for that device will be permanently deleted.
- If a device is deleted from Datto RMM, the Web Remote chat history for that device will be permanently deleted. Refer to Initiate a Web Remote chat.
NOTE This option is also available as an action button within the queue for deleted devices. For details about this action, refer to Remove.
Queue for deleted devices
By default, devices that are managed by an Agent and have been marked for deletion are moved to the queue for deleted devices.
If the device is online at the time of deletion, it will recognize that it has been placed into the queue for deleted devices. The Agent will be uninstalled from the device automatically, and the device will be immediately removed from the queue for deleted devices.
If the device is offline at the time of deletion, it will remain in the queue for deleted devices. The Agent will be uninstalled from the device when it next connects to the platform.
If the device is offline when deleted and stays offline for 30 days, it will be removed from the platform before the Agent can be instructed to uninstall itself. If the device then comes back online after 30 days, the Agent will connect to the platform, and it will be added again as a new device.
NOTE If the device is deleted from a site that is then deleted from the platform and the device comes back online after 30 days, the device will be added to the Managed site created by default when you originally set up your platform.
NOTE You are not charged for devices in the queue for deleted devices. They are also ignored in reporting and filtering.
The queue for deleted devices is visible on the Deleted Devices page, available at the global and site levels. For navigation paths, refer to Managing deleted devices in Security and navigation.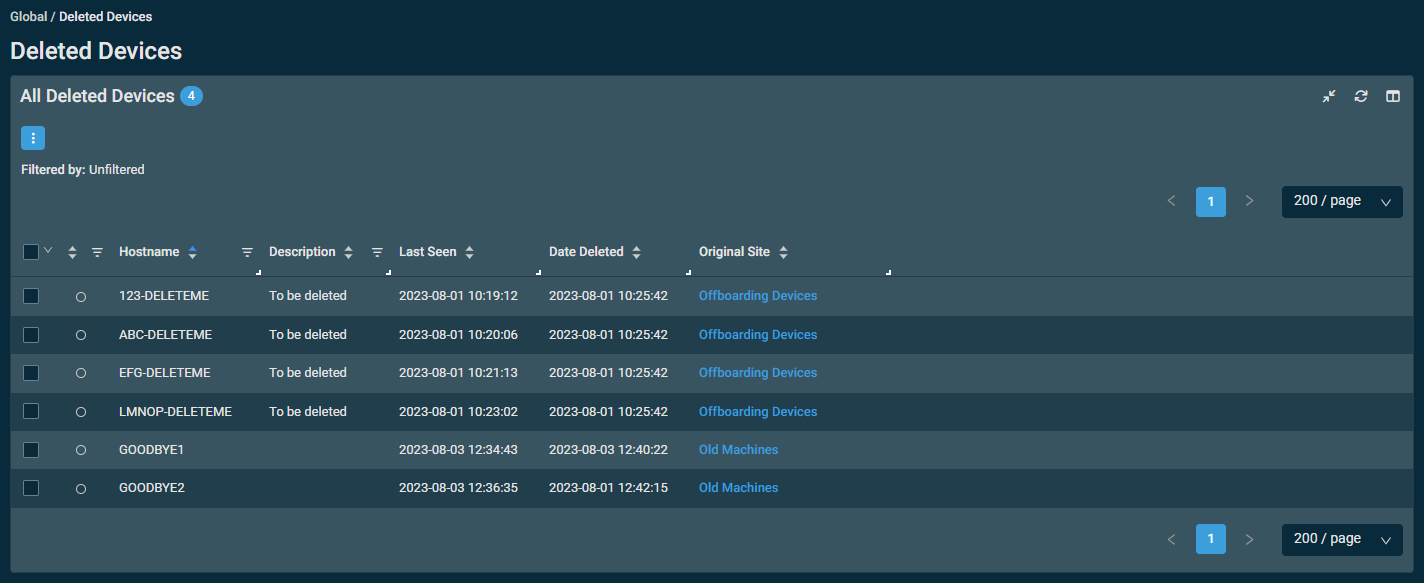
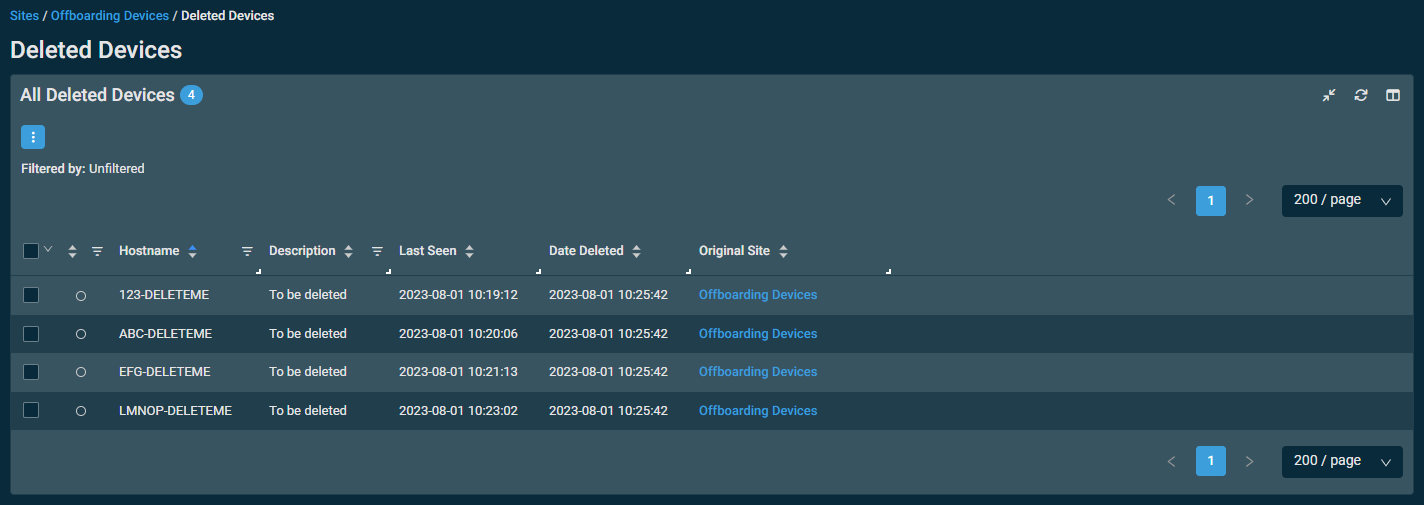
The Column Chooser icon  allows you to select which columns should be visible in the list. Refer to Column Chooser field definitions for descriptions of all of the available fields. The columns that apply to this table are summarized in the Column Chooser - Devices section, including the Date Deleted and Original Site columns, which are exclusive to this table. The columns can be reordered and resized. The order and size of the columns will persist the next time the page is accessed.
You can filter any columns with the filter icon  . The Filtered by bar displays all applied column filters. If a filter search term includes wildcard characters (for example, underscores and percent signs), they serve as normal characters if they are preceded by a backslash. For details, refer to Wildcard characters. Click the X next to any filter to remove that filter or click Reset Filters to remove all filters. If no filter is applied, the Filtered by bar displays Unfiltered. The filter selection in the columns will persist the next time the page is accessed.
NOTE You can also reset all filters by using the Reset Filters action button. Refer to Reset Filters.
The table density is set to condensed theme by default. To change it to relaxed theme, click the density toggle icon.  The selection will persist across all pages.
The number of results displayed can be specified by selecting the desired number from the pagination control. This selection will persist the next time the page is accessed.
Action buttons
To access all action buttons, click the Row Actions icon.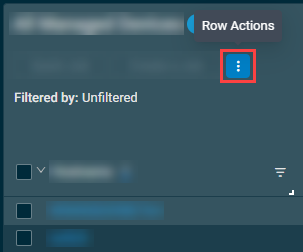
The action buttons are grayed out or become unavailable if no row is selected in the table or if the action button is not applicable to the selected rows. The check boxes allow you to select one or more rows. Select all rows shown on a page by selecting the check box in the table header. You can also use the drop-down arrow next to the check box in the table header to choose one of the following options: Select none, Select all on page, or Select all rows across all pages. If you choose to select all rows across all pages, the check boxes of the rows will not be selected; however, the page will indicate that all rows have been selected.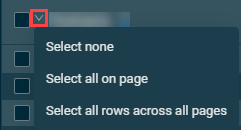
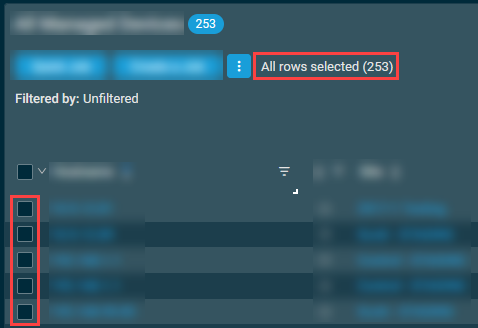
NOTE When all rows are selected across all pages, only certain action buttons are supported, which is indicated in the All Rows column in the table below.
| Action Button | All Rows | Description |
|---|---|---|
| Export Selected Rows to CSV |
|
In the confirmation dialog box that appears, select whether to show table headers in the file by turning on the toggle for Show table headers in the exported CSV. Click Confirm to download the file or Cancel to close out of the dialog box. Any column selections, filters, and sorting that have been applied to the table will also be applied in the CSV file.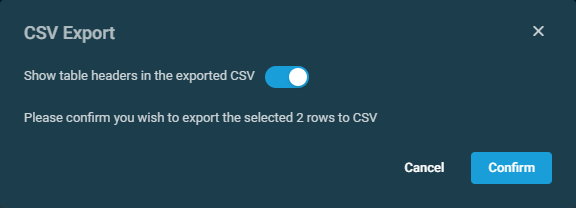 |
| Export All Rows to CSV |
|
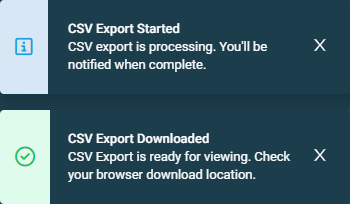
This action button is available only if all rows have been selected across all pages in the table. In the confirmation dialog box that appears, click Confirm to download the file or Cancel to close out of the dialog box.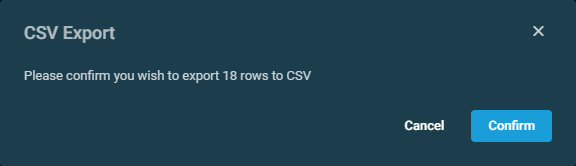 Pop-up notifications will inform you of the start and completion of the CSV export action. Click the X to close the notification; otherwise, the notification will automatically be cleared after five minutes. Any column selections, filters, and sorting that have been applied to the table will also be applied in the CSV file. |
| Remove |
|
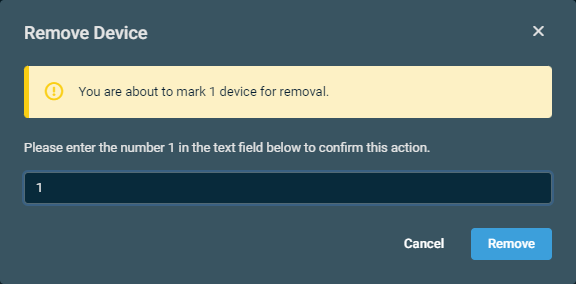
Allows you to immediately remove the selected device from the platform. The device will automatically be re-added to its original site when the Agent connects to the platform again. NOTE The device's original site may not be the site it was deleted from if the device had been moved to a different site after the Agent installation. When the device is re-added, its original record will be removed, and it will be treated as a completely new installation. NOTE This option is also available via a check box in the confirmation dialog box when initially marking devices for deletion before they are moved to the queue for deleted devices. Upon selecting this action button, a confirmation dialog box will prompt you to enter the number of devices you are deleting. Click Remove to execute the action or Cancel to close out of the dialog box. |
| Reset Filters |
|
Resets any of the filters applied in the table.
NOTE You can also reset all filters by using the Reset Filters button in the Filtered by bar. Refer to Queue for deleted devices. |
| Uncheck All |
|
Clears all selected rows. The number of selected rows is indicated next to the Row Actions icon. NOTE This action button is not available if all rows have been selected across all pages in the table. To clear all selected rows across all pages, use the Select none option from the drop-down arrow next to the check box in the table header. |

How to...
- Follow any of the navigation paths described in Deleting devices in Security and navigation.
- In the confirmation dialog box that appears, enter the number of devices you are deleting.
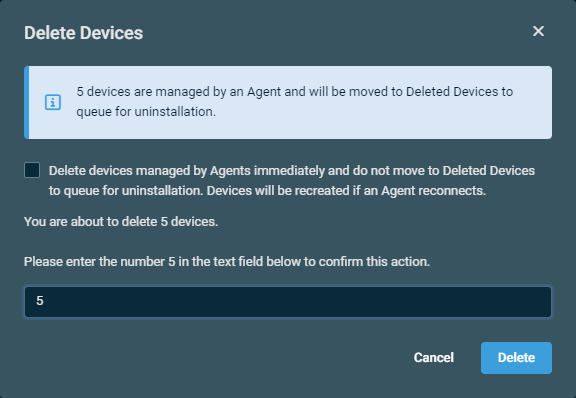
- Click Delete to execute the action or Cancel to close out of the dialog box.
IMPORTANT The confirmation dialog box will notify you of various stipulations and options depending on the types of devices you are marking for deletion. For details, refer to the Overview section.
By default, when an Agent-managed device is marked for deletion, it will be moved to the queue for deleted devices with a flag set on the database to uninstall the Agent from the device. Refer to Queue for deleted devices.
If an Agent-managed device is deleted from the queue for deleted devices, it will automatically be re-added to its original site when the Agent connects to the platform again.
NOTE The device's original site may not be the site it was deleted from if the device had been moved to a different site after the Agent installation.
When the device is re-added, its original record will be removed, and it will be treated as a completely new installation.


