User-defined fields - Legacy UI
PERMISSIONS Refer to the permissions described in Account Settings - Legacy UI and Site Settings - Legacy UI.
NAVIGATION Legacy UI > Sites > click on a site > Devices > click on a Device > Summary
Refer to User-defined fields.
User-defined fields (UDFs) in Datto RMM are used for displaying device information that is not picked up during the device audit. Each device record can have up to 30 UDFs. You can enter and edit UDF information manually on the Device summary - Legacy UI, or it can be populated by the Datto RMM Agent. Once a UDF is populated with information, the data can be filtered and searched for to provide additional targeting criteria for jobs and policies.
NOTE UDF labels have a limit of 22 characters.
NOTE UDFs have a limit of 255 characters.
How to...
For information about how to set up and rename UDFs, refer to the following topics:
IMPORTANT We recommend that you do not store credentials or other sensitive/confidential information in UDFs as the information contained in these fields is visible in plain text.
Refer to User-Defined Fields.
IMPORTANT We recommend that you do not store credentials or other sensitive/confidential information in UDFs as the information contained in these fields is visible in plain text.
Having UDF information displayed on the device summary page does not have to be a manual process exclusively. UDFs can also be populated by the Datto RMM Agent. By adding entries to the device, the Agent will immediately send the data back to the platform and the UDFs will get populated automatically. This makes for an extremely powerful and useful tool, especially when coupled with the scripting and component mechanisms within Datto RMM. For information on scripting, refer to Scripting - Legacy UI.
IMPORTANT When monitoring is suspended on a device, the Datto RMM Agent will not send UDF data back to the platform. Refer to Suspend or unsuspend monitoring.
TIP You can also update a device's description using any of the methods described as follows. The string value must be named DeviceDescription. The device's Description field will be updated with the string value data on audit (rather than immediately as in the case of UDFs). The data will be removed from the registry after the audit.
You can use either of the two ways described below to add registry entries to your devices.
NOTE Once the UDF data is sent back to the platform, it gets deleted from the registry.
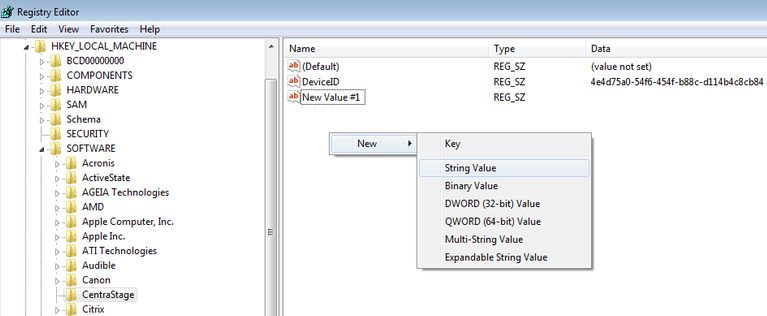
- Open the Registry Editor.
- Browse to HKEY_LOCAL_MACHINE\SOFTWARE\CentraStage.
- Right-click in the right-hand window and select New > String Value.
- Rename the New Value. Enter one of Custom1, Custom2, ... Custom30, according to the UDF you wish to populate.
EXAMPLE Custom1 will populate User-Defined Field 1, Custom2 will populate User-Defined Field 2, and so on.
- Double-click the value to edit the string.
- Enter the Value data. This is the information that will be displayed on the device summary page.
- Click OK. The Agent will now send the data to the platform.
- Open the Command Prompt window.
- To add a registry entry via the command line, use the following syntax:
REG ADD HKEY_LOCAL_MACHINE\SOFTWARE\CentraStage /v Custom[1-30] /t REG_SZ /d "ValueForFieldHere" /f
- Make the necessary changes in the command line:
| Field | Description |
|---|---|
| Custom[1-30] | This will be the string value name once added to the registry. Enter one of Custom1, Custom2, ... Custom30, according to the UDF you wish to populate. EXAMPLE Custom1 will populate User-Defined Field 1, Custom2 will populate User-Defined Field 2, and so on. |
| ValueForFieldHere | This will be the string value data once added to the registry. Enter the information you would like to display on the device summary page. |
EXAMPLE For example, the following command would put the name "Joe Smith" in User-Defined Field 1:
REG ADD HKEY_LOCAL_MACHINE\SOFTWARE\CentraStage /v Custom1 /t REG_SZ /d "Joe Smith" /f
- Click Enter. The Agent will now send the data to the platform.
You can use either of the two ways described below to append entries to a file on your devices.
NOTE Once the UDF data is sent back to the platform, it gets deleted from the device. The values.xml file will revert back to its original state.
- On macOS, locate and open
/var/root/.mono/registry/LocalMachine/software/centrastage/values.xml
OR
/var/root/.mono/registry/CurrentUser/software/centrastage/values.xml
On Linux, locate and open
/root/.mono/registry/LocalMachine/software/centrastage/values.xml
OR
/root/.mono/registry/CurrentUser/software/centrastage/values.xml
- Change this:
<values>
<value name="DeviceID" type="string">YourDeviceID</value>
</values>
to this:
<values>
<value name="DeviceID" type="string">YourDeviceID</value>
<value name="Custom1" type="string">Joe Smith</value>
</values>
NOTE "YourDeviceID" is the ID of the device you are updating. It is listed in Device Data.
EXAMPLE Custom1 will populate User-Defined Field 1, Custom2 will populate User-Defined Field 2, and so on. In the example above, the name "Joe Smith" will be put in User-Defined Field 1.
- The Agent will now send the data to the platform.
To automate the process described above, you can use the following script on a macOS device. It will locate the values.xml file and append a new UDF value.
#!/bin/bash
UDFOut=”xxxxxxx” # This will be the output from your script.
ExitCode=0 # This would be set to 0 or 1 somewhere in your script.
XMLPath=$(find /var/root/.mono/registry -name "values.xml") # Get the correct path of the values.xml file.
XMLTemp=$(cat $XMLPath | grep -v "</values>") # Create a string variable of the content of the values.xml file
barring the last line.
XMLTemp="$XMLTemp"$'\n'"<value name=\"CustomX\" type=\"string\">$UDFOut</value>"$'\n'"</values>" # Append the
UDFOut variable to the string variable containing the contents of values.xml. You must replace X with a number
1-10 for the respective UDF.
rm $XMLPath # Delete original values.xml
echo "$XMLTemp" >> $XMLPath # Copy the contents of the original values.xml plus append into a new values.xml
exit $ExitCode # Exit with respective ExitCode.
NOTE This script can also be used on Linux devices, however the values.xml path will differ based on OS. Refer to Locate and edit the values.xml file (as a manual process) to review known paths.


