Webroot Endpoint Security Integration - Legacy UI
PERMISSIONS Administrator
NAVIGATION Legacy UI > Setup > Integrations > Webroot Security Agent
About Webroot
Webroot provides cloud-based, real-time internet security against viruses, spyware, and other online threats. Its SecureAnywhere® suite of security products for endpoints, mobile devices, and corporate networks delivers advanced internet threat protection to customers.
The Webroot Endpoint Security Integration allows MSPs to deploy Webroot's lightweight software and to monitor and support the endpoints secured by Webroot directly from Datto RMM. With the integration enabled and a Webroot Security Management policy configured, you can perform the following:
- Deploy Webroot to Windows and macOS devices
- Uninstall Webroot from your endpoints
- Monitor your endpoints to be alerted as per the criteria configured in the Webroot Security Management monitor details
- Run Webroot-specific commands on your endpoints from device list pages
- Report on the current status of Webroot throughout your device estate
For information about how to set up a Security Management policy for Webroot, refer to Create a Security Management policy - Legacy UI.
Switching to Webroot in the New UI
IMPORTANT We strongly recommend that you discontinue use of the Webroot Endpoint Security Integration in the legacy UI if you have not yet transitioned to the updated functionality in the New UI. Doing so as soon as possible will ensure that you do not face complications when the legacy UI framework is removed.
In the New UI, the extension-based Webroot integration from the ComStore is no longer necessary. In its place are powerful new features now built into the web interface, such as:
- Automatic, scalable Webroot deployments via Software Management
- Remote Webroot-specific actions accessible to technicians on the device summary page or device list pages
- Monitoring capabilities for Webroot installation and status compliance
- Webroot-specific monitoring, such as alerting to infections or devices requiring attention
To learn about Webroot deployment, monitoring, and remote actions in the New UI, refer to Webroot SecureAnywhere Endpoint Protection and Webroot in the New UI Q&A.
- You must be an Administrator in Datto RMM to set up the Webroot Integration.
- You need at least one valid Webroot Site Key to be able to configure the Webroot Integration. You can obtain it from the Webroot Console once you log in to the Console. For assistance, please contact Webroot.
IMPORTANT Do not use the Webroot Parent Keycode when configuring the integration.
- 8.0.4.47 and later versions for both Windows and macOS
For a full list of supported Windows operating systems, as well as general, hardware, and software requirements, refer to the following Webroot article and scroll down to the For PC section:
For a full list of supported Mac operating systems, as well as general, hardware, and software requirements, refer to the following Webroot article and scroll down to the For Mac section:
Webroot logs are stored in the following locations:
| Windows | macOS |
|---|---|
| C:\ProgramData\CentraStage\EndpointSecurity\aes\wr-install-{date}.log | /usr/local/share/CentraStage/EndpointSecurity/aes/wr-install-{date}.log |
How to...
- Log in to your Datto RMM account and click the ComStore tab.
- Search for the Webroot Endpoint Security component.
- Open it and click Add to my Component Library to download it. This will add the Webroot Security Agent section to Setup > Integrations.
NOTE As soon as you download Webroot for your account, a new section will be added to Site Settings. Refer to Webroot Security Agent.
NOTE This step is optional, and mapping rules can only be used when importing Site Keys. Refer to Import your Site Keys.
You can specify mapping rules that will associate a set of characters from the Webroot site name with a set of characters from the Datto RMM site name. The association of Webroot sites with Datto RMM sites will be performed automatically upon importing your Webroot Site Keys, so you will not have to manually map the imported Site Keys.
EXAMPLE For example, having the rule to associate "location" with "office" will map your Webroot Site Key called "Location 1" to your Datto RMM site called "Office 1". For information about importing your Site Keys, refer to Add or import your Webroot Site Keys.
- Navigate to Setup > Integrations.
- Locate Webroot Security Agent.
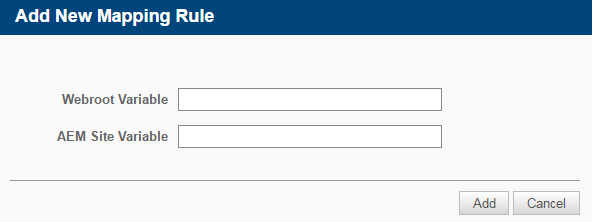
- In the Mapping Rules section, click Add New Mapping Rule.
- In the Add New Mapping Rule window, enter your Webroot variable and Datto RMM site variable, and click Add.
- The new mapping rule will be added to the Mapping Rules section of the Webroot Integration.
You can now import your Webroot Site Key(s) and if a matching variable is found, your corresponding Datto RMM site(s) will be associated with the Webroot Site Key(s).
Before you can create a Webroot Security Management policy in Datto RMM, you need to add your Webroot Site Key(s) to the Webroot Integration. You have two options to do so: add your Site Keys manually or import them.
Add your Site Keys manually
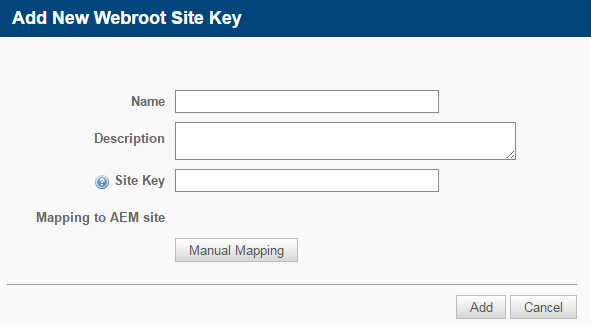
- In the Site Keys section, click Add Webroot Site Key. The Add New Webroot Site Key window will open.
- Complete the following fields:
| Field | Description |
|---|---|
| Name | Enter a name for the Webroot Site Key. NOTE This field has a limit of 255 characters. |
| Description | Enter a description for the Webroot Site Key. |
| Site Key | Enter your Webroot Site Key. You can obtain it from the Webroot Console. Refer to Requirements. |
| Mapping to AEM Site | Click Manual Mapping to be able to map your selected Datto RMM site(s) to this Webroot Site Key. |
- Click Add.
- Should you wish to add more than one Webroot Site Key, repeat steps 1-3.
Import your Site Keys
- You can also import your Webroot Site Keys to Datto RMM. Click Download CSV Template, Download XLS Template, or Download XLSX Template to the right of the screen, just above the Site Keys section.
- Open the downloaded file and add the following information: Name, Description, and Site Key. For information about Site Keys, refer to Requirements. Save your file.
NOTE The Name field has a limit of 255 characters.
- Click Import Webroot Site Keys in the Datto RMM Web Portal. Browse your saved file and upload it to the Web Portal. Your Site Key information will now appear on the Integrations page.
NOTE If you have set up mapping rules, your Webroot Site Keys will automatically be associated with your Datto RMM sites. Refer to Configure your mapping rules.
- You have the option to set one of the Site Keys as default by selecting the Default Site Key radio button.
The default Site Key will be used in Webroot Security Management policies if there is no Site Key associated with the Datto RMM site that the device belongs to. For further information, refer to Create a Security Management policy - Legacy UI.
NOTE The Number of Devices column displays the number of devices targeted by a Webroot Security Management policy using the site key in question. Once a device is added to the policy or removed from it (by being removed from the target of the policy or by getting excluded from the policy associations), the device count will increase or decrease accordingly.
NOTE To edit a Webroot Site Key, click the pencil icon ![]() next to it and update the information. You can also update its mapping rule. To delete a Site Key, click the Remove this License Key icon
next to it and update the information. You can also update its mapping rule. To delete a Site Key, click the Remove this License Key icon ![]() next to it.
next to it.
Now that you have set up the integration, you can use Datto RMM to deploy Webroot to your endpoints.
Set up a Security Management policy to push out Webroot to your devices and to raise alerts and tickets as per the criteria you set in the monitor details. You can create the policy at either account or site level. For further information, refer to Create a Security Management policy - Legacy UI.
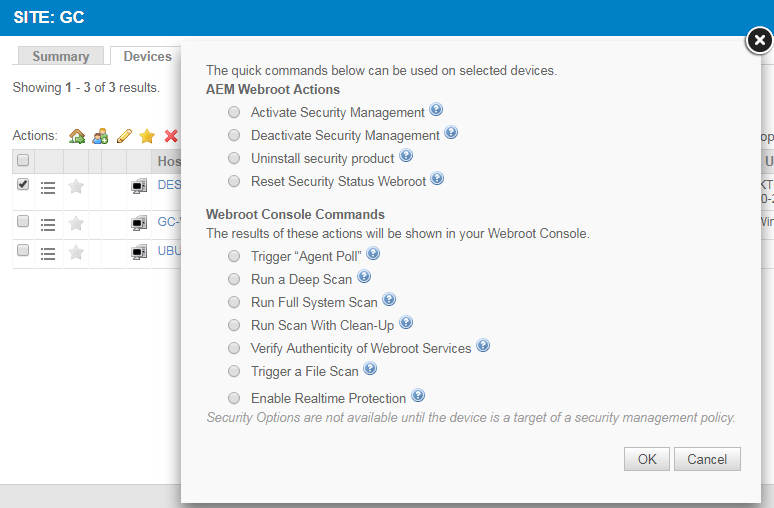
Once you have downloaded Webroot Endpoint Security from the ComStore, the Webroot Run Security Management Command button ![]() becomes available in the Action bar on the Devices page in each Managed site. Selecting a device and clicking this button will allow you to perform quick Webroot actions on your device or run Webroot Console commands on it. The results of the Webroot Console commands will be shown in your Webroot Console.
becomes available in the Action bar on the Devices page in each Managed site. Selecting a device and clicking this button will allow you to perform quick Webroot actions on your device or run Webroot Console commands on it. The results of the Webroot Console commands will be shown in your Webroot Console.
- Navigate to Sites and open a managed site associated with a Webroot Security Management policy. To learn about Webroot policies, refer to Create a Security Management policy - Legacy UI.
- Click the Devices tab.
- Select one or more of your devices targeted by the Security Management policy, and click the Webroot Run Security Management Command button in the action bar.

- The following commands will become available:
NOTE The selected device needs to be targeted by a Webroot Security Management policy so that you can run a Security Management command on it.
| AEM Webroot Actions | |
|---|---|
| Activate Security Management | Re-activates the site's Webroot Security Management policy on the selected device(s) either by including the device(s) in the policy target again or by re-activating a disabled policy. NOTE This action will only take place if the selected device has previously been targeted by a Webroot policy. |
| Deactivate Security Management | Excludes the selected device(s) from the site's Webroot Security Management policy. |
| Uninstall Security Product | Uninstalls Webroot from the device. The Password field should be left blank. If Webroot was installed on the device outside of Datto RMM (via an .exe installer), you can uninstall it locally or use a component to uninstall it non-silently using wsasme.exe -uninstall. Contact Webroot support for more information. |
| Reset Security Status Webroot | Resets the Security Management status on the device and triggers a deployment of Webroot if it's not installed on it. EXAMPLE For example, if the installation of Webroot had been unsuccessful on your device through a Webroot policy, but you managed to solve the issue on your device in the meantime, running this command will attempt to install Webroot on your device again. |
| Webroot Console Commands | |
|---|---|
| Trigger "Agent Poll" | Triggers a poll and program update by forcing the device to check in to the cloud. |
| Run a Deep Scan | Runs a deep scan on the device. |
| Run Full System Scan | Runs a full system scan on the device. TIP Running a full system scan is slower and uses more resources than the default deep scan; therefore, we recommend you run a default deep scan on your device(s). |
| Run Scan With Clean-Up | Runs a scan on the device and automatically removes any detected infections. |
| Verify Authenticity of Webroot Services | Forces the device to check in to the cloud to see if Webroot services are authentic. |
| Trigger a File Scan | Triggers a scan of a specific file or path on the device. Once the command is selected, you can enter the required path name. |
| Enable Realtime Protection | Enables real-time protection if the Webroot agent is offline. |
- Once you have selected a command, click OK, and the requested action will be performed.
NOTE Scans performed by the Webroot agent run silently. The Webroot tray icon will not change when a scan is running.
To be able to uninstall Webroot from your endpoints, you must ensure the Webroot Endpoint Security Integration is enabled and set up for your account and your endpoints are targeted with a Webroot Security Management policy. To uninstall Webroot from these devices:
- Log in to your Datto RMM account and navigate to the account or site policy which targets the devices you want to uninstall Webroot from.
- Remove the required devices from the list of target devices.
- Make sure that the Uninstall Webroot option is selected in the Security Management Install Options section.
-
Click Save and Push Changes.
If you click Save Only, you'll be directed to your list of policies where you can click Push changes... next to the policy in question.
TIP You can also run the Uninstall Security Product command on your devices. For more information, refer to Use the Webroot Security Management commands.
To learn how to see information and statistics about your devices with Webroot installed, refer to Security Management - Legacy UI.
You can report on the latest value and status of your Webroot Security Management monitor by scheduling a Device Monitor Status report. Refer to Device Monitor Status in the legacy UI and Device Monitor Status report in the New UI.
You can also create a custom filter to search for devices with a specific Security Management status. Refer to Filters - Legacy UI.


