Agent ticketing for end users
In addition to the web interface, tickets can be created using the Agent or the Agent Browser. These tickets allow end users to submit their support requests whether using standalone ticketing or integrated with a PSA. Refer to Creating a ticket.
NOTE If a user has a high dpi monitor, such as a 4K display, the Support Request window may not display properly. If you are facing this issue, refer to Agent Browser or Support Request Displaying Incorrectly.
How to...
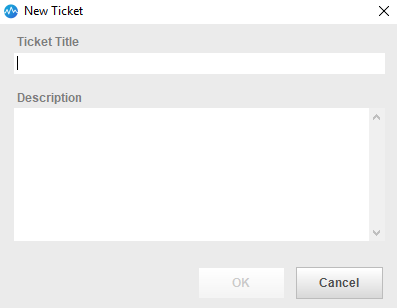
End users can create tickets in the Agent Browser on Windows devices by following these steps:
- Open the Agent Browser by double-clicking the Datto RMM system tray icon.
- Click OK to submit the ticket.
- You will be able to view open tickets on the Tickets tab in the Agent Browser.
NOTE An email notification will be sent to the assigned resource, and the technician can work on the ticket in Datto RMM. Refer to Edit a ticket.
The following requirements must be met in order for end users to create tickets using integrated ticketing:
- The Autotask Integration must be enabled and configured for the account. Refer to Autotask Integration.
- In the site that the end user's device is added to, the site must be mapped to a company in Autotask, and the device must be synchronized to Autotask. If the option is switched OFF or the device is not synchronized, the end user will not be able to access the Support Request form. For information on how to synchronize devices in the Autotask Integration, refer to Configure device synchronization.
- The end user's device must be targeted by an Agent Policy in which the Take screenshot and request support and/or Request support options are enabled. For more information, refer to Agent policy.
When the above requirements are met, end users can create tickets. Refer to Support Request form.
NOTE Technicians can access tickets from Datto RMM or directly in Autotask and edit them there. For information about the Autotask ticket integration, refer to Configure ticket settings. For information about the notes that are automatically added to the Autotask ticket when an end user submits the Support Request form, refer to Autotask ticket information and notes for end user tickets.
NOTE Once a ticket is created, a message will be displayed indicating the ticket number. In some instances, the ticket may be submitted successfully, but there may be a delay in receiving the ticket number from your PSA. In this case, a message will be displayed indicating that the request has been submitted and that the ticket number will be available on the Tickets tab once it is received. If ticket creation fails (for example, due to the device not being mapped within your PSA), an error message will be displayed.
Once an end user has submitted a ticket, the following information is displayed in the Autotask ticket:
- Configuration item: The Datto RMM device must be synchronized to Autotask. Refer to Configure device synchronization. The Configuration Item Insight displays a variety of details about the configuration item. Click on the configuration item name to open the Edit Configuration Item page.
- Contact: The email address provided on the Support Request form is matched against existing contact email addresses in the mapped Autotask organization. If a match is found, the contact will be listed in the ticket.
- Title: The Autotask ticket title will match the summary that the end user entered on the Support Request form.
- Description: The Autotask ticket description will include the end user's name, email address, and phone number. It will also include the urgency, impact, and description of the issue as entered on the Support Request form.
- Ticket attributes: Ticket attributes, such as Monitor Type, Queue, Issue, Sub Issue, and Work Type are set based on the ticket integration settings. Refer to Configure ticket settings.
- Resource: By default, the Autotask ticket is not assigned to a resource.
- Priority: By default, the Autotask ticket's priority is set to Medium.
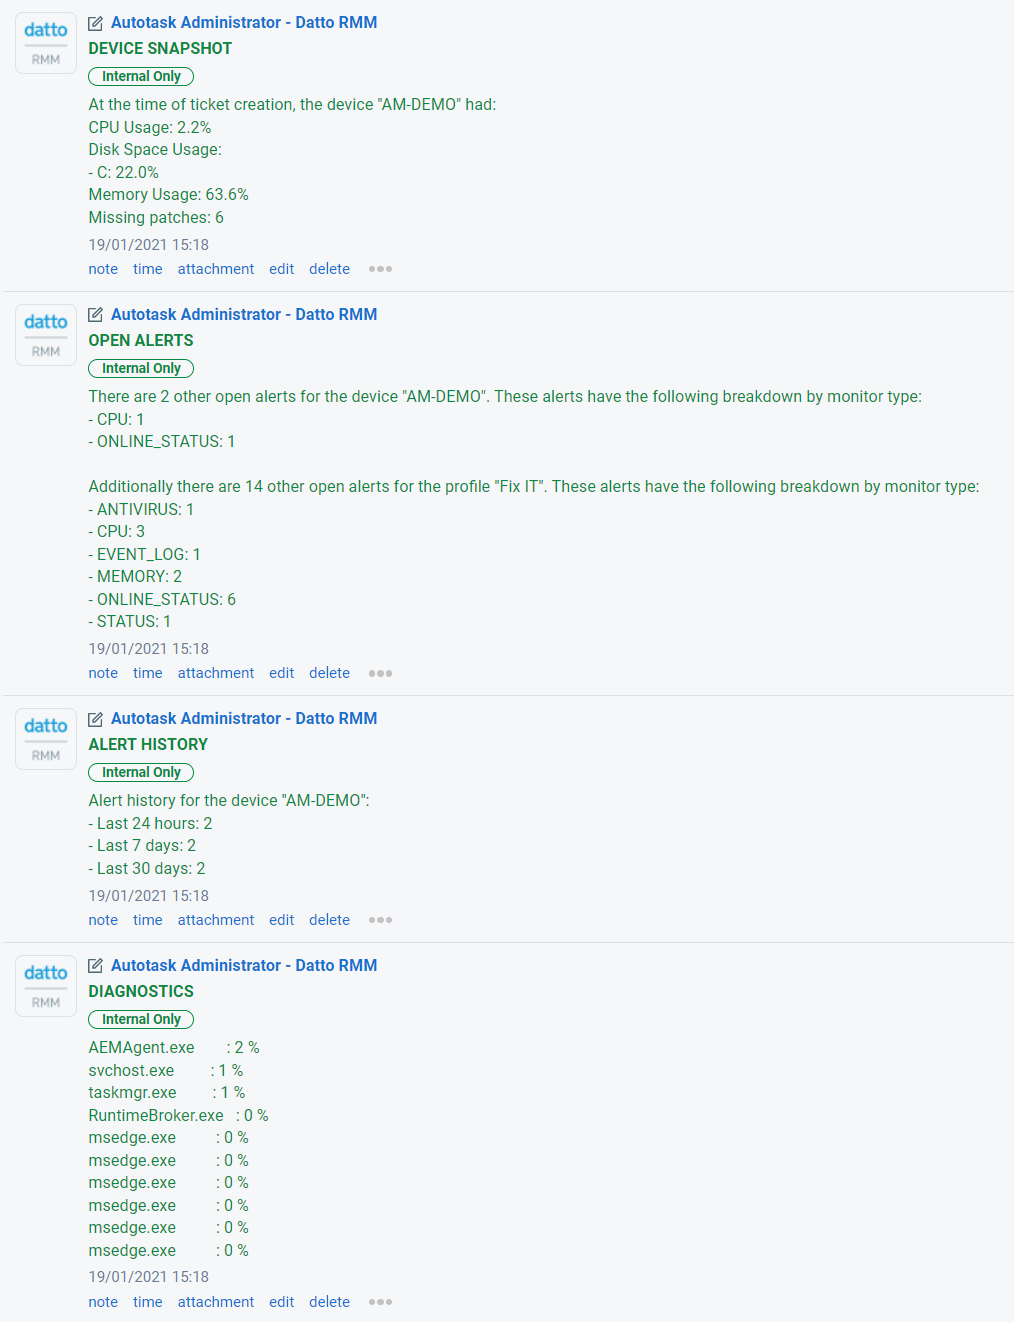
The following notes are added to the Activity tab of the Autotask ticket: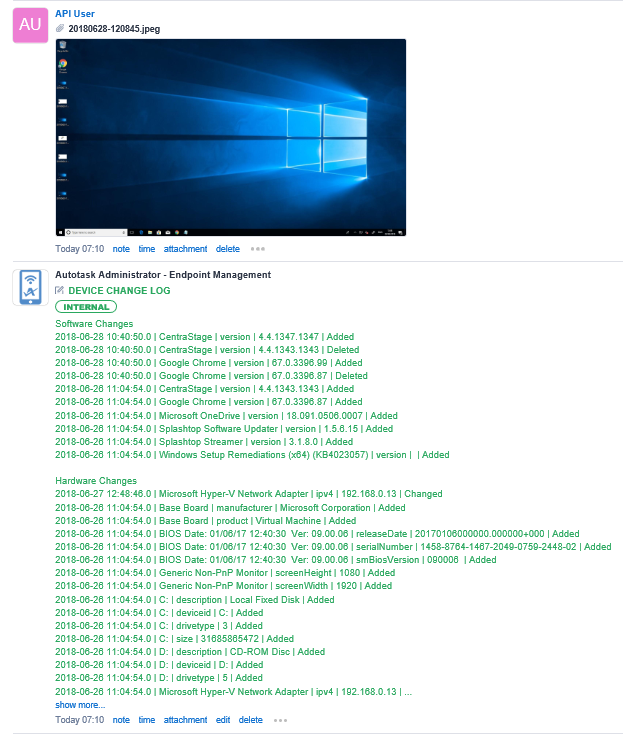
- Screenshot: The end user can choose to attach a screenshot to their support request form. If they do, the screenshot will be added to the Autotask ticket.
- Device Change Log: The most recent device change log entries will automatically be added to the ticket.
- Device Snapshot: Outlines metrics such as CPU Usage, Disk Space Usage, Memory Usage, Missing Patches.
- Open Alerts: Shows open alerts for the device and site.
- Alert History: Displays the device's alert history in the last 24 hours/7 days/30 days.
For more information, click the question mark icon in the upper-right corner of the Autotask page. You will automatically be directed to the appropriate topic in the Autotask Help system.
The following requirements must be met in order for end users to create tickets using integrated ticketing:
- The ConnectWise PSA Integration must be enabled and configured for the account. Refer to ConnectWise PSA Integration.
- Creating a ticket will only function if the relevant site and device are mapped in ConnectWise PSA; if not, the end user will not be able to access the Support Request form. For information on how to map sites and devices in ConnectWise PSA, refer to Map ConnectWise PSA companies to Datto RMM sites and Map Datto RMM device types to ConnectWise PSA configuration types.
- The relevant device must be targeted by an Agent Policy in which the Take screenshot and request support and/or Request support options are enabled. For more information, refer to Agent policy.
When the above requirements are met, end users can create tickets. Refer to Support Request form.
NOTE Technicians can access tickets from Datto RMM or directly in ConnectWise PSA and edit them there. For information about the ConnectWise PSA Integration, refer to ConnectWise PSA Integration.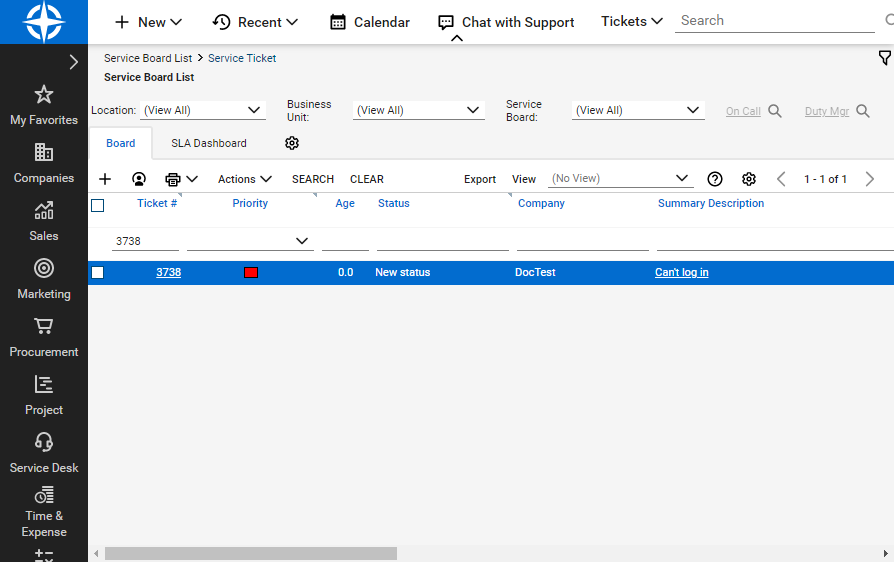
NOTE Once a ticket is created, a message will be displayed indicating the ticket number. In some instances, the ticket may be submitted successfully, but there may be a delay in receiving the ticket number from your PSA. In this case, a message will be displayed indicating that the request has been submitted and that the ticket number will be available on the Tickets tab once it is received. If ticket creation fails (for example, due to the device not being mapped within your PSA), an error message will be displayed.
ConnectWise PSA ticket priority
When an end user submits a ticket, they can specify how urgent the request is. Refer to Support Request form. The selected urgency corresponds to specific Datto RMM alert priorities, which define the ticket priority in ConnectWise PSA based on the mapping configured in the integration. The following table demonstrates this correlation:
| Support Request Urgency | Datto RMM Alert Priority | ConnectWise PSA Ticket Priority |
|---|---|---|
| Not urgent | Low |
Determined by the integration setup. Refer to Map Datto RMM alerts to ConnectWise PSA tickets. |
| Normal | Moderate | |
| Urgent | Critical |
End users can create tickets by following the steps below.
- Open the Support Request form using one of these methods:
| Method | Description |
|---|---|
| Agent Browser | Open the Agent Browser on your Windows device by double-clicking the Datto RMM system tray icon. Select the Tickets tab and click New Ticket.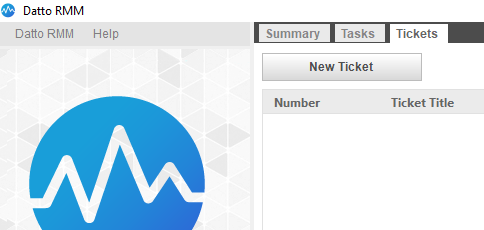 |
| Agent | Right-click the Datto RMM icon in the system tray on a Windows device or click the Datto RMM icon in the menu bar on a macOS device, and select Take screenshot and request support or Request support.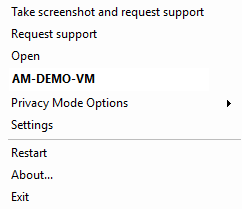 |
| Desktop shortcut | If you are using a Windows device and the tray icon is hidden, you can create a Gui.exe shortcut to open the Support Request form. Set the shortcut's target to "C:\Program Files (x86)\CentraStage\Gui.exe" /newticket by browsing to and selecting Gui.exe, then adding a space and /newticket. Once the shortcut has been created, you can use it to create a ticket.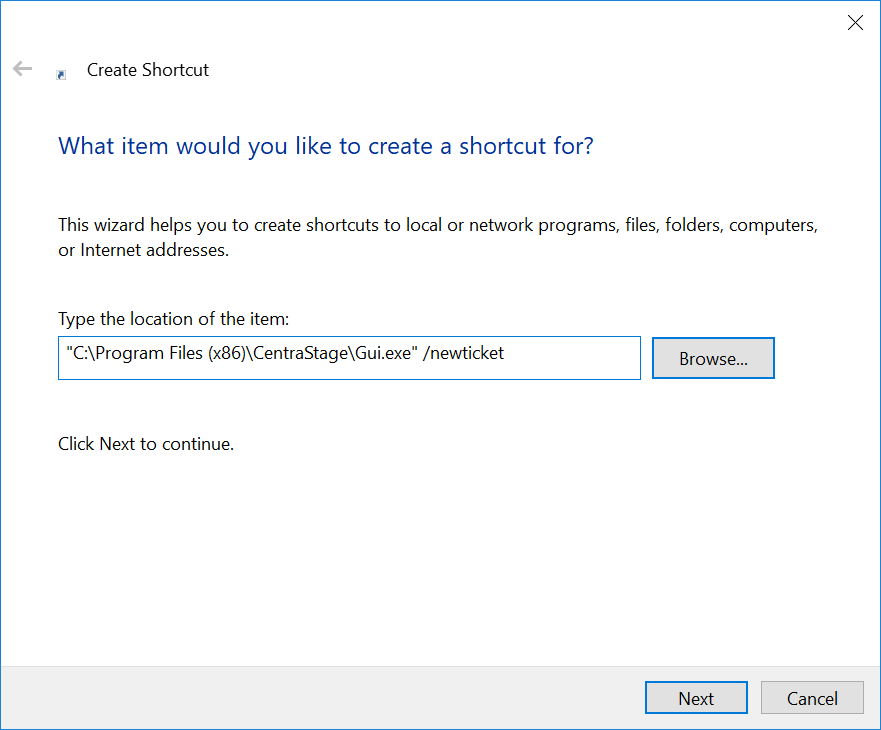 TIP The desktop shortcut can also be created by running the ComStore component Create "New Support Ticket" Shortcut [WIN] on the end user's device. To learn how to download components from the ComStore, refer to Download a component. |
NOTE The Support Request form can be branded and configured. Refer to Branding.
NOTE If the end user's Windows operating system is Dutch or French, the Support Request form is translated into Dutch or French, respectively.
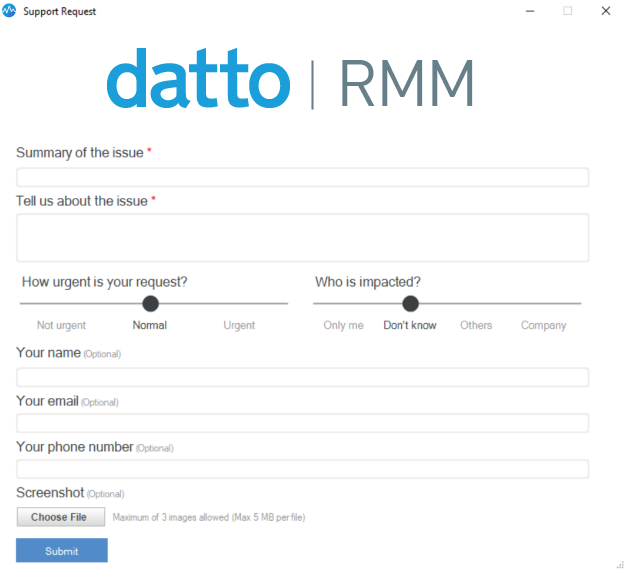
- Depending on the Support Request form settings, some fields are marked as mandatory with an asterisk *, while some fields are optional. By default, you can see the following fields:
| Field | Description |
|---|---|
| Logo | The company logo. |
| Summary of the issue | Enter a short summary of the issue you are experiencing. |
| Tell us about the issue | Provide a more detailed description of the issue so that the Datto RMM Support team can have a better understanding. |
| How urgent is your request? | Select one of the following options: • Not urgent • Normal • Urgent |
| Who is impacted? | Select one of the following options: • Only me • Don't know • Others • Company |
| Your name | Enter your name. |
| Your email | Enter your email address. |
| Your phone number | Enter your phone number. |
| Screenshot | Click Choose File to add a screenshot. A maximum of three images are allowed. Only pictures are allowed as attachments, and each file must not exceed 5 MB. If you selected the Take screenshot and request support option from the Datto RMM icon, a screenshot is taken of your current screen, saved to your desktop (with the date and time as file name), and added to the Support Request form automatically. When you submit the form, the screenshot is automatically deleted from your desktop. If you close the form without submitting it, the screenshot will not be deleted from your desktop. NOTE When the Screenshot field in Support Request Branding is configured to be hidden but an Agent policy targets a device that has the Take screenshot and request support option ON, the end user can still take and submit a screenshot. Refer to Branding and Agent policy. |
- Click Submit. A dialog box confirms that your support request has been submitted.
- Click the Refresh icon
 on the Tickets tab in the Agent Browser to see open tickets raised within the last seven days.
End users can add comments to tickets and close them in the Agent Browser on Windows devices by following these steps:
- Open the Agent Browser by double-clicking the Datto RMM system tray icon.
- Select the Tickets tab.
- Click the pencil icon next to a ticket.
- Add a note and click Submit. A technician will be able to see your note in Datto RMM. Notes added by a technician can also be seen in the Agent Browser.
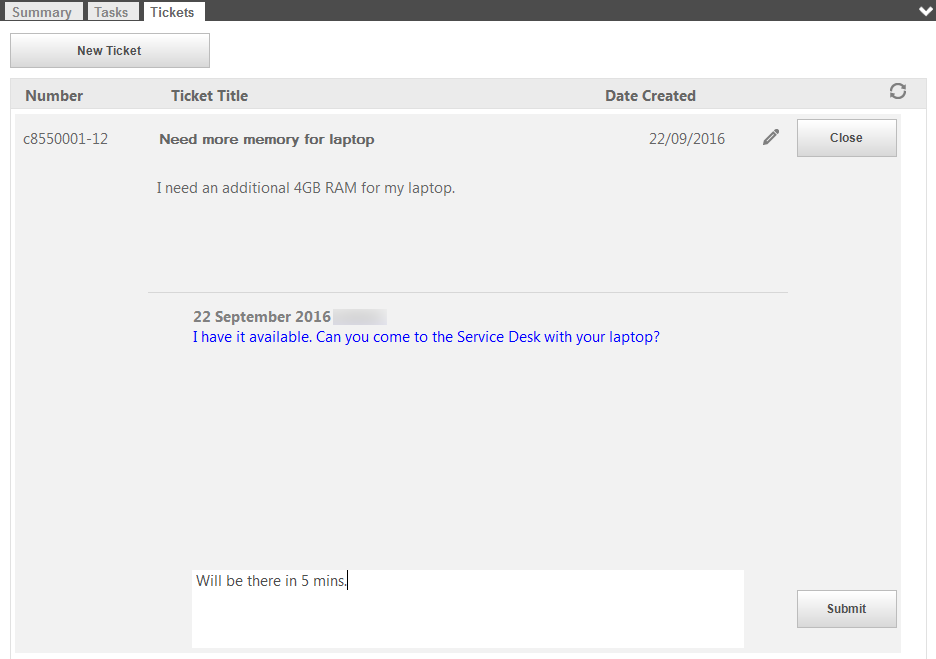
- Click Close to complete a ticket. It will no longer be visible in the Agent Browser.
Technicians or administrators will still be able to access the ticket via Datto RMM.
Once an end user submits a support request, they can no longer edit the ticket from within the Agent Browser. Therefore, best practice is to set up a workflow rule in Autotask to send a confirmation email to the end user once their support request has been received and a ticket has been created in Autotask. The end user can reply to the confirmation email if they want to add notes to the ticket. Technicians will be able to view the added notes in Autotask.
End users can add comments to tickets by following these steps:
- Open the email confirming that your support request has been received and a ticket has been created in Autotask.
- Reply to the email with the notes you wish to add to the ticket.
- Once the reply is sent, the notes will be added to the ticket within Autotask.
- You can check the status of the ticket in the Datto RMM Tickets tab via the Agent Browser, or within the Autotask Client Portal.

NOTE Only tickets created within the last 7 days will show in the Tickets tab.
