Integration: Datto RMM and Datto EDR
 Security and navigation
Datto RMM
NAVIGATION Setup > Integrations > Datto Endpoint Security
PERMISSIONS To enable the integration, refer to Setup > Integrations in Permissions.
Datto EDR
NAVIGATION Organizations
PERMISSIONS The API token used to set up this integration must be generated by a Datto EDR administrator. Refer to Generating Datto EDR API tokens in the Datto EDR Help.
Datto RMM and Datto Endpoint Detection and Response (EDR) integrate to let you deploy and manage the Datto Endpoint Security agent across your managed endpoints from a single console. Once connected, Datto RMM sites sync to Datto EDR as locations, endpoint security policies control agent deployment, and high and severe EDR alerts flow into Datto RMM automatically.
Kaseya 365
If you have the following Kaseya 365 subscription, this integration is included in your subscription:
To learn about Kaseya 365, refer to Kaseya 365 overview in the KaseyaOne Help.
Automations powered by this integration
- Deploy Datto EDR from Datto RMM
- Deploy and Manage Datto AV from Datto RMM
- One-Click EDR Host from Datto RMM
- One-Click AV Host from Datto RMM
- True-Sync for Datto EDR and Datto RMM
- Endpoint Shortcut for EDR
- Datto EDR Event Dashboard in Datto RMM
- EDR Security Event Alerts in Datto RMM
Details on these and more automations are available in the Automation Center in Kaseya One. Refer to Automation Center.
Prerequisites
- An active Datto RMM subscription and an active Datto EDR or Datto Antivirus (AV) subscription.
- Administrator-level access to both the Datto RMM console and the Datto EDR portal.
- The Datto RMM agent already installed and checked in on any device before you deploy the Datto Endpoint Security agent to it. Installing the RMM agent first ensures the device is assigned to the correct site before the EDR sync occurs.
- If a standalone Datto EDR agent was previously deployed outside of Datto RMM, uninstall it and redeploy through Datto RMM. Deploying through Datto RMM on top of a pre-existing, non-RMM-managed agent is not supported.
What happens automatically after enabling the integration
After you enable the integration and map the two products, the following occurs automatically:
- Every Datto RMM site syncs to Datto EDR as a location and is grouped under a default Default RMM organization.
- Any endpoint with the Datto Endpoint Security agent installed syncs to Datto EDR as a device under its matching location.
- Datto EDR checks for new or changed sites and endpoints roughly every four hours.
- High and Severe EDR alerts replicate from Datto EDR into Datto RMM. This replication is one-directional (Datto EDR to Datto RMM only).
Known limitations
- You cannot rename or delete an RMM-synced location from within the Datto EDR portal. Rename sites on the Datto RMM side.
- Devices cannot be moved between locations in Datto EDR once synced. The location a device lands in is determined by its RMM site.
- The integration does not automatically deduplicate sites if the same client exists in Datto RMM under more than one site.
- Uninstall Protection on the endpoint prevents Datto RMM or any other method from removing the Datto Endpoint Security agent directly. Uninstall must be done from the Datto EDR portal. Refer to Offboard a client below.
How to...
Enable the integration
To enable the Datto Endpoint Security integration, complete the following steps:
- In the Datto EDR portal, generate an API token. Refer to Generating Datto EDR API tokens in the Datto EDR Help. You need this token only once, at initial setup.
- In Datto RMM, navigate to Setup > Integrations > Datto Endpoint Security.
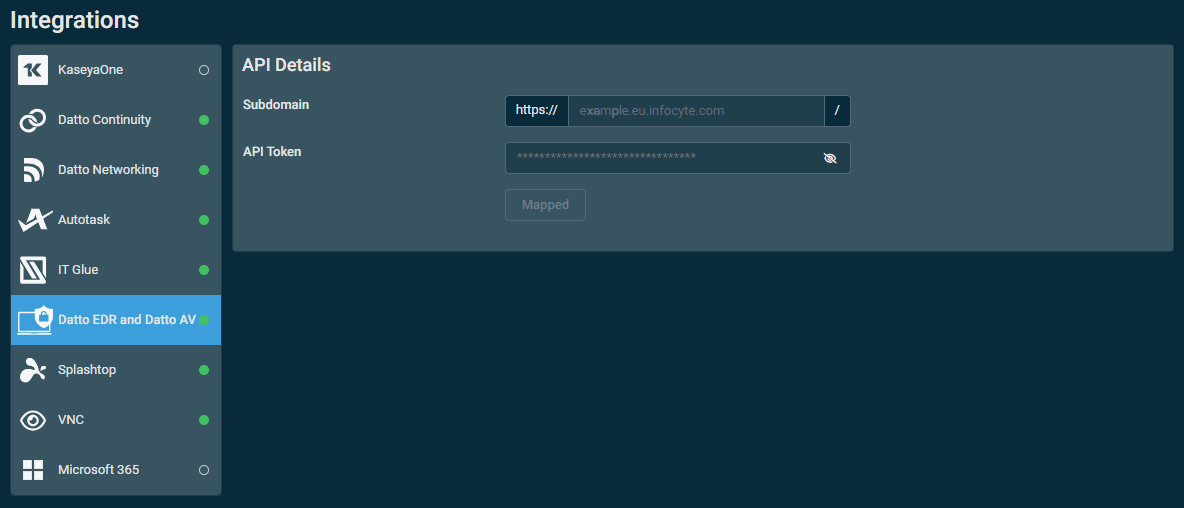
- In the API Details card, click Turn On.
- Type the full URL for your Datto EDR instance.
- Paste the API token you generated in step 1.
- Click Save and check now.
Upon successful authentication, the status displays as Mapped. Datto RMM sites begin syncing to Datto EDR as locations within approximately four hours.
NOTE The API token requires a one-time handshake only and does not need to be re-entered after it expires unless you delete and fully reconfigure the integration.
IMPORTANT If you already have a standalone Datto EDR instance with locations and agents deployed outside of Datto RMM, do not deploy any new EDR agents until after this mapping step is complete. Deploying before mapping can create duplicate or unmanaged devices that require manual cleanup.
Configure deployment targets for Datto EDR
An Endpoint Security Policy can be applied broadly, but in almost every real MSP scenario you want EDR deployed only to specific clients, specific sites, or specific devices. Datto RMM’s Filters and Groups let you define exactly that scope, and then target the Endpoint Security Policy at the Filter or Group instead of at “everything.”
Site Groups in Datto RMM can be used to define which of your clients are using Datto EDR, and you can use those site groups to build Filters so you can pinpoint which devices in those Site Groups will receive Datto EDR.
Create a site group
Use a Site Group to define which clients should receive Datto Endpoint Security. A Site Group provides a manually maintained gate: only sites you explicitly add to the group will be in scope for the deployment filter and policy.
To create the Site Group, complete the following steps:
- In Datto RMM, navigate to Global > Site Groups, or from the Sites list, select Sites > Site Groups.
- Click Create Site Group.
- Type a name for the group, for example, EDR Clients.
- Click Add Site.
- In the Sites menu pop-up, select the sites you want covered by Datto Endpoint Security by clicking Add next to the name of the site. This will add them to the site group. Use the search bar at the top to filter the list of sites if needed.
- When done adding sites to the site group, close the Sites pop-up.
- Click Create Site Group.
Once the Site Group is created, you can use it to create the filter for device deployment. Refer to Create a device filter.
NOTE The deployment filter references the group, so the group must be created first.
Create a device filter
A device filter narrows the deployment scope to specific device types within your target clients. The filter is dynamic: it automatically includes any device that matches its criteria and excludes devices that stop matching, which means new devices at in-scope clients are picked up without additional steps.
To create the filter, complete the following steps:
- In Datto RMM, go to the Global view and open the Filters panel.
- Click Create Filter.
- Type a descriptive name, for example, EDR Target — EDR Clients (Workstations and Servers).
- Set the Scope to Global.
- Add a criterion: For example “Site Group > is a member of > EDR Clients” (the name of the site group you created).
- Click the plus sign under the first criterion to add a second criterion to limit the device types targeted in each site. For example: “Device Type > contains > Laptop, or Desktop, or Server”.
NOTE Ensure that when you add the second criterion, the AND operator is applied between it and the first criterion.
- Under Site Targets, ensure the Select devices from all sites toggle is enabled. While this filter will only target devices within the sites defined in the site group, this ensures that any new sites added to the site group are automatically taken into account by the filter.
-
Configure which security levels, if any, you want to share this filter with.
- Click Save.
The filter is saved. It evaluates the two criteria as an AND condition: a device must belong to a site in the site group and match the specified device types. Devices that do not meet both criteria — for example, network appliances at an in-scope client — are automatically excluded.
NOTE This is one example of how to use filters and site groups to scope an Endpoint Security deployment. Many other targeting strategies are valid. Refer to Device filters and Site Groups for the full range of options.
Deploy the Endpoint Security policy
The Endpoint Security policy deploys the Datto Endpoint Security agent to the devices matched by your filter. Complete the following steps:
- In Datto RMM, navigate to Policies > Endpoint Security.
- Click Create Policy and confirm that the Endpoint Security policy type is selected as the Type.
- Type a name for the policy, for example, Endpoint Security — Clients that should have EDR.
- In the Targets section, set the Custom Target to the filter you created in Create a device filter. Using the filter rather than the site group alone ensures both the client scope and the device-type scope are enforced.
- Enable the desired feature toggles: Datto EDR, Datto Antivirus, and Ransomware Detection are independent. Review the mutual-exclusivity warnings below before enabling any combination.
IMPORTANT Ransomware Detection: Ransomware Detection can run through Datto RMM or through Datto EDR, but not both at the same time on the same device. If you enable it in one product, disable it in the other for the same devices.
IMPORTANT Windows Defender Antivirus: Only one product should actively manage Windows Defender Antivirus policy for a given device. Confirm whether Datto RMM or Datto EDR is the source of truth for Defender management before enabling both.
- Click Save and Deploy Now.
Datto RMM begins deploying the Datto Endpoint Security agent to matching devices on its standard policy cadence.
Verify deployment
Confirm the rollout in both consoles:
- In Datto RMM, check the device's Endpoint Security card for install status and agent status.
- In Datto EDR, confirm the device appears under its synced location and is actively checking in. Allow up to four hours for the sync to occur.
Onboard a new client
Because the site group has static membership, adding a new client requires one deliberate step before the deployment policy picks up the client's devices automatically.
To onboard a new client, complete the following steps:
- Install the Datto RMM agent on the client's devices and confirm the site is checked in as usual.
- Add the new client's site to the Clients that should have EDR site group. Refer to Create a site group for navigation. No changes to the filter or policy are required — the filter references the group dynamically, so any device at the newly added site that matches the device-type criteria is automatically picked up on the next policy application cycle.
- Confirm the new site appears as a location in Datto EDR (allow up to four hours).
- Confirm the Endpoint Security agent is installed on target devices in Datto RMM and that devices are reporting in Datto EDR.
- Review and assign detection and response policies for the new location in the Datto EDR portal. Refer to Configure detection and response policy in Datto EDR below.
The new client's eligible devices are now covered by the Endpoint Security policy and visible in Datto EDR.
Configure detection and response policy in Datto EDR
Having the agent installed and reporting into Datto EDR is not the same as having it configured for your environment. Datto EDR Real Time Monitoring, Ransomware Detection, Ransomware Rollback, Datto AV, and Automated Responses are all controlled by policies configured inside the Datto EDR portal — not in Datto RMM.
Datto EDR policies can be assigned at three scopes: organization, location, and device group. In general, the most specific assignment takes precedence: a device-group assignment overrides a location assignment, which overrides the organization default. When troubleshooting unexpected device behavior, check for overrides at each level, starting from the device and working up.
IMPORTANT Configure EDR detection and response policy for a location before deploying the Endpoint Security policy broadly to that location's devices. If your workflow requires deploying first, set your default EDR policies to an alert-only configuration so that unreviewed automated response actions are not taken on devices that come online ahead of schedule.
Assign policy at the organization scope
To assign or review policy at the organization scope, complete the following steps:
- In the Datto EDR top navigation, click Organizations.
- Click the name of the client organization you want to manage.
- On the Organization Details page, click Assign Policy.
- In the Policy Type, Policy, and Device Group drop-down lists, select the applicable options. Leave Device Group blank to apply the policy to the entire organization, or select a group to narrow the assignment.
- Click Assign.
Assign policy at the location scope
To assign or review policy at the location scope, complete the following steps:
- In the Datto EDR top navigation, click Organizations.
- In the Organization column, click the desired organization.
- In the Locations table, click the applicable location.
- On the Location details page, click the Policies tab.
- Click Assign Policy.
- In the Policy Type, Policy, and Device Group drop-down lists, select the applicable options. Leave Device Group blank to apply the policy to the entire location, or select a group to narrow the assignment.
- Click Assign.
Bulk-assign policy across multiple organizations or locations
To assign the same policy to multiple organizations at once, complete the following steps:
- In the Datto EDR top navigation, click Organizations.
- Select the check box next to each organization you want to assign the policy to.
- Open the actions menu and click Assign Policy.
- Select the Policy Type and Policy, and optionally a Device Group to narrow the assignment within each selected organization.
- Click Assign. The policy is assigned to every selected organization.
To bulk-assign across multiple locations, navigate into the desired organization, select the check boxes next to the applicable locations in the Locations table, and follow steps 3–5 above. The Assign Policy button activates only when at least one location is selected.
Offboard a client
Offboarding a client requires steps in both Datto RMM and the Datto EDR portal. Completing only the Datto RMM step is a common mistake that leaves the agent installed on the client's devices.
Removing a site from the site group, disabling the policy, or deleting the Endpoint Security policy does not uninstall the Datto Endpoint Security agent from devices that already have it. The agent remains installed until you explicitly uninstall it from the Datto EDR portal, as described in step 2 below. Uninstall Protection blocks removal attempts from outside the Datto EDR portal.
Step 1: Remove the client from the deployment target in Datto RMM
To remove the client's site from the site group, complete the following steps:
- In Datto RMM, navigate to Global > Site Groups.
- Open the Clients that should have EDR site group.
- Locate the client's site in the site list.
- Select the check box next to the site and choose Remove.
- Confirm the removal when prompted.
The site and its devices no longer match the filter, so the Endpoint Security policy stops targeting them. The agent, however, remains installed until step 2 is complete.
Step 2: Uninstall the agent and delete the organization from the Datto EDR portal
To uninstall the Datto Endpoint Security agent and delete the organization from EDR, complete the following steps:
- Log in to the Datto EDR portal.
- Navigate to Organizations and open the client's organization.
- Select the first location and click the Devices tab.
- Select all devices.
- Click the ellipses menu and select Delete, OK.
- Navigate back to the organization's details page.
- For the location for which you deleted the devices, click the ellipses menu and select Delete, OK.
- Repeat steps 3 through 7 for each location.
- When all locations have been deleted, on the organization's details page, click Delete, OK.
The uninstall applies uniformly across Windows, macOS, and Linux — no separate procedure is required per operating system.
Step 3: Verify removal
- In Datto EDR, confirm the devices no longer show as active or reporting under the organization.
- In Datto RMM, confirm the Endpoint Security card on affected devices no longer reports an active agent.
Disable the integration
IMPORTANT Use the steps below only if you need to disable the entire Datto RMM and Datto EDR integration, not just offboard a single client. Disabling the integration does not uninstall agents already deployed. Complete the offboarding steps in Offboard a client for each affected organization before or after disabling the integration.
Step A: Delete all Endpoint Security policies
- In Datto RMM, navigate to Policies > Endpoint Security.
- Filter or sort the policy list to identify every policy of type Endpoint Security.
- Select the check box next to the first Endpoint Security policy.
- Click Delete in the toolbar and confirm when prompted.
- Repeat steps 3 and 4 for every remaining Endpoint Security policy until none remain.
IMPORTANT You cannot disable the integration while any Endpoint Security policy with the Datto Endpoint Security toggle enabled still exists. Delete all such policies before proceeding to step B.
Step B: Turn off the integration
- Navigate to Setup > Integrations > Datto Endpoint Security.
- In the API Details card, click Turn Off.
- Enter a valid API token generated from the Datto EDR subdomain used for this integration.
NOTE If you are turning off the integration for a Datto EDR instance that no longer exists, such as a previous trial, generate a new API token in your current Datto EDR instance and enter that instead. Refer to Generating Datto EDR API tokens in the Datto EDR Help.
- Click Confirm.
The integration status changes from Mapped to Off. If you are unable to disable the integration, confirm no Endpoint Security policies remain.
FAQ
Does the order in which I purchased Datto RMM and Datto EDR matter?
No. The order of purchases does not affect the integration process.
Regardless of which product you purchased first, you can integrate them by following the steps in Enable the integrationabove.
How does this integration affect an existing standalone Datto EDR instance?
Existing standalone agents must be uninstalled and redeployed through Datto RMM.
Your existing organizations and locations in the standalone Datto EDR instance remain. The instance will also receive the synced organizations and locations from Datto RMM. However, to manage existing agents centrally through Datto RMM, you must uninstall any agents deployed via the standalone instance and redeploy them using an Endpoint Security policy in Datto RMM.
Do not deploy new agents through Datto RMM until after the integration is mapped. Deploying before the mapping step is complete can result in duplicate or unmanaged devices that require manual cleanup.
Why isn't the Endpoint Security policy deploying to a device I expect it to reach?
The device likely does not match the filter criteria, or its site is not in the target site group.
Check the device's Device Type in Datto RMM and confirm it is set to Laptop, Desktop, or Server (or whichever types your filter targets). Then confirm the device's site is a member of the site group referenced by the filter. Refer to Create a device filter and Create a site group.
The agent shows as installed in Datto RMM, but the device isn't appearing in Datto EDR. What should I do?
Wait for the next sync cycle, then check the integration status.
Sync between Datto RMM and Datto EDR occurs roughly every four hours. If the device was recently added, allow time for the next cycle. If the issue persists, confirm the integration status is Mapped in Setup > Integrations > Datto Endpoint Security. If the Datto RMM agent was installed before the integration was mapped, the Endpoint Security agent may need to be uninstalled and redeployed.
I can't remove the Datto Endpoint Security agent from a device. Why?
Uninstall Protection blocks removal attempts from outside the Datto EDR portal.
Uninstall the agent from the Datto EDR portal, not from Datto RMM or locally on the device. Refer to Offboard a client for the full procedure.
Ransomware Detection or Windows Defender settings are conflicting between Datto RMM and Datto EDR. How do I resolve this?
Choose one product as the source of truth for each feature and disable it in the other.
Ransomware Detection can run through Datto RMM or through Datto EDR, but not both simultaneously on the same device. Similarly, only one product should actively manage Windows Defender Antivirus policy per device. Determine which product owns each feature and clear the corresponding toggle in the other product. Refer to the feature toggles section in Deploy the Endpoint Security policy.
I removed a client from Datto RMM, but the client is still active in Datto EDR. What do I do?
Complete the Datto EDR portal uninstall step. Removing the RMM policy or site group assignment alone does not uninstall the agent.
Offboarding requires action in both products. If you have only removed the client's site from the site group or disabled the policy in Datto RMM, the agent remains installed and reporting to Datto EDR. Proceed to step 2 in Offboard a client to uninstall the Datto EDR agent from the Datto EDR portal.


