Branding
PERMISSIONS Administrator
NAVIGATION Setup > Branding
About
On the Branding page, you can add custom branding to your Datto RMM account, including the web interface, the Agent, and the Agent Browser, and configure the end-user support request form settings. To see all available options, review the following sections.
Uploaded image files cannot exceed 10 MB.
You can customize the header of the web interface, alert email notifications, and Web Remote chat (header logo and header background color) as well as the logo that appears in reports. The Header section displays previews of the selections.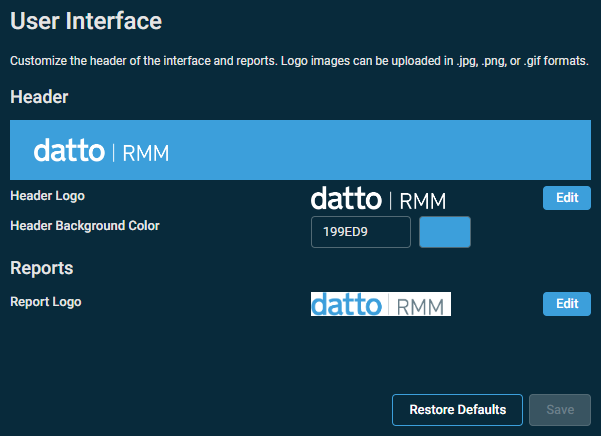
If you choose to preserve (or restore) the default settings, the Datto blue header will display a wave design behind the Datto RMM logo.
- Modify any of the following settings:
| Setting | Description |
|---|---|
| Header Logo | Click Edit, and an upload area will appear to the right. Choose one of the following options: • Upload a file for editing and cropping. Click to open a file browser window and select a file or drag a file from your device to the upload area. Using the image editor, adjust how the logo will appear. The logo will be cropped to dimensions of 134 pixels wide by 24 pixels high. Files can be uploaded in the following formats: JPG, PNG, or GIF; however, the image editor will create a static (non-animated) logo. NOTE For Web Remote chat, header logos exceeding dimensions of 260 pixels wide by 36 pixels high will be dynamically resized. • Upload a file that does not require editing. Click to open a file browser window and upload a file that is 134 pixels wide by 24 pixels high. Files can be uploaded in the following formats: JPG, PNG, or GIF. Both static and animated images with the correct dimensions are accepted. Upon saving, an error message will be displayed if the size of the file is incorrect. |
| Header Background Color | Select or enter the color of the header background in hexadecimal color value. |
| Report Logo | Click Edit, and an upload area will appear to the right. Upload a file for editing and cropping. Click to open a file browser window and select a file or drag a file from your device to the upload area. Using the image editor, adjust how the logo will appear. The logo will be cropped to a size of 758 pixels wide by 130 pixels high. Files can be uploaded in the following formats: JPG, PNG, or GIF; however, the image editor will create a static (non-animated) logo. |
- To keep your changes, click Save.
To restore the original default settings, click Restore Defaults.
To cancel without saving any changes, click Cancel.
NOTE The Cancel button will only appear once you have made a change.
You can customize the Agent branding settings on managed devices or opt to preserve the default options.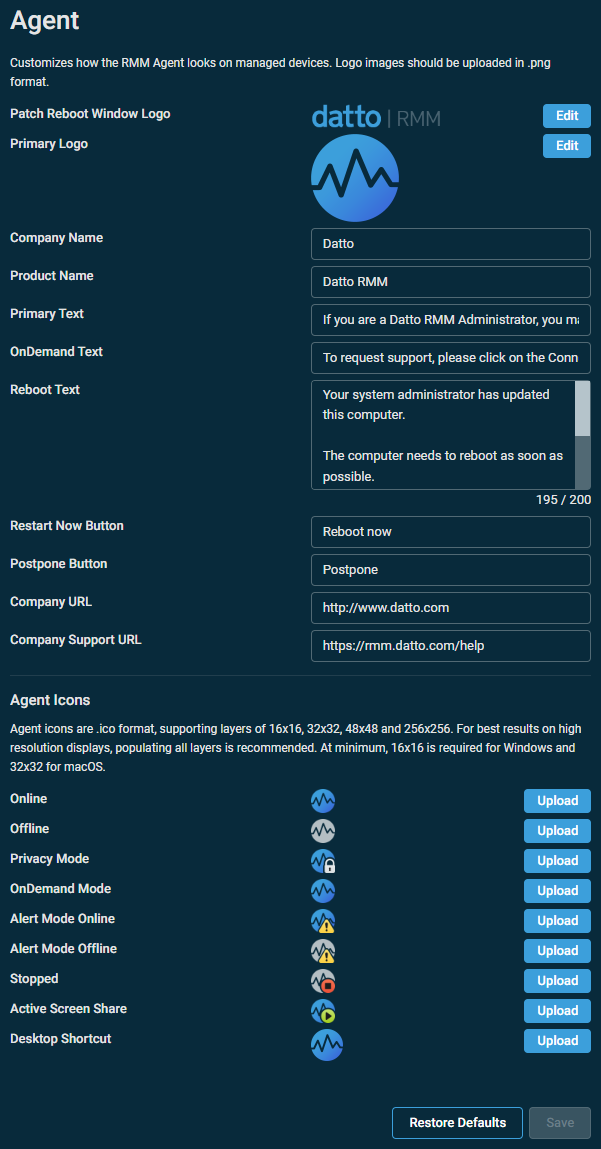
NOTE If custom Agent branding icons are corrupted or incompatible, default Datto RMM branding is applied. In this scenario, all Agent branding icons will revert to default icons, even if only one file is corrupted or incompatible. Ensure your custom branding meets the following requirements, and if you confront any issues, submit a Kaseya Helpdesk request.
- Modify any of the following settings:
| Setting | Description |
|---|---|
| Patch Reboot Window Logo | Click Edit, and an upload area will appear to the right. Upload a file for editing and cropping. Click to open a file browser window and select a file or drag a file from your device to the upload area. Using the image editor, adjust how the logo will appear. The logo will be cropped to a size of 260 pixels wide by 35 pixels high. Files can be uploaded in the following format: PNG. This logo appears in the reboot dialog box on the end user's device to remind them that a reboot is required to finish a patch update on the device. For more information, refer to the Power section in Policies. The following screenshot displays the reboot logo, reboot text, and reboot button text the end user will see on their device by default (if not customized in this section). 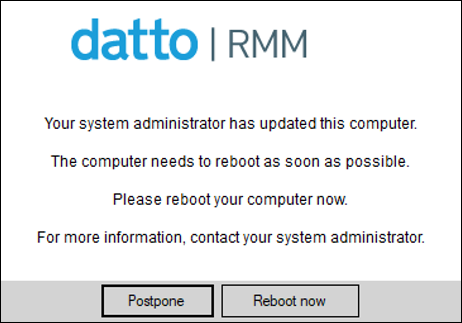 NOTE You can also customize the reboot text and reboot button text in the dialog box. Refer to Reboot Text, Restart Now Button, and Postpone Button. |
| Primary Logo | Click Edit, and an upload area will appear to the right. Upload a file for editing and cropping. Click to open a file browser window and select a file or drag a file from your device to the upload area. Using the image editor, adjust how the logo will appear. The logo will be cropped to a size of 176 pixels wide by 176 pixels high. Files can be uploaded in the following format: PNG. The logo will appear on the Agent Browser login screen. |
| Company Name | Enter your company's name that will appear under the About section in the Agent Browser. (Either right-click the Agent and click About or open the Agent Browser and click Help > About.) |
| Product Name | Enter your product's name that will appear in the following places: • As the Agent Browser icon label in the system tray • Next to the desktop shortcut logo in the upper-left corner of the Agent Browser window • As the first menu in the Agent Browser's menu bar • In confirmation dialog boxes in the Agent Browser |
| Primary Text |
NOTE This setting is currently depreciated. Changing the contents of this field does not modify the Agent Browser configuration. |
| OnDemand Text | Specify the text that will be displayed on a device with an OnDemand Agent installed. The current text is shown here. |
| Company URL |
Enter your company's website that will appear under the About section in the Agent Browser. (Either right-click the Agent and click About or open the Agent Browser and click Help > About.) NOTE Mailto addresses (for example: CompanyName<mailto:email@email.com>) will work in this field. |
| Company Support URL | Enter your company's support website. |
| Reboot Text | Enter the text to appear in the reboot dialog box on the end user's device to remind them that a reboot is required to finish a patch update on the device. For more information, refer to the Power section in Policies. The following screenshot displays the reboot logo, reboot text, and reboot button text the end user will see on their device by default (if not customized in this section). NOTE Emojis and any other utf8mb4 characters are not currently supported. NOTE You can also customize the reboot logo, reboot button text, and postpone button text in the dialog box. Refer to Patch Reboot Window Logo, Restart Now Button, and Postpone Button. |
| Restart Now Button | Enter the text for the button that allows end users to proceed with a reboot by restarting their device. Special language characters are supported. This button appears in the reboot dialog box on the end user's device to remind them that a reboot is needed to finish a patch update on the device. For more information, refer to the Power section in Policies. The following screenshot displays the reboot logo, reboot text, and reboot button text the end user will see on their device by default (if not customized in this section). NOTE Emojis and any other utf8mb4 characters are not currently supported. NOTE You can also customize the reboot logo, reboot text, and postpone button text in the dialog box. Refer to Patch Reboot Window Logo, Reboot Text, and Postpone Button. |
| Postpone Button | Enter the text for the button that allows end users to postpone a reboot on their device. Special language characters are supported. This button appears in the reboot dialog box on the end user's device to remind them that a reboot is needed to finish a patch update on the device. For more information, refer to the Power section in Policies. The following screenshot displays the reboot logo, reboot text, and reboot button text the end user will see on their device by default (if not customized in this section). NOTE Emojis and any other utf8mb4 characters are not currently supported. NOTE You can also customize the reboot logo, reboot text, and restart button text in the dialog box. Refer to Patch Reboot Window Logo, Reboot Text, and Restart Now Button. |
| Agent Icons | Click Upload to open a file browser window and select a file. Agent icons and the desktop shortcut are in the ICO format. Supported icon sizes:
NOTE For best results on high resolution displays, the highest supported resolution. Administrator users can use Paint.net for Windows (available from the ComStore) to produce ICO files. For more information about Agent icons, refer to Agent icons. |
| Desktop Shortcut | The desktop shortcut will appear in the upper-left corner of your Agent Browser window and in the Agent Browser's About section. (Either right-click the Agent and click About or open the Agent Browser and click Help > About.) The desktop shortcut is also used in the support request submission dialog box. |
- To keep your changes, click Save.
To restore the original default settings, click Restore Defaults.
To cancel without saving any changes, click Cancel.
NOTE The Cancel button will only appear once you have made a change.
- Once you have saved your changes, click Deploy for the changes to be applied.

You can customize the support request form that end users can submit through the Agent Browser or opt to preserve the default options.
IMPORTANT This section is only available if either the Autotask Integration or the ConnectWise PSA Integration is enabled. For information about the integrations, refer to Autotask Integration and ConnectWise PSA Integration. For information about how end users can create a ticket (support request), refer to Agent ticketing for end users.
- Modify any of the following settings:
| Setting | Description |
|---|---|
| Form Logo | Click Edit, and an upload area will appear to the right. Upload a file for editing and cropping. Click to open a file browser window and select a file or drag a file from your device to the upload area. Using the image editor, adjust how the logo will appear. The logo will be cropped to a size of 688 pixels wide by 130 pixels high. Files can be uploaded in the following formats: JPG, PNG, or GIF; however, the image editor will create a static (non-animated) logo. The logo will be displayed at the top of the support request form. |
| Logo Alignment | Click to choose left or center alignment for the logo. |
| Submit Button Color | Select or enter the color of the Submit button in hexadecimal color value. |
| Submit Button Text Color | Select or enter the color of the Submit button text in hexadecimal color value. |
| Support Field Options | You can customize the information you receive through a support request form. The following options are available: • Tell us about the issue: Select one of the following options: Hide, Mandatory (selected by default), or Optional. • How urgent is your request?: Select one of the following options: Hide or Show (selected by default). • Who is impacted?: Select one of the following options: Hide or Show (selected by default). • Your name: Select one of the following options: Hide, Mandatory, or Optional (selected by default). • Your email: Select one of the following options: Hide, Mandatory, or Optional (selected by default). • Phone number: Select one of the following options: Hide, Mandatory, or Optional (selected by default). • Screenshot: Select one of the following options: Hide or Show (selected by default). When the Screenshot field in Support Request Branding is configured to be hidden but an Agent policy targets a device and has the Take screenshot and request support option ON, the end user can still take and submit a screenshot. Refer to Agent policy. |
| Pre-populate fields | This setting allows information entered by the user in the support request form to be remembered and pre-populated after the first time it is entered. This information is tied to the user profile, so different users will have different pre-populated information. |
- To keep your changes, click Save.
To restore the original default settings, click Restore Defaults.
To cancel without saving any changes, click Cancel.
NOTE The Cancel button will only appear once you have made a change.
- Once you have saved your changes, click Deploy for the changes to be applied.


