Policies
PERMISSIONS Refer to Global > Policies in Permissions.
PERMISSIONS Refer to Sites > Policies in Permissions.
PERMISSIONS For ComStore policies, also refer to ComStore > ComStore in Permissions.
NAVIGATION Policies > All
NAVIGATION Policies > click any policy type in the list
NAVIGATION Global > Policies
NAVIGATION Sites > All Sites > click the name of a site > Policies (left navigation menu)
NAVIGATION Device summary page > Policies card > click the full-screen icon. To view the various navigation paths you can use to access the device summary page, refer to Device summary.
About policies
Policies in Datto RMM are frameworks that define the technical model behind a Standard Operating Procedure (SOP). Policies are used to:
- Define something you want to do, for example, configure a setting or run a monitor.
- Define which devices you want to target by using filters and groups.
- Deploy changes immediately or wait for the changes to be deployed later.
You can create and manage the following types of policies:
Creating a policy
Navigate to a Policies page by following any of the navigation paths described in Security and navigation. Click Create Policy and specify the policy details.
NOTE If you are viewing a list of policies that is not filtered by Type and you click Create Policy, the policy type will default to Monitoring. However, if you are viewing a specific type of policies, for example, Agent policies (Policies > Agent) and click Create Policy, the policy type will default to the one you are currently viewing (in this example, Agent).
NOTE If you are viewing a list of policies of one site (Sites > All Sites > click the name of a site > Policies) and click Create Policy, the policy scope will default to the site that is currently selected, but the scope can be changed.
When creating a policy, the following areas will need to be configured:
- Name: Enter a name for the policy.
- Description: Optionally, enter a description of the policy.
- Scope: Define if the policy should be able to apply to devices across all sites, or only one site. Refer to Scope.
- Type: Choose the type of policy that you want to create. Refer to Type.
- Targets: Define which devices the policy should be applied to. Refer to Targets.
- Enabled: Choose whether the policy is enabled for targeted devices. Refer to Enabling or disabling the policy, sites, or devices.
Review the sections below for more details.
Select one of the following options:
- Global: The policy will apply to all sites in the Datto RMM account. For the policy to apply to devices in any site, you must configure targets. Refer to Targets.
- Site: The policy will only apply to one site. Once this option is selected, enter a site name. The search results will be narrowed as you type. For the policy to apply to devices within that site, you must configure targets. Refer to Targets.
NOTE If a global policy is created by a user with a security level that does not have access to all sites, the global policy will deploy only to devices the security level has access to. Refer to Device visibility in Security levels.
NOTE If you are viewing a list of policies of one site (Sites > All Sites > click the name of a site > Policies) and click Create Policy, the policy scope will default to the site that is currently selected, but the scope can be changed.
NOTE The policy scope cannot be changed when editing an already created policy. Refer to Editing a policy.
From the drop-down list, select a policy type and configure its details.
The following policy types are available for configuration:
- Agent policy
- Endpoint Security policy
- ESXi policy
- Maintenance policy
- Monitoring policy
- Patch Management policy
- Software Management policy
- Windows Update policy
NOTE If you are viewing a list of policies that is not filtered by Type and you click Create Policy, the policy type will default to Monitoring. However, if you are viewing a specific type of policies, for example, Agent policies (Policies > Agent) and click Create Policy, the policy type will default to the one you are currently viewing (in this example, Agent).
NOTE The policy type cannot be changed when editing an already created policy. Refer to Editing a policy.
An Agent policy deploys settings to affect the operation and configuration of the Datto RMM Agent. An Agent policy may affect Privacy Mode, Agent installation and service, security, and the Agent Browser mode. For information about the Agent, refer to Datto RMM Agent.
Privacy mode options
Select any of the following options:
| Option | Description |
|---|---|
| Activate Privacy Mode on devices | Automatically turns on Privacy Mode for all devices targeted by the policy and will require end-user permission when connecting to a targeted device. Once Privacy Mode is enabled on a device, the Datto RMM Administrator cannot disable this setting. Privacy Mode can only be disabled by the end user on the device itself. For further information, refer to Privacy Mode. |
| Allow connections to the device when no user is logged in | Allows you to connect to a device when no user is logged in but Privacy Mode is enabled on the device. NOTE This setting will apply to all remote connections. |
| Only require permission from the device when connecting with Restricted Tools | Allows you to configure Privacy Mode in a way that end user permission is only required when the following restricted tools are used: VNC, RDP, Splashtop, Screenshot, or Web Remote. NOTE The Web Remote restriction applies only to remote takeover sessions and does not apply to PowerShell sessions. |
Service options
Select any of the following options:
| Option | Description |
|---|---|
| Install the Agent as Service-only, preventing the application displaying in the System Tray or Start menu for Windows devices | No system tray icon or Start menu shortcuts will be installed. It is only available for Windows devices. Hiding the Datto RMM Agent icon in the system tray may be useful if you do not want your end users to access all of the options it offers (for example, the option to create a ticket), or because you want to prevent end users from stopping the Agent or turning on Privacy Mode. When this option is selected, the gui.exe process (Agent Browser) will not start on the targeted devices, and the following features will not be available:
IMPORTANT Selecting this option will not close the gui.exe process if it is already running. The targeted device needs to be restarted in order for the gui.exe process to not start on boot. NOTE If this option is selected, then jobs set to Run as a logged-in user will not work, as they rely on the agent browser interface (gui.exe) being active. |
| Prevent the Agent from running Jobs | Prevents the Agent from running jobs. NOTE Even if this option is selected, components enabled as User Tasks can still be installed. Refer to User Tasks. |
| Prevent remote access from another device | Prevents remote access to the targeted device when initiated from Datto RMM. NOTE Remote options for the targeted device will be visible on the device summary page and on device list pages but no remote request will be processed. |
| Prevent the Agent from submitting audits to the platform | Prevents the Agent from submitting audits to the platform. |
User actions
Select any of the following options:
| Option | Description |
|---|---|
| Remove user access to the Privacy Mode options | Removes access to Privacy Mode Options from the system tray icon. NOTE You cannot disable Privacy Mode in the Agent using this setting if Privacy Mode has already been activated. Once Privacy Mode is enabled on a device, it can only be disabled by the end user. For further information, refer to Privacy Mode. |
| Remove user access to the Settings menu | Disables the following features:
|
| Remove user access to the Quit option | Removes the option for the user to exit the Agent. |
| Prevent users from creating tickets from the Agent Browser tickets tab | Removes the option for the user to log a ticket through the Agent. |
| Allow users to select ‘Take screenshot and request support’ from the menu | This option is only available if an integration with a PSA is enabled. When this option is selected, the Take screenshot and request support menu entry is added to the Agent. For more information about ConnectWise PSA, refer to ConnectWise PSA Integration. |
| Allow users to select ‘Request support’ from the menu | This option is only available if an integration with a PSA is enabled. When this option is selected, the Request support menu entry is added to the Agent. For more information about ConnectWise PSA, refer to ConnectWise PSA Integration. |
Agent Browser mode
Select one of the following options from the drop-down list:
| Option | Description |
|---|---|
| Disabled | Prevents any access to the Agent Browser window. |
| User - no access to support tab | Allows the user to open the Agent Browser window but prevents them from logging in. For more information, refer to Log in to the Agent Browser. |
| Admin - can log in to support tab | Allows full access to the Agent Browser window. This option is selected by default. Refer to Agent Browser. |
To learn about the Endpoint Security features in Datto RMM, refer to Endpoint Security overview.
An Endpoint Security policy allows you to keep your devices secure and respond to active threats by configuring and deploying various endpoint security technologies through one centralized policy. The three available configurations are turned off by default. Turn on the toggles to enable the configurations, and click to expand any of the tiles to view or modify the settings.
IMPORTANT A warning will be displayed if both the Datto Endpoint Security and Ransomware Detection toggles are turned on, if both the Datto Endpoint Security and Managed Windows Defender Antivirus toggles are turned on, or if all three toggles are turned on. This warning advises against enabling Datto Endpoint Security in conjunction with the other available security policy configurations. Adhering to this warning will prevent configuration conflicts that may lead to security gaps, unexpected statuses and alerts, and unanticipated billing requirements for standalone Ransomware Detection. We recommend exclusively enabling Datto Endpoint Security for optimal performance.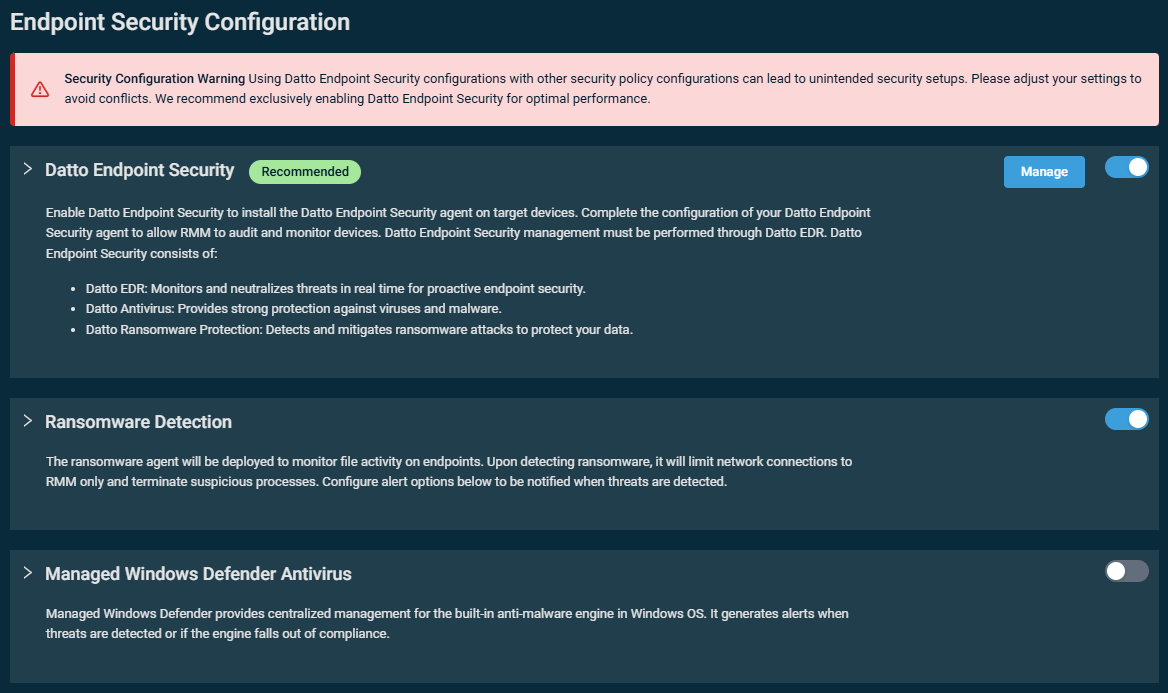
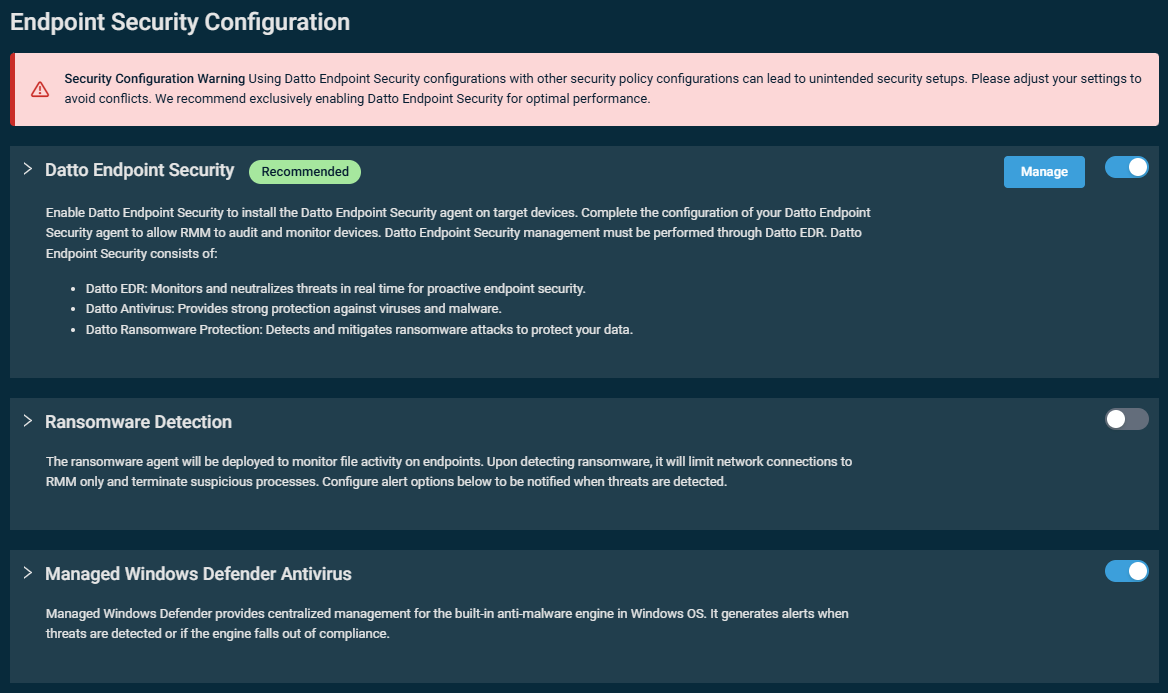

NOTE To be able to save the policy, at least one of the endpoint security configurations must be enabled.
NOTE A device should be targeted by only one Endpoint Security policy. If multiple Endpoint Security policies target the device, the Datto RMM Agent will continue to use the policy that was deployed first. If that policy is then disabled, the Datto RMM Agent will use the next active (enabled) policy targeting the device.
NOTE A widget displaying the number of devices in each of your sites that do not have certain security features configured is available in the Widget Library. Refer to Security Threats.
Supported operating systems: Windows, macOS, Linux
NOTE This option is available only if the Datto Endpoint Security Integration is enabled in your Datto RMM account. If not yet enabled, click Configure to navigate to the integration setup page.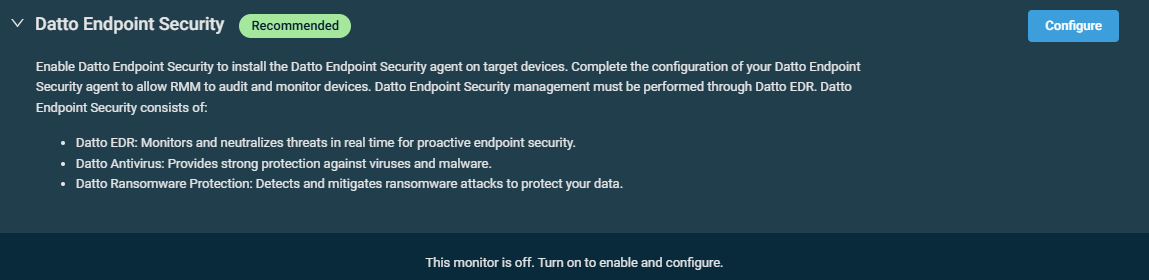
Refer to Datto Endpoint Security Integration.
This tool will deploy the Datto Endpoint Security agent, which will allow you to monitor threats, protect against viruses and malware, and detect and mitigate against ransomware on the targeted endpoints. By default, when indicators of compromise are detected, an alert of critical priority will be generated.
After policy configuration, Datto Endpoint Security management must be performed through Datto EDR/AV. Clicking Manage opens the list of policies in your instance of Datto EDR/AV in a new tab. Refer to the policies overview in the Datto EDR Help system.
The default configuration of the monitor can be modified by clicking Edit next to the alert details.The monitor type cannot be modified. To review the monitor settings, click View Details. Refer to Threat Detection monitor in Creating a monitor. 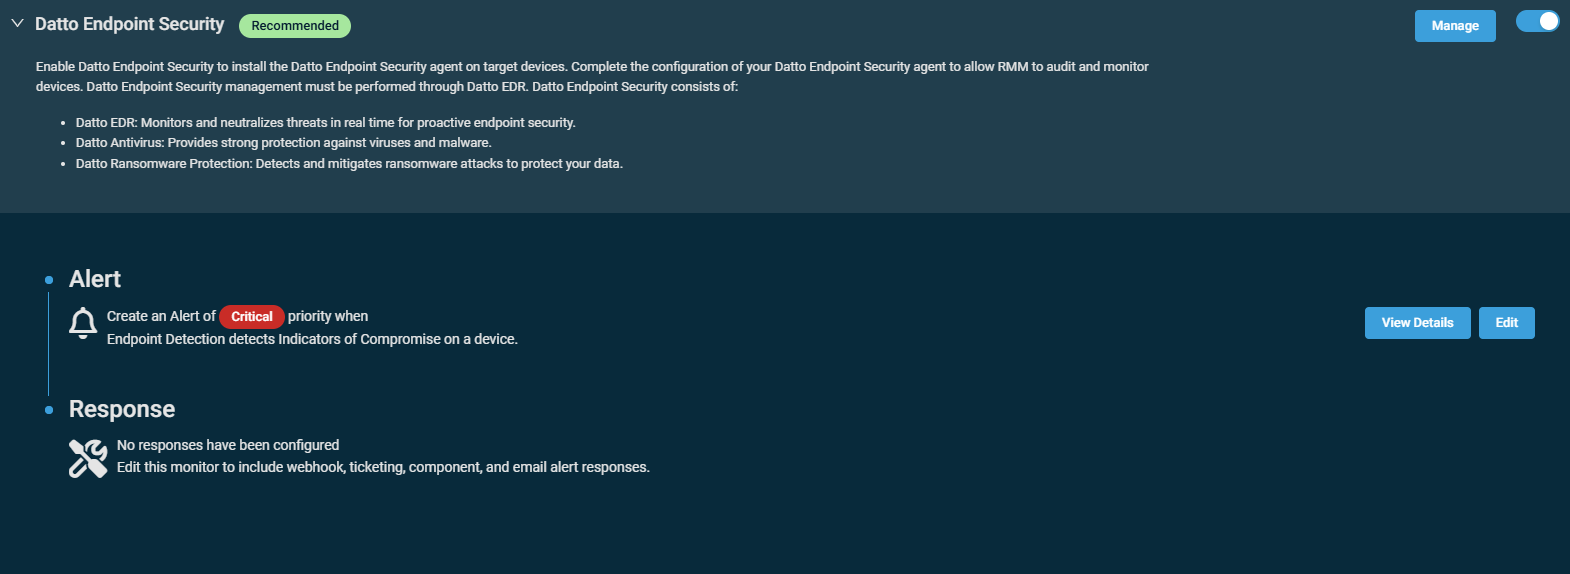
IMPORTANT Disabling an Endpoint Security policy or turning off the Datto Endpoint Security toggle in an Endpoint Security policy does not automatically uninstall Datto EDR. Refer to Disable the Datto Endpoint Security Integration in Datto RMM.
Supported operating system: Windows
NOTE This option is only available if standalone Ransomware Detection or Datto EDR is enabled for your Datto RMM account. Refer to Licenses.
NOTE The Ransomware monitor requires a license. Refer to Add Ransomware Detection licenses.
NOTE While it is best practice to use Ransomware Detection as part of an Endpoint Security policy, it is possible to have other Ransomware monitors targeting your endpoints both at the device level and as part of a Monitoring policy.
This tool will deploy the Datto RMM Ransomware Detection engine, which will start analyzing file activity on the targeted endpoints. Refer to Standalone Datto RMM Ransomware Detection. By default, when ransomware activity is detected in the system drive, the activity will be stopped, and an alert of moderate priority will be generated. If the issue stops occurring, the alert will be auto-resolved within one minute.
The default configuration of the monitor can be modified by clicking Edit next to the alert details.The monitor type cannot be modified. To review the monitor settings, click View Details. Refer to Ransomware monitor in Creating a monitor.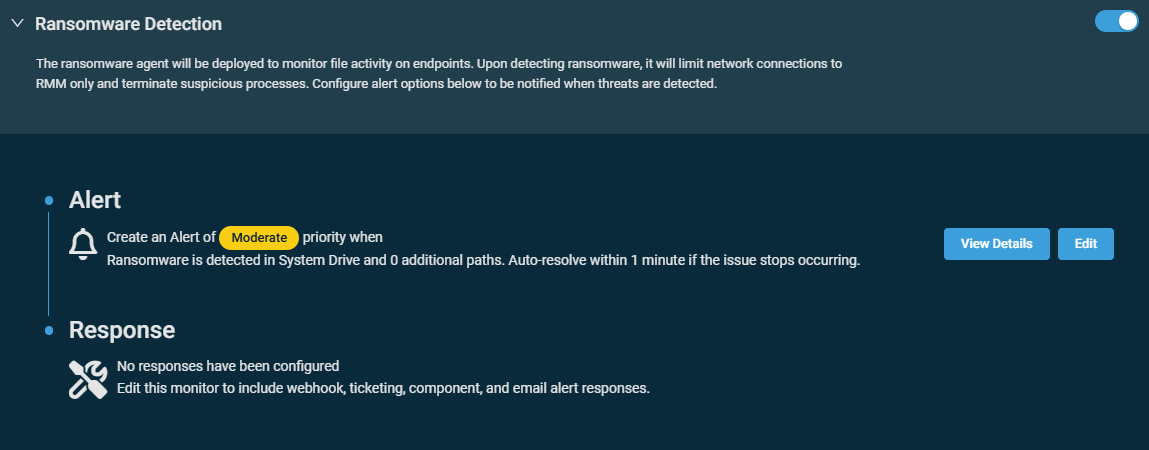
Supported operating system: Windows
NOTE Windows Defender must be enabled on the targeted devices for the Managed Windows Defender Antivirus configuration to take effect. The Windows Defender Antivirus monitor will enforce the configured settings, but it will not enable Windows Defender if it is not already enabled on a device.
Managed Windows Defender Antivirus allows you to conduct centralized management for the antimalware engine built into Windows OS. When threats are detected or when the engine is not compliant, an alert of moderate priority will be generated. If the issue stops occurring, the alert will be auto-resolved within one minute.
The default configuration of the monitor can be modified by clicking Edit next to the alert details.The monitor type cannot be modified. To review the monitor settings, click View Details. You can disable the monitor by clicking the toggle button next to Alert. Refer to Windows Defender Antivirus monitor in Creating a monitor.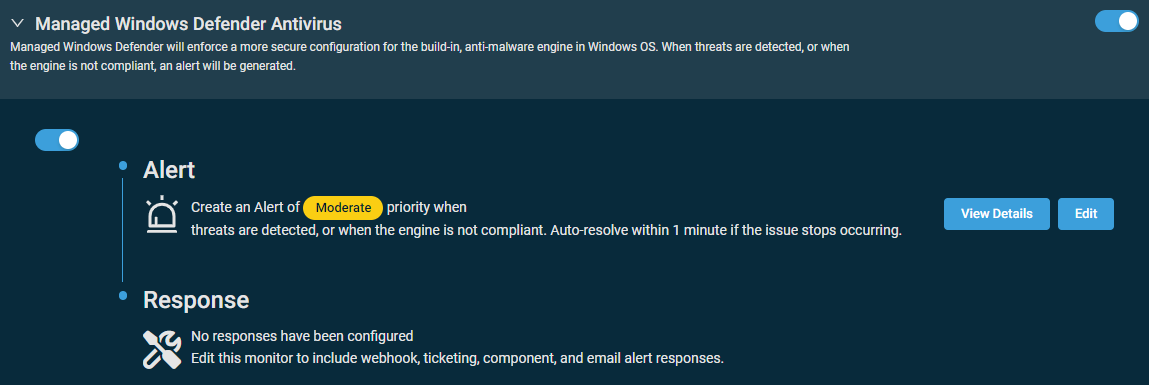
NOTE The Windows Defender Antivirus monitor is only supported on Windows 8.1 and above. On lower Windows versions, the Datto RMM Agent will not enforce any settings defined in the Endpoint Security policy and it will report back blank data.
You can also configure further settings most of which are not customizable in the front end in Windows. The screenshots below display the default configuration for Managed Windows Defender Antivirus. These settings are recommended as best practice by Datto RMM.
NOTE Some of the options listed below are enabled but not editable.
NOTE Real-time protection in Virus & threat protection settings in Windows cannot be turned off or on using an Endpoint Security policy.
User Experience
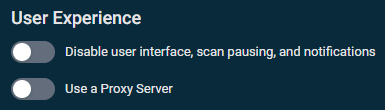
- Disable user interface, scan pausing, and notifications
- Use a Proxy Server
Protection

- Detection based on heuristics
- Cloud-delivered Protection
- Monitor file and program activity
- Network Inspection protocol recognition
- Behavior-based monitoring
- Microsoft Outlook protection
- Keep Defender Service alive in all circumstances
- Scan scripts that are used in Microsoft browsers
Scanning
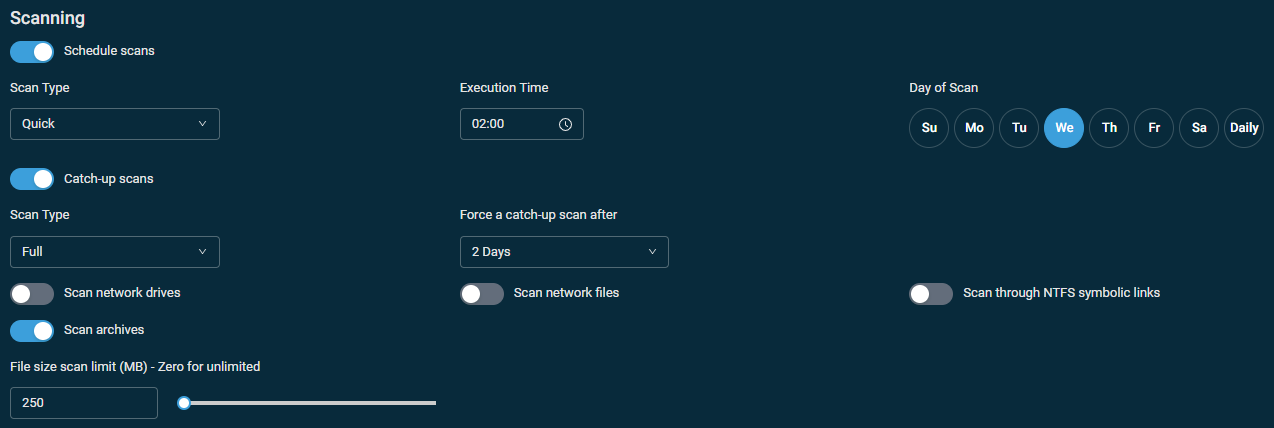
- Schedule scans: Select the scan type (Quick or Full), the execution time, and the day of the scan or a Daily scan.
- Catch-up scans: Select the scan type (Quick or Full) and when to force a catch-up scan (after 2-20 days).
- Scan network drives
- Scan network files
- Scan through NTFS symbolic links
- Scan archives
- File size scan limit (MB): Enter a number or use the slider to set a limit. When zero is set, the file size is unlimited.
Scanning Exclusions
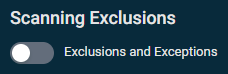
- Exclusions and Exceptions: Enable this to exclude processes, files, and/or folders from being scanned.
Defender Attack Surface Reduction

- Use advanced ransomware protection
- Block abuse of exploited or vulnerable signed drivers
- Block untrusted and unsigned processes running from USB
- Block advanced malware attack techniques
- Use advanced Office and Adobe Reader protection
Attack Surface Reduction Exclusions
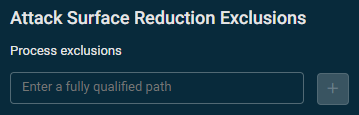
- Process exclusions: Enter a path to be excluded. To add another path, click the plus sign. To remove a path, click the minus sign.
When exclusions are defined here, the Datto RMM Agent will enforce them on the targeted device and remove any exclusions already set on the device.
NOTE If a device already has exclusions defined, leaving the Process exclusions field blank will not remove those exclusions. To remove those exclusions using an Endpoint Security policy, you must enter a path in the Process exclusions field (even if that path does not exist). If a device is no longer targeted by a Windows Defender Antivirus monitor, the exclusions set on the device will remain unchanged.
An ESXi policy allows you to apply one or more monitors to multiple ESXi devices to monitor their performance, datastore, temperature, and hardware status.
- In the Monitors section, click Add Monitor.
- In the Monitor Type section, click Select.
- In the Select a Monitor pane, use the search bar to search for a monitor type or scroll down in the list. Click Select to specify the monitor type.
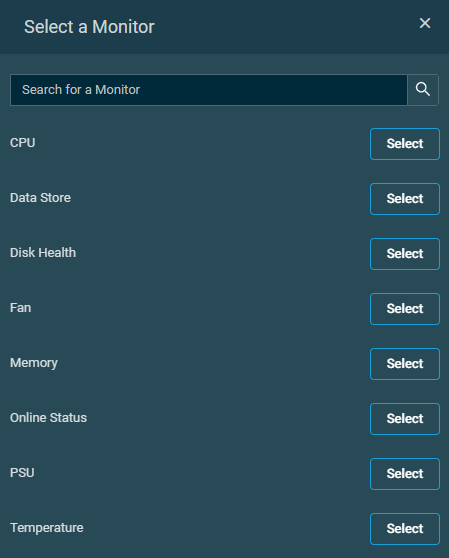
- Once the monitor type has been selected, you can configure the monitor criteria. To choose a different monitor type, click Change Monitor Type and modify your selection.
- Configure the monitor criteria. For information on all available monitor types, refer to Alert details per monitor type and Response details.
- Once you have configured the monitor details, click Add Monitor.
- To add further monitors to the policy, repeat the steps above. To review the details of a monitor, click its description. Refer to Viewing monitor details. To delete a monitor, click the delete icon
 .
.
A Maintenance policy allows you to pause monitoring while doing scheduled maintenance work on your devices. Pausing monitoring lets you prevent false alerts, for example, during a backup.
During a maintenance window, the following actions will be taken if an alert condition is met:
- Monitors will be able to raise alerts; however, these alerts will not be listed as open alerts. You can only view them when selecting All from the Status column in a list of alerts. Refer to Alerts. Alerts raised by webhooks will also be suppressed.
- Monitors will not create tickets or send email notifications; however, response components will be executed as normal.
- Alerts that have not resolved during the maintenance window will become active and be listed under Open Alerts. Tickets and email notifications will be created and sent from this alert.
NOTE Alerts remain open if auto-resolution criteria are still pending, even if the conditions that raised the alert have resolved.
When configuring the policy, the calendar view in the Schedule > Recurrence section provides a visual indicator of when the maintenance window will occur according to the selected schedule.
| Field | Option | Description |
|---|---|---|
| Recurrence |
At selected date and time |
The policy will run once on the date and at the time specified in the Start date and execution time section. |
|
Daily |
The policy will run every day starting from the date and time specified in the Start date and execution time section. | |
|
Weekly |
The policy will run every week starting from the date and time specified in the Start date and execution time section. In the This Policy will run on these days section, select the days on which the policy should run. Clicking a second time will clear the selected day. | |
|
Monthly |
The policy will run in the selected months starting from the date and time specified in the Start date and execution time section. In the This Policy will run in these months section, select the months in which the policy should run. Clicking a second time will clear the selected month. In the On these days section, enter the days of the month (1-31) on which the policy should run, separating each day by a comma (for example: 1, 2, 3-7), and click Add. Once added, the days will be listed below this field and can be removed by clicking the X next to the day you wish to remove. | |
|
Monthly day of week |
The policy will run in the selected months on the specified occurrence of the selected days of the week starting from the date and time specified in the Start date and execution time section. Clicking a second time will clear the selected option. | |
| Duration |
Hour/minutes |
Specify the duration of the maintenance window (0-24 hours, 0-59 minutes). |
Once a device has been placed into maintenance mode, an icon is displayed next to the device name at the top of the device summary page. For more information, refer to Maintenance mode status indicator.
NOTE You can create a maintenance mode widget to see all devices currently in maintenance. Refer to Devices Under Maintenance.
A few things to note
- Changes made to a Maintenance policy while it is running or within 15 minutes of the start of a maintenance window will only take effect at the next run. For example, if you are creating a new Maintenance policy with a daily schedule, and the start date and execution time is set to 10 minutes from now, the first run time will only occur on the following day.
- You can end a scheduled maintenance mode window by updating the associated Maintenance policy so that it no longer targets the device. Refer to Editing a policy.
- You can also end a maintenance mode window on the device summary page or on a device list page. Refer to Ending a maintenance mode window.
A Monitoring policy allows you to apply one or more monitors to multiple devices.
- In the Monitors section, click Add Monitor.
- In the Monitor Type section, click Select.
- In the Select a Monitor pane, use the search bar to search for a monitor type or scroll down in the list. Click Select to specify the monitor type.

- Once the monitor type has been selected, you can configure the monitor criteria. To choose a different monitor type, click Change Monitor Type and modify your selection.
- Configure the monitor criteria. For information on all available monitor types, refer to Alert details per monitor type and Response details.
- Once you have configured the monitor details, click Add Monitor.
- To add further monitors to the policy, repeat the steps above. To review the details of a monitor, click its description. Refer to Viewing monitor details. To delete a monitor, click the delete icon .
NOTE Datto also offers best practice Monitoring policies. For more information, refer to Download a ComStore policy.
Exporting a Monitoring policy allows you to share the file with other users who can then import the policy into their own Datto RMM account. Refer to Importing a Monitoring policy.
An exported Monitoring policy includes the targets (limited to the Default Device Filters provided by Datto RMM) and the configured monitors' alert details (everything configured in the Alert section). However, it does not include any custom configuration in the monitors' Response section. When an exported Monitoring policy is imported, the policy's scope will be set to Global by default.
The following monitor types cannot be exported:
- Antivirus Status monitor
- Component monitor
- Datto Continuity monitor
To export a Monitoring policy, follow these steps:
- Open a Monitoring policy by following one of the navigation paths described in Security and navigation.
- Click Export.
- The policy will be saved as a .pcy file.
If an exported Monitoring policy (.pcy file) has been shared with you, you can import it into your own Datto RMM account. For export instructions and details, refer to Exporting a Monitoring policy.
To import a Monitoring policy, follow these steps:
- Navigate to any Policies page by following one of the navigation paths described in Security and navigation.
- Click Import.
- Select the .pcy file saved on your device.
- The imported policy will open in the edit page with the Global scope by default. You can edit all policy details except for the policy type. Refer to Creating a policy.
For general information about Patch Management for Windows devices in Datto RMM, including determining a device's patch status, patch reporting, and more, refer to Patch Management.
NOTE Patch Management support for macOS devices is available via the ComStore component Install Updates with SUPER [MAC]. For more information, refer to macOS Patch Management.
All new accounts are provisioned with a default Patch Management policy that can be found in Policies > Patch Management > Default Windows Patching policy. It is configured the following way:
| Field | Description |
|---|---|
| Name | Default Windows Patching policy |
| Scope | Global |
| Type | Patch Management |
| Schedule | Audit only |
| Power | Do not restart |
| Approval | Approve patches that match the following criteria: • Category > contains > Security updates or Update rollups or Critical updates or Definition updates |
| Targets | • Default Device Filter: All Windows Desktops • Default Device Filter: All Windows Servers |
| Enabled | Enabled |
| Disable Sites | All sites are enabled. |
| Disable Devices | All devices are enabled. |
You can create another Patch Management policy or modify the default one by following the steps below.
With a Patch Management policy, you are pre-approving patches to be installed on your Windows devices on an ongoing basis as per the conditions you define. A Patch Management policy can not only manage the patches made available in Windows Update, but it also gives you more control, lowers your workload, and increases the security of your devices.
You can set up a global or site-level policy that can target multiple devices. You can define conditions such as the patch window and patch approval rules. You can also create a Patch Management policy for audit purposes only, and apply site-level overriding of global policy options.
IMPORTANT Only Windows Managed Agents support Patch Management. Refer to Managed and OnDemand Agents.
TIP We recommend that you create at least two Patch Management policies: one for workstations and one for servers.
NOTE Patch Management support for macOS devices is available via the ComStore component Install Updates with SUPER [MAC]. For more information, refer to macOS Patch Management.
To ensure that a device only receives updates that you have approved, we recommend that you do the following:
- Target the device with a Windows Update policy and select Turn off automatic updates in the Update options section.
- Target the device with a Patch Management policy as well and specify the patches you want to approve.
To create a Patch Management policy, refer to Schedule, Power, and Approval.
To learn how to override global policies for a specific site, refer to Overriding a global Patch Management policy at the site level.
NOTE While multiple Patch Management policies can target the same device or group of devices to support different scheduling needs, it is important that the patch approval criteria remain consistent across all policies, otherwise it can lead to undesirable behavior regarding approved patch statuses and installation on individual devices.
Schedule
Select one of the following options:
- Schedule: Selected by default. When configuring the policy, the calendar view in the Schedule > Recurrence section provides a visual indicator of when the Patch Management policy will run according to the selected schedule. The policy will run at the local time zone of the targeted devices.
NOTE Only Patch Management policies will always use the local time zone of the targeted device. All other scheduled tasks use the time zone defined in Account Settings by default.
| Field | Option | Description |
|---|---|---|
| Recurrence |
At selected date and time |
The policy will run once on the date and at the time specified in the Start date and execution time section. |
|
Daily |
The policy will run every day starting from the date and time specified in the Start date and execution time section. | |
|
Weekly |
The policy will run every week starting from the date and time specified in the Start date and execution time section. In the This Policy will run on these days section, select the days on which the policy should run. Clicking a second time will clear the selected day. | |
|
Monthly |
The policy will run in the selected months starting from the date and time specified in the Start date and execution time section. In the This Policy will run in these months section, select the months in which the policy should run. Clicking a second time will clear the selected month. In the On these days section, enter the days of the month (1-31) on which the policy should run, separating each day by a comma (for example: 1, 2, 3-7), and click Add. Once added, the days will be listed below this field and can be removed by clicking the X next to the day you wish to remove. | |
|
Monthly day of week |
The policy will run in the selected months on the specified occurrence of the selected days of the week starting from the date and time specified in the Start date and execution time section. Clicking a second time will clear the selected option. | |
| Install updates for |
1-24 hours |
Specify the duration of the policy (1-24 hours). If this time window is overrun, the targeted device will stop installing patches once the ongoing operation has completed. EXAMPLE If patches 1-10 should be installed on a device but the set time limit is reached while the installation of patch 6 is still in progress, patch 6 will be installed on the device but patch 7 will not. Patch 7 will resume during the next scheduled policy run. |
| Monitoring Maintenance Window | Turn on the toggle to enable maintenance mode on targeted devices for the duration of the patch window, or when the device finishes patching, whichever comes first. Enabling this will suppress unnecessary alert generation and creation of tickets during this time. For an explanation of monitoring maintenance mode windows, refer to Create a Maintenance Mode Window in Device summary. | |
NOTE Time zones will be taken into account at run times. For example, if the policy is set to run at midnight and it is applied to two devices in different time zones, one UTC and one PST, then the policy will run at midnight UTC on the UTC device and at midnight PST on the PST device. The policy cannot be scheduled to run at a time that has already passed in all time zones.
- Audit only: Select this option to use the policy for audit purposes only. This will allow you to see missing patches on your devices without the ability to (unintentionally) run the policy on them.
Power
Select any of the following options:
| Option | Description |
|---|---|
| Wake devices for scheduled updates | Select this option to wake the targeted devices before the policy is due to start. You must have a Network Node device in the same site as your targeted devices to use this feature. If multiple Network Nodes are nominated, all will send requests. Be aware that Wake-on-LAN must be enabled in BIOS/EFI and it typically only works for laptops when they have an active mains connection. For more information, refer to the Network Node field in the Summary card. NOTE Network Nodes will receive Patch Management policy definitions which have the option enabled to wake devices before patching if the devices targeted by the policy are in the same site as the Network Node. This will not be shown in the web interface but will be evident in log files. |
| Shut down | Shuts down the targeted devices after installing the updates. |
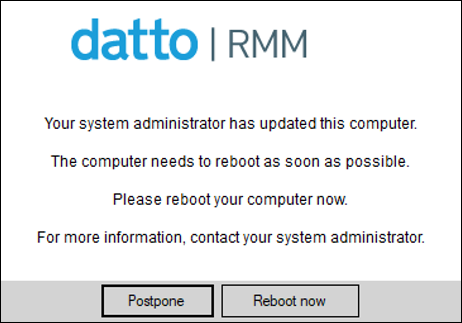
| Restart | Restarts the targeted devices, if required, after installing the updates. When this option is selected, the following additional option will become available:
NOTE Leave the Allow devices to start if a USB mass storage device is connected option unchecked if you want to prevent servers from rebooting into a LiveUSB. NOTE Selecting Restart may reboot targeted devices multiple times in a patch window, as some patches will require a reboot before continuing further updates. |
| Do not restart | Selected by default. Does not restart the targeted devices after installing the updates. When this option is selected, the following additional option will become available:
When the Display a restart reminder to users option is selected, the following additional option will become available:
|
Approval
You can configure the following options:
- Approve patches that match the following criteria: Allows you to configure filters to automatically approve patches. Refer to Patch filter criteria.
These filters can be overridden by the Do not approve patches that match the following criteria and the Manual approval options below. - Do not approve patches that match the following criteria: Allows you to configure filters to automatically deny patches. Refer to Patch filter criteria.
These filters take precedence over your approval filters above. For example, configurations such as “Approve critical security patches but do not approve critical security patches with ‘Defender’ in the title” are entirely possible.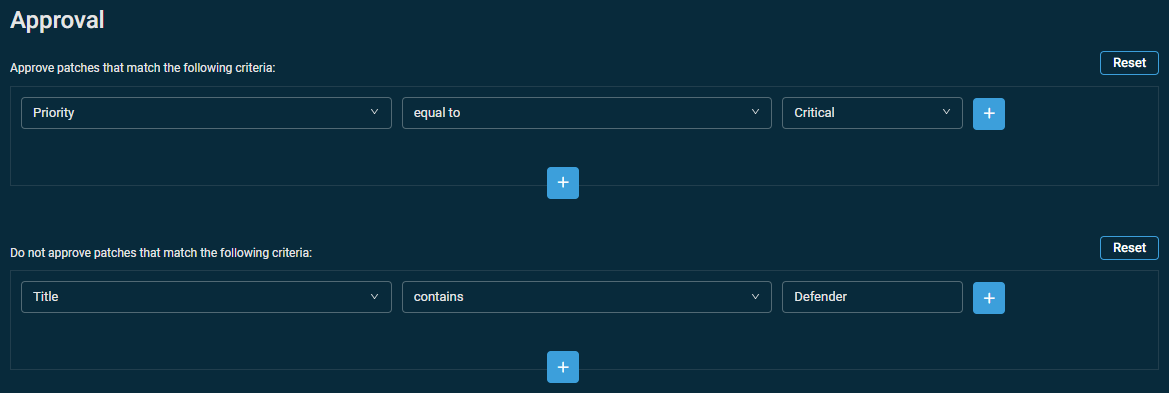
These filters can be overridden by the Manual approval option below. - Manual approval: Allows you to configure individual patches regardless of any previous filters. Refer to Manual approval.
The Approve patches that match the following criteria and Do not approve patches that match the following criteria sections can be configured based on the following filter criteria:
| Criterion | Restriction | Value |
|---|---|---|
| All | Not applicable.Selecting the All criterion will include all patches. | |
| Category | Select one of the following options: • contains • does not contain • is empty • is not empty • begins with • does not begin with • ends with • does not end with |
If applicable, select one of the following options:
NOTE When using the does not contain criterion in the Restriction column, the is empty criterion is implicitly included. Refer to A note on the "does not contain" criterion. |
| Description | Select one of the following options: • contains • does not contain • is empty • is not empty • begins with • does not begin with • ends with • does not end with |
If applicable, enter a value. You can use the % symbol as a wildcard character. All searches are case-insensitive. NOTE When using the does not contain criterion in the Restriction column, the is empty criterion is implicitly included. Refer to A note on the "does not contain" criterion. |
| Max Size | Select one of the following options: • less than • less or equal to • equal to • greater or equal to • greater than • between |
Enter a value. Use G (gigabytes), M (megabytes), K (kilobytes), or exact number for bytes. For example: 4G, 21M, 4K, or 435. For the between option, enter a minimum and a maximum value. NOTE You can enter whole and decimal numbers and the byte unit can be lower or upper case (for example, 4G or 3.5g). Decimal numbers without any byte unit will be rounded down to the nearest whole number and treated as bytes (for example, 1.5 will be treated as 1 byte). |
| KB Article | Select one of the following options: • contains • does not contain • is empty • is not empty • begins with • does not begin with • ends with • does not end with |
If applicable, enter a value. You can use the % symbol as a wildcard character. All searches are case-insensitive. NOTE A KB number is a Microsoft Knowledge Base article number that is associated with the patch. NOTE When using the does not contain criterion in the Restriction column, the is empty criterion is implicitly included. Refer to A note on the "does not contain" criterion. |
| Severity | Select one of the following options: • less than • less or equal to • equal to • greater or equal to • greater than • between |
Select one of the following options:
NOTE Severity refers to Microsoft Security Response Center (MSRC) severity as specified in Microsoft Security Bulletins. Datto RMM Patch Management policies reference Security Bulletin classifications, not the severity specified by Windows Update. Refer to About Microsoft Update classifications. |
| Require Reboot | Select one of the following options: • less than • less or equal to • equal to • greater or equal to • greater than • between |
Select one of the following options:
For the between option in the Restriction column, select two values. NOTE This filter allows you to avoid installing updates that require a reboot during business hours. |
| Release date | Select one of the following options: • before • after • older than 7 days • older than 14 days • older than 30 days • older than 60 days • older than 90 days |
If applicable, select a date from the calendar. |
| Request user input | Not applicable. |
Select one of the following options:
NOTE If you filter for patches that require user input, schedule them to install during business hours. |
| Title | Select one of the following options: • contains • does not contain • is empty • is not empty • begins with • does not begin with • ends with • does not end with |
If applicable, enter a value. You can use the % symbol as a wildcard character. All searches are case-insensitive. NOTE When using the does not contain criterion in the Restriction column, the is empty criterion is implicitly included. Refer to A note on the "does not contain" criterion. |
| Type | Not applicable. |
Select one of the following options:
|
Adding multiple criteria
- Configure a patch filter criterion.
- Click the plus icon below the configured criterion.

- Select the AND or OR operator and configure another criterion.
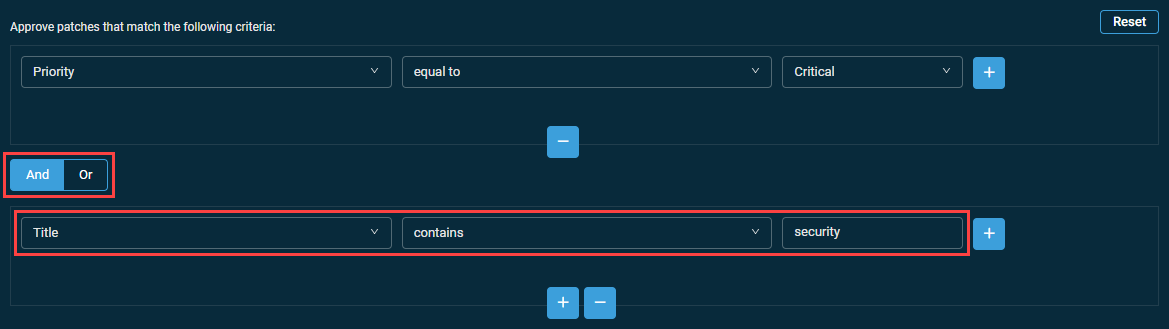
NOTE If both conditions must be true for the patch to be included in the search results, select AND. If either one must be true, select OR.
- When you add additional criteria, you cannot combine AND and OR. The selection you made first is repeated for any subsequent criterion.
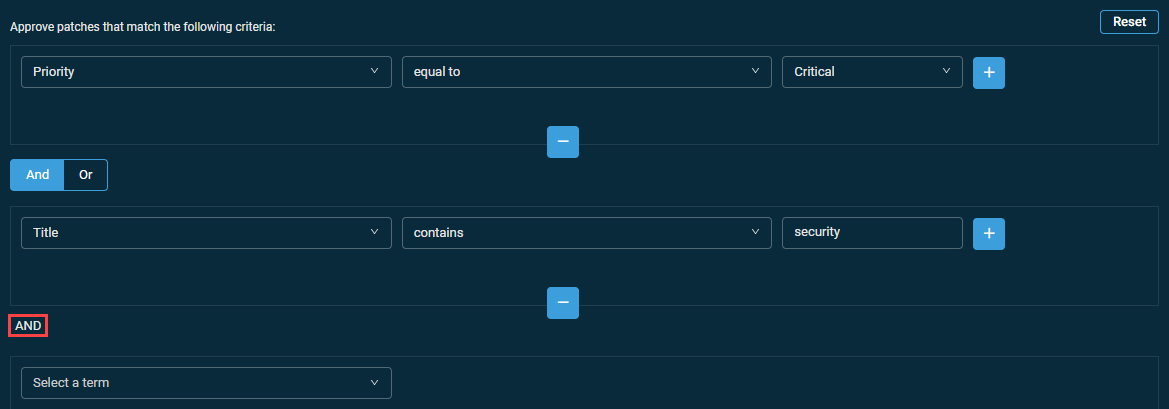
Adding sub-criteria
- Configure a patch filter criterion.
- Click the plus icon next to the configured criterion.

- Select the AND or OR operator and configure another criterion.

- When you add additional criteria, you cannot combine AND and OR. The selection you made first is repeated for any subsequent criterion.
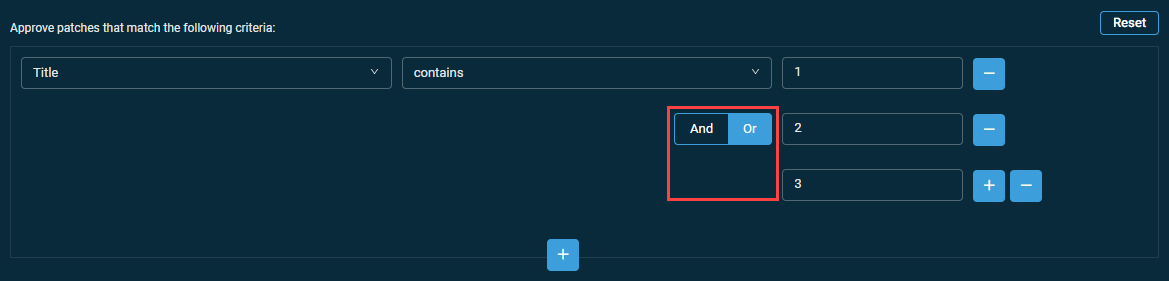
NOTE Standard SQL dictates that positive sub-criterion queries (for example, "Title contains 1", "Title contains 2", "Title contains 3") need to be grouped with OR. For example, "Title contains 1 OR 2 OR 3" will return patches whose title contains either 1 or 2 or 3.
Negative sub-criterion queries (for example, "Title does not contain 1", "Title does not contain 2", "Title does not contain 3") need to be grouped with AND. For example, "Title does not contain 1 AND 2 AND 3" will only return patches whose title contains neither 1 nor 2 or 3.
Removing one or more criteria
To remove any of the criteria, click the minus icon below or next to the criterion. To remove all criteria in either the Approve patches that match the following criteria or the Do not approve patches that match the following criteria section, click the Reset button.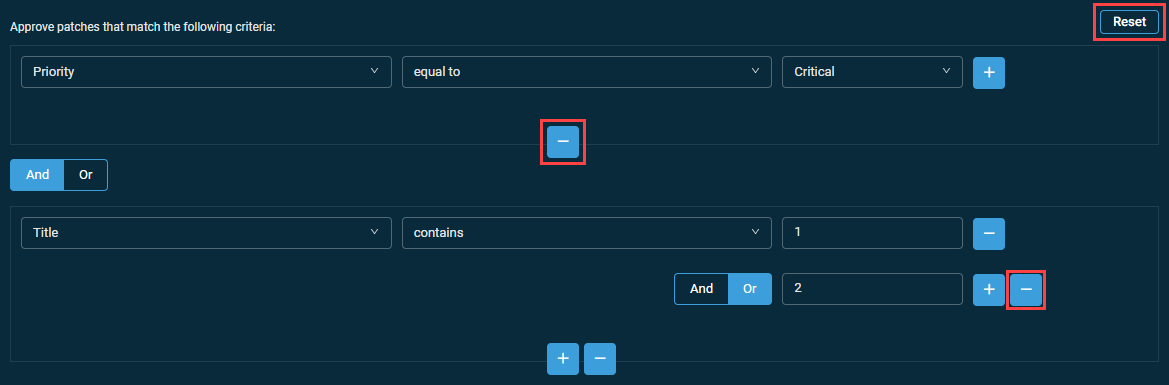
This section allows you to configure individual patches regardless of any previous filters configured in the Approval section (Approve patches that match the following criteria and Do not approve patches that match the following criteria). Refer to Approval. The patches listed in this table for manual approval will not change based on filters configured in the Approval section. This section is designed to allow you to manually approve any patches that may not meet the criteria for any of the filters configured in the Approval section.
When editing a Patch Management policy, this section displays the following patch lists, in separate tabs:
- Available: Lists all patches available for install, collected from the audit data of all of the devices in the account. You can approve or deny patches.
- Approved: Lists all patches that have been approved through the Available list. You can move patches back to the Available list or deny them.
- Not approved: Lists all patches that have been denied through the Available or the Approved list. You can move patches back to the Available list or approve them.
The table displays the following information when creating or editing a Patch Management policy:
| Field | Sortable? | Description |
|---|---|---|
| Title |
|
The title of the patch. To narrow the list, click the filter icon  , enter a term, and click Apply. To see the full list, click Reset. , enter a term, and click Apply. To see the full list, click Reset. |
| Release Date |
|
Displays when the patch was released. |
| Severity |
|
Displays the priority of the patch as specified in Microsoft Security Bulletins. Refer to About Microsoft Update classifications. Click the filter icon and click Critical, Important, Moderate, Low, or Unspecified to filter by the priority of the patch. |
| Max Size |
|
Displays the maximum size of the patch, per Microsoft. NOTE While we show the maximum patch size, this is the size the patch could reach in an absolute worst case scenario, such as a device not having any of the previous updates leading up to that version of the patch. Because of this, in most cases, the actual download size of the patch will be less, sometimes much less, than the Max Size. |
| Require Reboot |
|
Displays if a reboot is required after the patch installation. Click the filter icon and click Yes or No. To see the full list of patches, click All. |
| Require User Input |
|
Displays if user input is required during the patch installation. Click the filter icon and click Yes or No. To see the full list of patches, click All. |
| KB Article |
|
Displays a Microsoft Knowledge Base article number that is associated with the patch. Click the number to open the associated article in a new tab. To narrow the list, click the filter icon , enter all or part of an article number, and click Apply. To see the full list, click Reset. |
| Manual Override |
|
Displays the individual override status of the patch. If the patch approval has been overridden at the device level, this field shows Yes. Otherwise, this field shows No. |

The table density is set to condensed theme by default. To change it to relaxed theme, click the density toggle icon.  The selection will persist across all pages.
The number of results displayed can be specified by selecting the desired number from the pagination control. This selection will persist the next time the page is accessed.
Action buttons
The action buttons are unavailable if no row is selected or if the action is not applicable to the selected rows. The check boxes allow you to select one or more rows. Select all rows shown on the page by selecting the check box in the table header. To access all action buttons, click the Row Actions icon. The table below lists all available action buttons.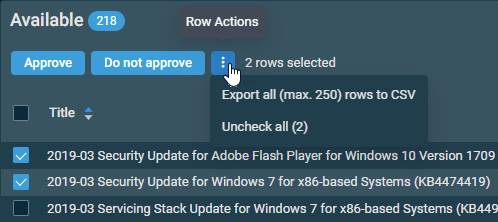
| Action Button | Description |
|---|---|
| Approve | Approves the patch and moves it to the Approved list from either the Available or the Not approved list. |
| Do Not Approve | Denies the patch and moves it to the Not approved list from either the Available or the Approved list. |
| Make Available | Moves the patch back to the Available list from either the Approved or the Not approved list. |
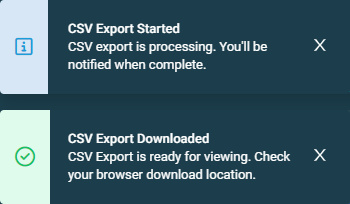
| Export All (Max. 250) Rows to CSV | This action button is available only if all rows have been selected across all pages in the table. In the confirmation dialog box that appears, click Confirm to download the file or Cancel to close out of the dialog box. Pop-up notifications will inform you of the start and completion of the CSV export action. Click the X to close the notification; otherwise, the notification will automatically be cleared after five minutes. Any column selections, filters, and sorting that have been applied to the table will also be applied in the CSV file. |
| Uncheck All | Clears all selected rows. The number of selected rows is indicated next to the Row Actions icon. |
Overriding a global Patch Management policy at the site level
Global Patch Management policies can be overridden at the site level to change only the most necessary settings of the policy for a smaller subset of devices without modifying the global policy.
- Navigate to the list of policies. Refer to List of policies.
- Select the check box next to the global Patch Management policy and click Override. Refer to Override. The edit page will open.
Alternatively, click the name of the global Patch Management policy to open the edit page, and click Override on the edit page.
Refer to Editing a policy. - In the Scope section, specify the site for which you want to override the policy. Refer to Scope.
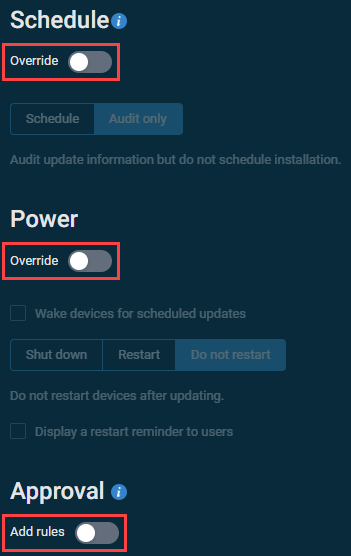
- To override a section of the policy, the Override toggle can be enabled in the Schedule and/or Power sections, and the Add rules toggle can be enabled in the Approval section, as needed. Refer to Schedule, Power, and Approval.
Patching at the device level
Using the Patch Now action button, you can patch one or multiple devices outside of the schedule configured in a Patch Management policy. Refer to Patch Now on the device summary page and Patch Now in device lists.
For general information about Software Management in Datto RMM, including the supported applications and operating systems, security level permissions, Software Management status, software compliance reporting, and more, refer to Software Management.
If Advanced Software Management is active for the Datto RMM account, an Advanced Software section is available for configuration in a Software Management policy. While Datto RMM's standard Software Management functionality updates key applications, the Advanced Software Management module integrates an expanded library of software applications and enables both installation and uninstallation via a Software Management policy. Refer to Advanced Software.
For an overview of Advanced Software Management, refer to Advanced Software Management.
All new accounts are provisioned with a default Software Management policy that can be found in Policies > Software Management > Default Software Management Policy. It is configured the following way:
| Field | Description |
|---|---|
| Name | Default Software Management Policy |
| Scope | Global |
| Type | Software Management |
| Timing | Immediately On Detection |
| Managed Applications | All Actions are set to Unmanaged. |
| Targets |
|
| Enabled | Enabled |
| Disable Sites | All sites are enabled. |
| Disable Devices | All devices are enabled. |
You can create another Software Management policy or modify the default one by following the steps below.
A Software Management policy allows you to configure third-party software application updates and define when those updates should be installed.
Once a policy is configured, you can create a Software Management Status widget to have an overview of the software compliance status of your devices. Refer to Software Management Status.
You can also use the Software Management pages at the global and site levels and the Software card at the device level. Refer to Software Management.
IMPORTANT Multiple global (account-level) and site-level Software Management policies can be enabled at a time, but only one Software Management policy can be enabled per device at a time. If an additional Software Management policy is configured to target a device that already has a Software Management policy enabled, the additional policy will be automatically disabled at the device level. You can change the Software Management policy enabled on a device in the Software card on the Device summary page.
NOTE The third-party software applications you want to manage through a Software Management policy do not have to be downloaded from the ComStore. A Software Management policy can be configured independently of what's already present in your Component Library.
To create a Software Management policy, configure the following settings:
Timing
Select one of the following options:
- Immediately On Detection: An application update will be installed as soon as the Agent detects that an update is ready after the device completes an audit.
- Schedule: The Agent checks hourly for updates, and installs software updates on a scheduled basis. The calendar view in the Schedule > Recurrence section provides a visual indicator of when software updates will occur according to the selected schedule. The policy will run at the local time zone of the targeted devices.
NOTE Time zones will be taken into account at run times. For example, if the policy is set to run at midnight and it is applied to two devices in different time zones, one UTC and one PST, then the policy will run at midnight UTC on the UTC device and at midnight PST on the PST device. The policy cannot be scheduled to run at a time that has already passed in all time zones.
Software
NOTE For a list of applications supported through standard Software Management, refer to Supported software applications and operating systems. If using Advanced Software Management, refer to Advanced Software Management application catalog for the expanded list of available applications.
In the Action column, select the installation/update behavior to apply to each application. To apply the same action to all added applications, select the action from the Apply to all rows drop-down menu.
Advanced Software
BEFORE YOU BEGIN To unlock this section, Advanced Software Management must be activated for the Datto RMM account. Refer to Advanced Software Management and Add Advanced Software Management licenses.
If Advanced Software Management is active for the Datto RMM account and the Advanced Software section appears in the policy, the configuration is affected as follows:
• All available standard software applications are visible and can continue to be managed through standard Software Management via the Software section. Refer to the preceding section in this topic (Software).
• If an application in the Software section is set to any action other than Unmanaged, and you subsequently add that application to the Advanced Software section, the matching application in the Software section will be automatically reset to Unmanaged. As a result, that application will be managed through Advanced Software Management.
• If matching applications are added to both the Software section and Advanced Software section, and you subsequently change the action for that application to anything other than Unmanaged in the Software section, the matching application in the Advanced Software section will be automatically removed. As a result, that application will be managed through standard Software Management.
• By design, it is not possible to manage an application through both standard Software Management and Advanced Software Management in a single policy.
• Whether Advanced Software Management is active or inactive, existing policies will continue to work as originally configured.
Click Add Software to open the list of available software on the right side of the page.
NOTE For information about these applications and the tier-based software update system, refer to Advanced Software Management application catalog.
Click Add next to each application you wish to manage through this policy.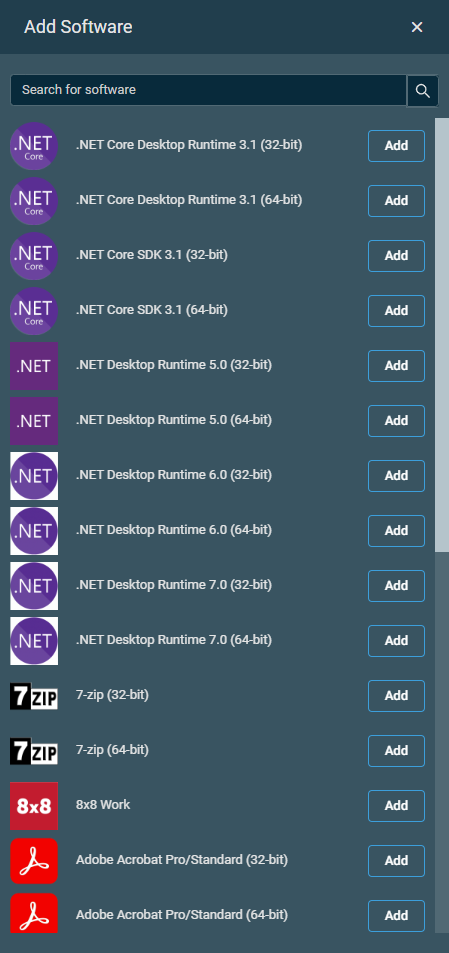
If you add an application to the Advanced Software section that already exists in the standard Software section, the application will be automatically removed from the Software section, as it will be managed through Advanced Software Management.
NOTE Advanced Software Management supports only Windows devices. If any macOS devices are targeted in the policy, applications in the standard Software section that can be managed on macOS will be used for the macOS devices, even if those applications are also added to the Advanced Software section. The advanced software will be used for any targeted Windows devices. The advanced software will be displayed on the Software Management page and in the Software card on the device summary page. The action selected in the Advanced Software section is applied, but the Uninstall action is not supported for macOS devices, as the standard software applications are used for macOS.
NOTE If a software application that supports only 32-bit architecture systems is added, Advanced Software Management will skip scanning targeted 64-bit systems.
To remove an advanced application you do not wish to manage through this policy, click the delete icon . To add more applications, click Add Software.
In the Action column, select the installation/uninstallation/update behavior to apply to each application. To apply the same action to all added applications, select the action from the Apply to all rows drop-down menu.
When Windows Update is enabled on a device, you allow Microsoft to take control of update installations. A Windows Update policy in Datto RMM allows you not only to manage the settings of Windows Update but also to control the installation of updates.
NOTE The Windows Update service gets restarted when a Windows Update policy is running. However, if patches are being installed via a Patch Management policy at the same time, the Windows Update service will not be restarted, and this will be noted in the Agent logs. If an audit is in progress while a Windows Update policy is running, the Windows Update service will wait for the audit to finish before restarting. This occurs in incremental periods (30, 60, 90, 120, 150, and 180 seconds; that is, a total of 10.5 minutes). If the audit does not complete within this period, the Windows Update service will not be restarted, and this will be noted in the Agent logs. The Windows Update service will be restarted at the next Windows Update policy run time, and all recent changes will then be applied to the targeted devices.
IMPORTANT Removal or disabling of a Windows Update policy does not revert targeted devices back to their original configuration. If different settings need to be applied to targeted devices before off-boarding from a Windows Update policy, update the policy to reflect how you want the devices to be configured after being removed from the policy, and ensure the policy has applied before off-boarding.
NOTE Patch Management support for macOS devices is available via the ComStore component Install Updates with SUPER [MAC]. For more information, refer to macOS Patch Management.
For step-by-step recommendations, refer to Step 1: Configuring a Windows Update policy in Best practices for Patch Management.
Update options
Select one of the following options:
| Option | Description |
|---|---|
| Automatically detect recommended updates for my computer and install them | When any of these options is selected, the Legacy (Windows 7 / Server 2008 R2 or below) section with additional options will become available further below. |
| Download updates for me, but let me choose when to install them | |
| Notify me of updates, but do not automatically install them | |
| Turn off automatic updates | Selected by default. Disables automatic updates via Windows Update. |
Disabling Windows updates
To ensure that a device only receives updates that you have approved, we recommend that you do the following:
- Target the device with a Windows Update policy and select Turn off automatic updates in the Update options section.
- Target the device with a Patch Management policy as well and specify the patches you want to approve. Refer to Patch Management policy.
IMPORTANT Windows updates cannot be disabled on devices running Windows 10 build 1909 and below; however, you can configure various aspects of the updates. Refer to Windows as a service (Windows 10 / Server 2016 or above).
For more information about Windows as a service and Datto RMM Patch Management, refer to Patch Management and Windows as a service.
Universal (all Windows versions)
These settings apply to all Windows versions. The screenshot below shows the default settings.
Select any of the following options:
| Option | Description |
|---|---|
| Receive updates for other Microsoft products when Windows is updated | Selected by default. NOTE When this option is selected and applied in the policy, the change will not be visible in the Windows UI; however, the status can be queried by running |
| Configure Windows Server Update Services (WSUS) settings | If you have set up a Windows Server Update Services (WSUS) server, it will act as a central location for other Windows devices to pull updates from rather than each device downloading Windows updates separately. Essentially, the server acts like a local cache, but only for Windows patches. When this option is selected, the following additional options will become available:
NOTE The WSUS server specified will be defined as registry key values for both WUServer and WUStatusServer in HKLM\Software\Policies\Microsoft\Windows\WindowsUpdate\ |


Windows as a service (Windows 10 / Server 2016 or above)
These settings apply to devices adopting the Windows as a service model (for example, Windows 10). The screenshot below shows the default settings.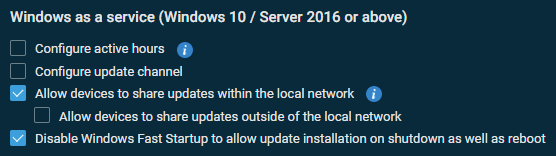
Select any of the following options:
| Option | Description |
|---|---|
| Configure active hours | When this option is selected, you can specify when active hours should start (00:00-23:00 hours) and for how long they should last (1-18 hours).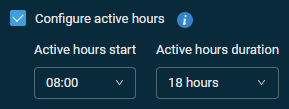 NOTE This setting only applies if using any update option other than Turn off automatic updates. NOTE If a Patch Management policy is set to restart devices in the power settings, then devices will reboot if required after patching, regardless of active hours settings. |
| Configure update channel |
When this option is selected, device telemetry will be enabled and the following additional options will become available:
When the Semi-Annual Channel option is selected, the following additional options will become available:
When any of the deferral options is selected, the following additional options will become available:
NOTE If you choose the Defer for a time as close as possible to (0-365) days option, Datto RMM will defer to what the device's Windows version permits. Different versions of Windows have different maximum values. For example, if you enter 35 days but the device's Windows version only supports 28, the update will be deferred to 28 days. NOTE Security Updates fall under quality updates. |
| Allow devices to share updates within the local network |
Selected by default. Peer sharing can significantly reduce the amount of bandwith consumed for downloading updates.
|
| Disable Windows Fast Startup to allow update installation on shutdown as well as reboot | Selected by default. When this option is selected, updates will be installed on both shutdown and reboot (instead of only on reboot). |


Legacy (Windows 7 / Server 2008 R2 or below)
This section is only available if one of the following options has been selected in the Update options section above: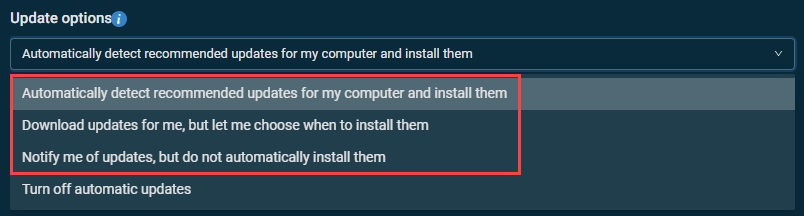
- Automatically detect recommended updates for my computer and install them
- Download updates for me, but let me choose when to install them
- Notify me of updates, but do not automatically install them
The screenshot below shows the default settings.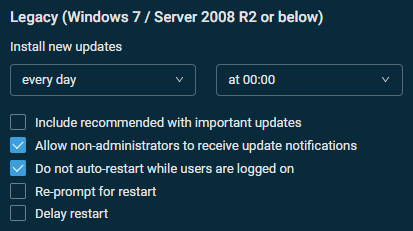
| Option | Description |
|---|---|
| Install new updates | Select on which day and at what time you want to install the updates. |
| Include recommended with important updates | When this option is selected, recommended updates will be included together with important updates. |
| Allow non-administrators to receive update notifications | Selected by default. When this option is selected, non-administrator users will receive update notifications. |
| Do not auto-restart while users are logged on | Selected by default. When this option is selected, automatic updates will wait for the device to be restarted by any user who is logged on, instead of causing the device to restart automatically. When this option is disabled, the logged-on user will be notified that the device will automatically restart in 5 minutes to complete the scheduled installations. |
| Re-prompt for restart | When this option is selected, you can configure when a new prompt notifying of a restart for scheduled installations should appear after the previous prompt for restart was postponed. Specify the interval by selecting the number of hours (0-24 hours) and minutes (1-59 minutes) from the drop-down lists. The maximum interval can be 24 hours. When this option is disabled, the default interval is 10 minutes. |
| Delay restart | When this option is selected, you can configure for how long a restart for scheduled installations should be delayed. Specify the interval by selecting the number of minutes from the drop-down list (1-30 minutes). When this option is disabled, the default interval is 15 minutes. |
For a policy to be applied to a device, the device needs to be part of at least one filter or group that the policy targets. To learn how to add a device to a filter or a group, refer to Device filters and Groups. To learn how policy memberships get recalculated, refer to Policy membership recalculation.
To manage the policy targets, follow these steps:
- Click Add Target to open the Targets pane.
- From the drop-down list, select one of the following target types: Device Filters, Device Groups, or Site Groups. You can use the Search bar under any of the drop-down lists, or you can simply scroll down in the lists. If you use the Search bar, the search results will be narrowed as you type.
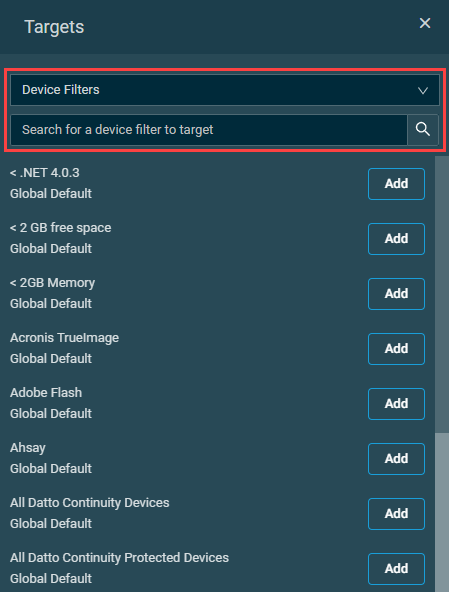
NOTE The Device Filters option contains all Default Device Filters, as well as Custom Device Filters appropriate to the scope of the policy (Global Custom Device Filters are only available if the policy is scoped globally, and Site Device Filters are only available if the policy is scoped to a specific site). Refer to Device filter types.
NOTE The Site Groups and Device Groups options are only available for global policies. Site Device Groups are only available for site-level policies. Refer to Group types.
- Click Add to add a target or Delete to remove it.

You can also remove a target on the policy page by clicking the delete icon .
NOTE Devices of Unknown device type will not be targeted by the policy.
NOTE Multiple targets will apply the OR logic, that is, the policy will be run on a device if it is included in any of the targets.
The Enabled section allows you to enable or disable a policy by clicking the Enabled or Disabled button, respectively.
NOTE You can also enable or disable a policy directly from a list of policies. Refer to Enabled in Column Chooser - Policies.
Depending on the scope of the policy, you can also disable or enable sites and exclude or include devices, which is explained in the table below. When a device is excluded from a policy, the policy will not run on that device. When a site is excluded from a policy, the policy will not run on any of the devices in that site.
NOTE Some options may not be available upon policy creation as explained in the table below.
NOTE On Datto Endpoint Security-enabled Datto RMM accounts, disabling an Endpoint Security policy or turning off the Datto Endpoint Security toggle in an Endpoint Security policy will not uninstall Datto EDR, Datto AV, and Datto Ransomware Detection (managed through Datto EDR) from the devices targeted by the policy. You will be prompted to confirm that you wish to execute this action.
| Scope | Enabled/Disabled | Option | Description |
|---|---|---|---|
| Global | Enabled | Disable Sites | Click the Disable Sites button to open the Sites pane. You can use the search bar to search for a site, or you can simply scroll down in the list. Click Disable to exclude a site or click Enable to include a site. By default, all sites are included.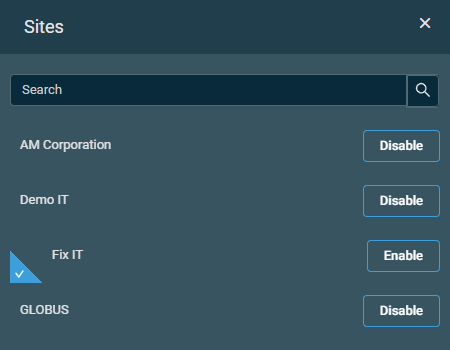 Disabled sites are listed on the policy page, and a badge displays the number of these sites. You can remove a site from the list by clicking the delete icon . This action will include the site in the policy again. |
| Global | Enabled | Disable Devices | This option is available only once the policy has been deployed and the targets have been calculated; however, the Disable Devices button will remain unavailable if the list of targeted devices is empty. Click the button to see a list of disabled devices. The number of these devices is displayed on the button, for example, Disable Devices (1).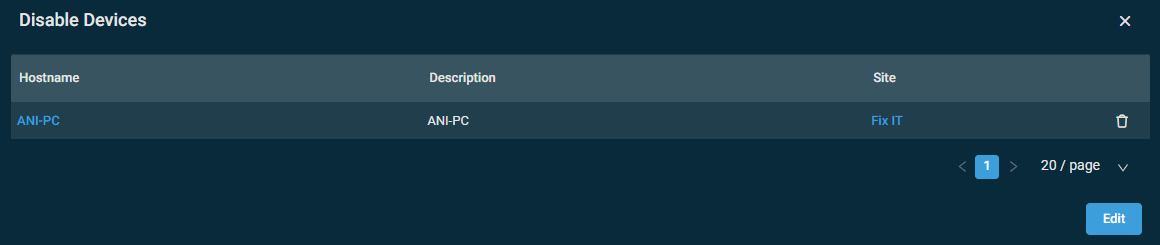 Click the device name to open the Device summary page, and click the site name to open the Site summary page. To remove a device from this list, click the delete icon . This action will include the device in the policy again.To disable the policy for one or more devices, click Edit. This will pop up a confirmation message confirming if you want to proceed. 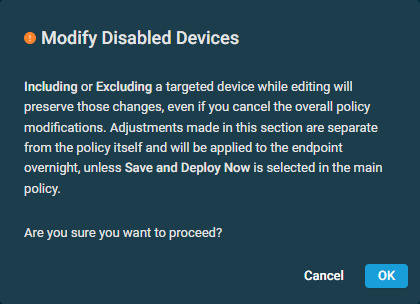 Click OK on this message to open the Disable Devices pane. You can use the search bar to search for a device, or you can simply scroll down in the list. Click Exclude to disable the policy for that device, or click Include to re-enable the policy for that device. By default, all targets of the policy are included. 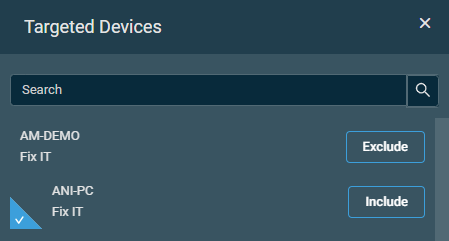 NOTE Make sure to save the policy for these changes to take effect. Refer to Saving and deploying the policy. |
| Global | Disabled | Enable Sites | Click this button to open the Sites pane. You can use the search bar to search for a site, or you can simply scroll down in the list. Click Enable to include a site or click Disable to exclude a site. By default, all sites are excluded.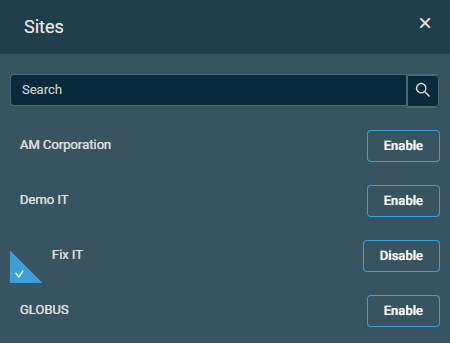 Enabled sites are listed on the policy page, and a badge displays the number of these sites. You can remove a site from the list by clicking the delete icon |
| Global | Disabled | Disable Devices | Refer to Disable Devices. |
| Site | Enabled | Disable Devices | Refer to Disable Devices. |
| Site | Disabled | Disable Devices | Refer to Disable Devices. |

To discard the changes made in the policy, click Cancel.
To save the changes, select one of the following options:
- Save and Deploy Now: The changes will be saved and the policy will be deployed immediately.
- Save and Deploy Later: The changes will be saved and the policy will automatically be deployed later when the policy is recalculated. To learn how policy memberships get recalculated, refer to Policy membership recalculation.
Then, click Confirm to execute the action or Cancel to close out of the dialog box.
NOTE The Name field is required for the deployment buttons to become available.
Exporting and importing policies
Only Monitoring policies can be exported. Refer to Exporting a Monitoring policy.
Only Monitoring policies can be imported. Refer to Importing a Monitoring policy.
Viewing and managing policies
Navigate to a Policies page by following any of the navigation paths described in Security and navigation. At the top of the page, click Global to filter the list by global policies or Site to filter the list by site-level policies.
Viewing policies at global, site, and device levels
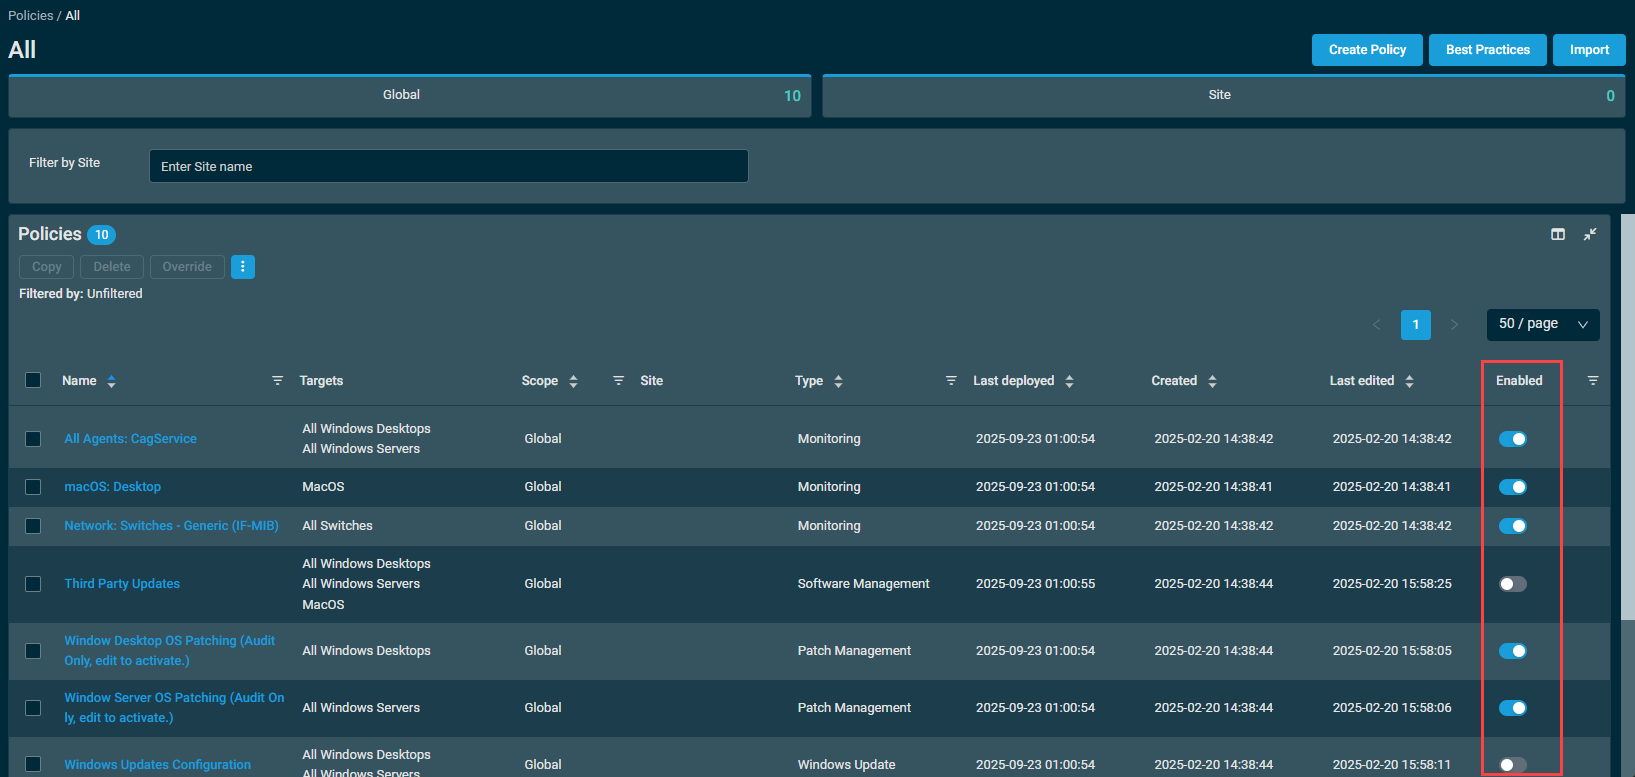
From the left navigation menu, click either Global > Policies or Policies > All to see all policies. To see only one type of policy, select a policy type from the Policies menu.
To see a list of policies of only one site, enter a site name in the Filter by Site field. The search results will be narrowed as you type.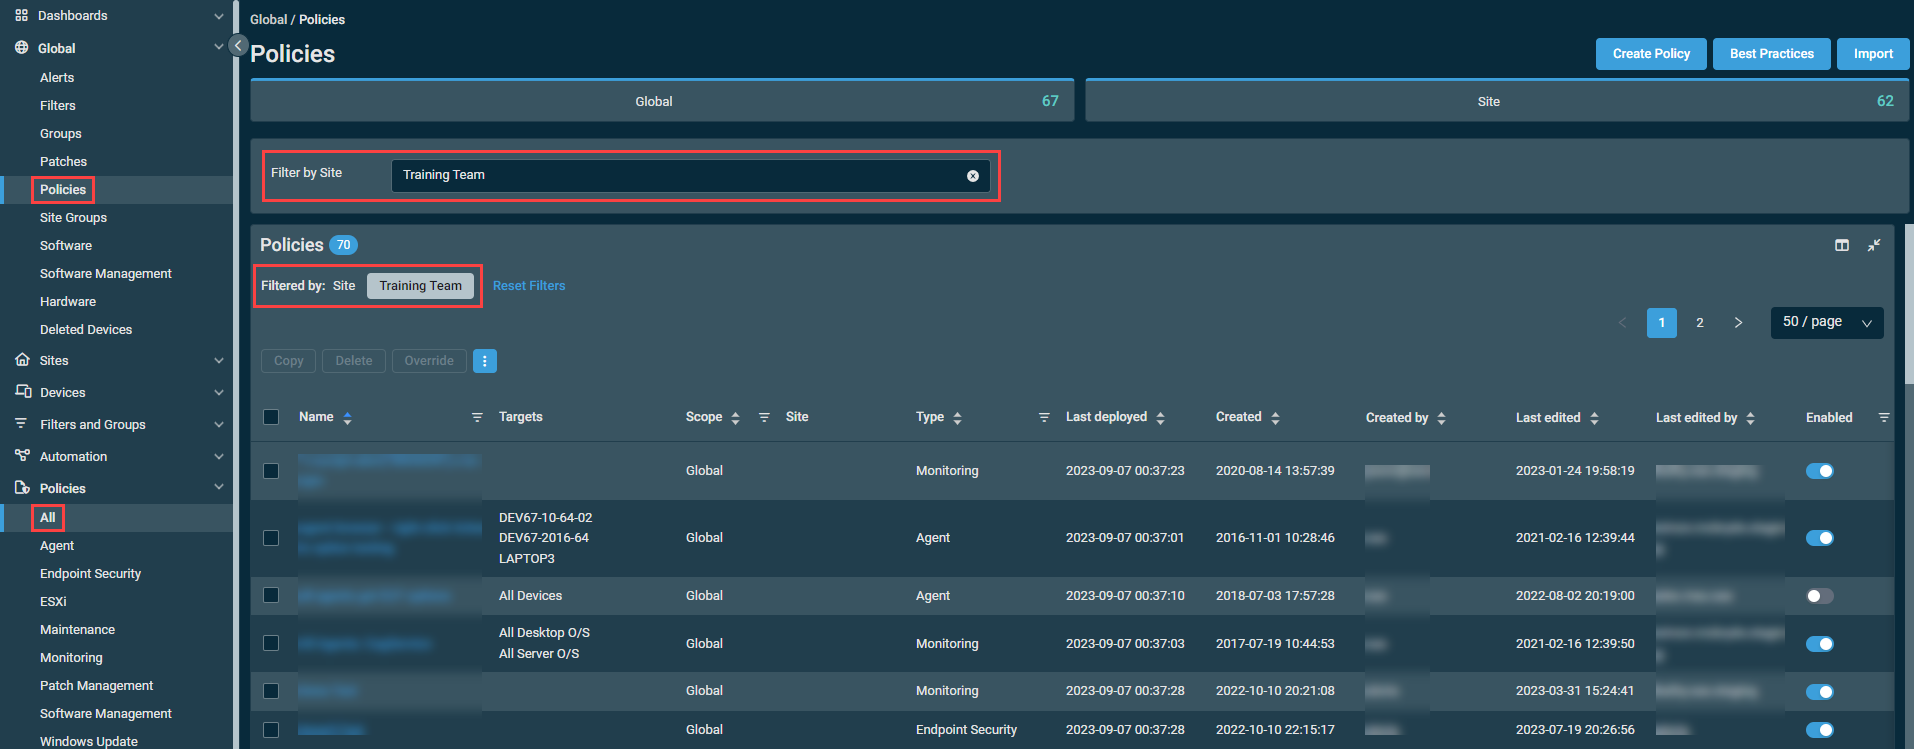
Alternatively, from the left navigation menu, click Sites > All Sites > click the name of a site > Policies.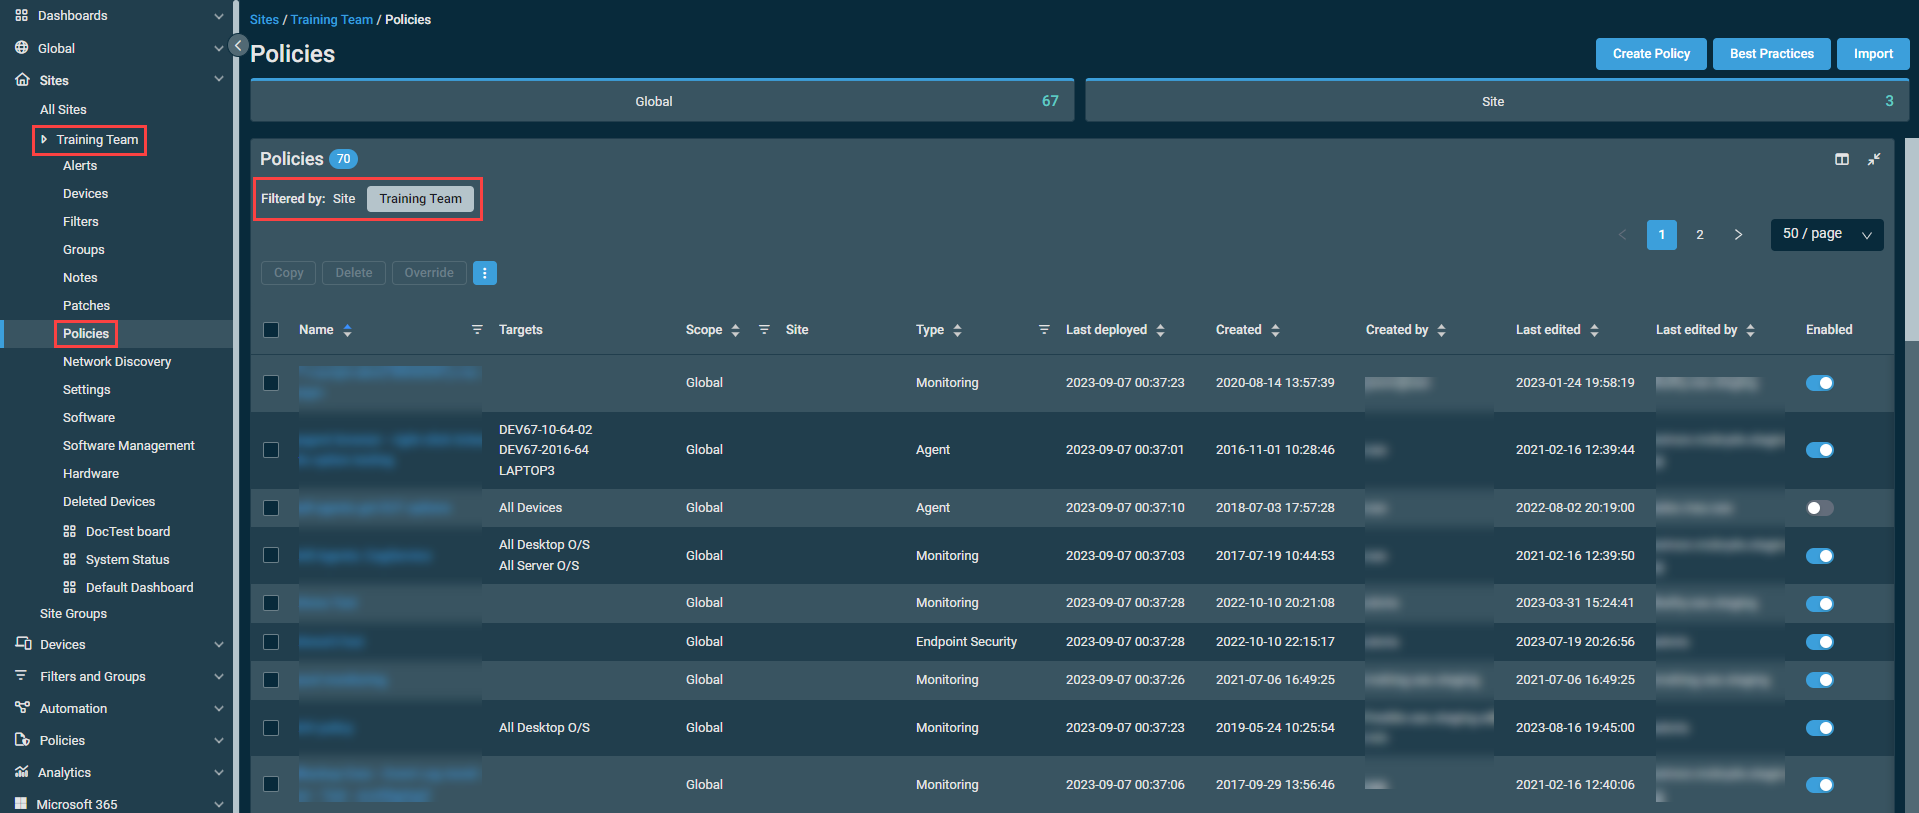
To see a list of policies of only one device, navigate to the Policies card for that device. Refer to Policies in Device summary.
NOTE Click the full-screen icon to open the device-level Policies table in full-screen mode and access the full filtering functionality, Column Chooser, and all action buttons described in the following sections.
Policies list features
You can filter any columns with the filter icon . The Filtered by bar displays all applied column filters. If a filter search term includes wildcard characters (for example, underscores and percent signs), they serve as normal characters if they are preceded by a backslash. For details, refer to Wildcard characters. Click the X next to any filter to remove that filter. Click Reset Filters to return to the default view for the particular type of policies list that is selected:
- The default policies list accessed via Global > Policies or Policies > All displays Unfiltered (all global and site-level policies).
- A default policies list accessed via Policies > click any policy type in the list displays Type: policy type (all policies of the selected type).
- A default site-level policies list accessed via Sites > Policies displays Site: site name (all policies of the selected site).
- A default full-screen device-level policies list accessed via the Policies card on the device summary page displays Device: device hostname (all policies of the selected device).
The filter selection in the columns will persist the next time the page is accessed.
The Column Chooser icon  allows you to select which columns should be visible in the list. Refer to Column Chooser field definitions for descriptions of all of the available fields.
The table density is set to condensed theme by default. To change it to relaxed theme, click the density toggle icon. The selection will persist across all pages.
The number of results displayed can be specified by selecting the desired number from the pagination control. This selection will persist the next time the page is accessed.
Action buttons
The action buttons are unavailable if no row is selected or if the action is not applicable to the selected rows. The check boxes allow you to select one or more rows. Select all rows shown on the page by selecting the check box in the table header. To access all action buttons, click the Row Actions icon. The table below lists all available action buttons.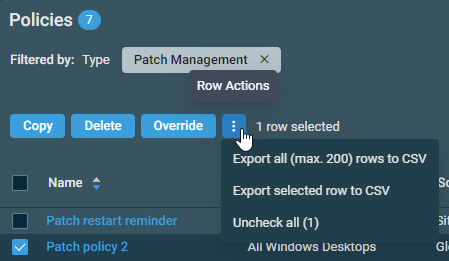
| Action Button | Description |
|---|---|
| Copy | Allows you to copy an already existing policy. You can then modify the policy details of the copy as necessary. This action is only available when a single row is selected. This action is also available when editing a policy. Refer to Editing a policy. |
| Delete | Deletes the selected policy upon confirmation. This action is only available when a single row is selected. This action is also available when editing a policy. Refer to Editing a policy. |
| Override | Only displayed for global Patch Management policies. Allows you to override the policy for a specific site. Refer to Overriding a global Patch Management policy at the site level. |
| Export All (Max. 200) Rows to CSV | In the confirmation dialog box, select whether to show table headers in the file by toggling the Show table headers in the exported CSV button. Click Confirm to download the file. Any filters and sorting that have been applied to the table will also be applied in the CSV file. A maximum number of 200 rows can be exported to a single CSV file. The Export All (Max. 200) Rows to CSV action is available without selecting any row in the table.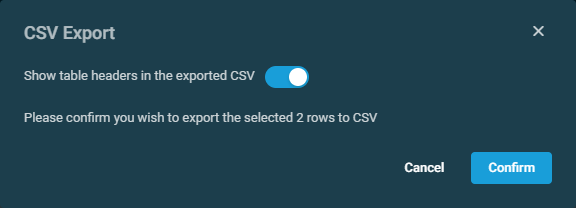 |
| Export Selected Rows to CSV | |
| Uncheck All | Clears all selected rows. The number of selected rows is indicated next to the Row Actions icon. |
You can disable a policy from applying to all of it's targets from the Policies page, and see which policies are disabled, right from the list of policies. This is done via the Enabled column.
In order to disable a policy from the policies list, find the policy in the list and click the Enabled slider to the off position.
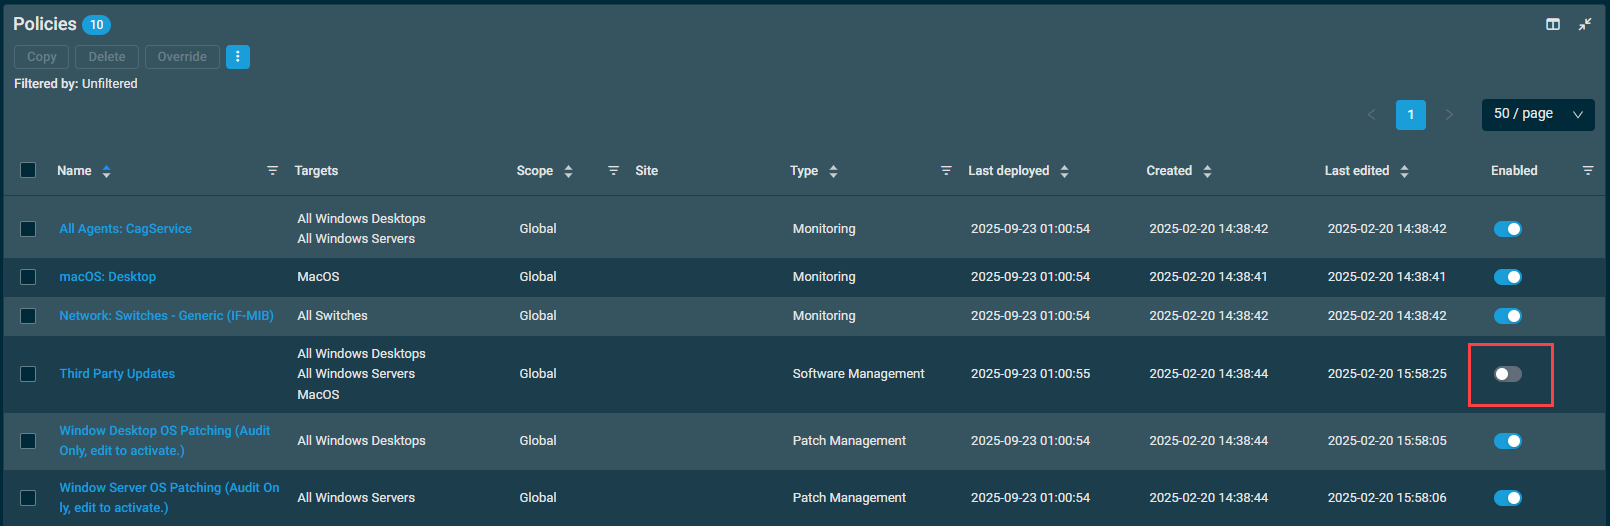
Once the policy is disabled, it will immediately no longer apply to any of it's targets.
NOTE You can also disable a policy while editing it. Refer toEditing a policy.
Navigate to a Policies page by following any of the navigation paths described in Security and navigation. In the Policies table, click the name of a policy to open it. You will see the following information at the top of the page: policy name, Scope, Type, Created by, Last edited by, and Last deployed.
To update the policy details, refer to Creating a policy.
NOTE The Scope and Type of the policy are not editable.
NOTE When editing a Maintenance policy, also refer to A few things to note.
The following action buttons are available at the top of the page:
| Button | Description |
|---|---|
| Delete | Deletes the policy upon confirmation. NOTE This action button is also available on the Policies page. Refer to Delete. |
| Copy | Creates a copy of the policy. You can modify the policy details of the copy as necessary. NOTE This action button is also available on the Policies page. Refer to Copy. |
| Override | Only displayed for global Patch Management policies. Allows you to override the policy for a specific site. Refer to Overriding a global Patch Management policy at the site level. NOTE This action button is also available on the Policies page. Refer to Override. |
| Export | Only displayed for Monitoring policies. Allows you to download a .pcy file of the policy. Refer to Exporting a Monitoring policy. |
Editing a monitor within a policy
You can make changes to a monitor while editing an Endpoint Security policy, an ESXi policy, or a Monitoring policy. Once you have edited a monitor, a message will appear on the policy page. Click Save Progress to save the edited monitor and dismiss the message. The monitor description and criteria will be updated.
Endpoint Security policy
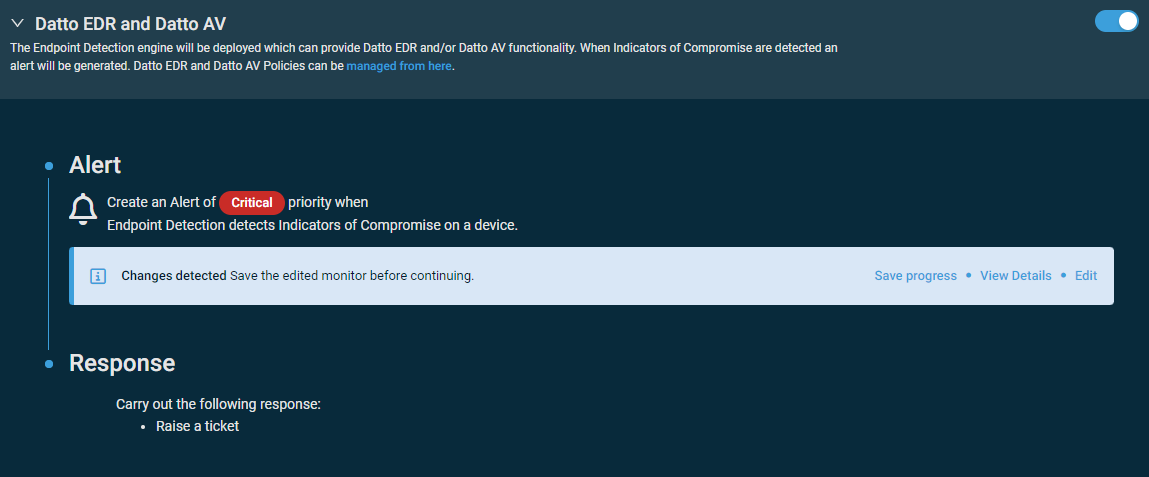
NOTE The View Details and Edit options will not be available until Save Progress is clicked.
ESXi policy or Monitoring policy
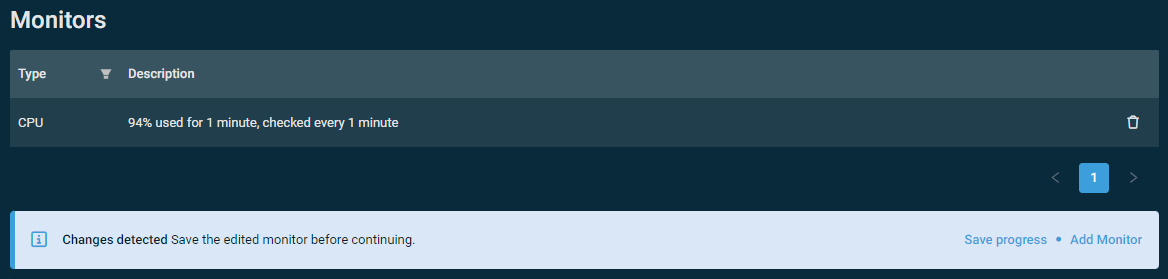
NOTE The option to add another monitor will remain available. To add another monitor before saving the edited monitor, click Add Monitor in the message. All monitor descriptions will be read-only until Save Progress is clicked.
NOTE The message will also appear if a new monitor is added while editing the existing policy. All monitor descriptions will be read-only until Save Progress is clicked.
To learn how policy memberships get recalculated, refer to Policy membership recalculation.
Best Practices (ComStore policies)
In addition to setting up your own policies, a selection of Monitoring policies is freely available to download from the ComStore or the Policies page. These include best practices to monitor the most common platforms and applications such as Exchange and SQL.
These Monitoring policies aim to provide a best-practice solution for the most typically encountered usage scenarios involving Datto RMM. However, they only serve as guidelines and may require modification depending on device configuration. (For example, ensure that network Monitoring policies are querying the correct SNMP OIDs of your devices.)
We encourage you to try these policies on your own devices to provide a solid, baseline monitoring solution to which your own monitoring can be added. Once added to your account, a policy downloaded from the ComStore or the Policies page becomes a regular Monitoring policy, which can be configured and modified as required. Targets typically must be configured before use.
For more information, refer to Best practices for Monitoring policies which includes detailed information on the criteria monitored in some of the policies.
To download a Monitoring policy from the ComStore, follow these steps:
- Navigate to the Policies page by following any of the navigation paths described above.
- Click Best Practices.
- In the Best practices pane, use the search bar to search for a policy or scroll down in the list. Search results will be narrowed as you type.
- Click Create next to a policy in the list to start the creation of a new global Monitoring policy with recommended values.
- On the Create Policy page, review and update the recommended values as necessary. Refer to Creating a policy.
Once you have saved the policy, it will be available in the List of policies.


