Alerts
PERMISSIONS Refer to Global > Monitor and Sites > Monitor in Permissions.
NAVIGATION Global > Alerts
NAVIGATION Sites > All Sites > click the name of a site > Alerts (left navigation menu)
NAVIGATION Device summary page > Alerts card. To view the various navigation paths you can use to access the device summary page, refer to Device summary.
NAVIGATION Single Alert View page > Device Alerts card. To view the various navigation paths you can use to access the Single Alert View page, refer to Single Alert View.
NAVIGATION Dashboards > click the name of a dashboard > view the Recent Alerts widget or click an area of any alert widget to drill into a list of alert messages
NAVIGATION Sites > All Sites > click the name of a site > click the name of a dashboard (left navigation menu) > view the Recent Alerts widget or click an area of any alert widget to drill into a list of alert messages
About
An alert is the automatic response to a device operating outside of the parameters defined in a monitor. To learn how to create a monitor, refer to Creating a monitor.
Alert lists are available at the global, site, and device levels. Details about a single alert can be viewed on an individual alert page.
NOTE Alerts are retained for six months. An alert will be re-raised for any monitor that is in alert condition for more than six months.
NOTE If a device is deleted from Datto RMM, all alerts for that device will be permanently deleted.
List of alerts
Navigate to the Alerts page or Alerts card by following the navigation paths described in Security and navigation.
At the top of the Alerts page is the Search Alerts box. You can enter any text in the search box to narrow the results.
NOTE An alert consists of many different variables rather than a single message; therefore, the search is performed in a number of alert fields. Not all alert fields are currently supported, and more will be added over time.
The table header has a badge showing the number of alerts. By default, the table displays open alerts created within the last 30 days. Time stamps reflect the user time zone and preferred date format configured on the Setup > My Settings page. Hovering over any time stamp will show its date in the alternative format. Refer to User Time Zone and Date Format.
The Column Chooser icon  allows you to select which columns should be visible in the list. Refer to Column Chooser field definitions for descriptions of all of the available fields. The filter selection in the columns will not persist the next time the page is accessed as the table will return to the default view.
You can filter any columns with the filter icon  . The Filtered by bar displays all applied column filters. If a filter search term includes wildcard characters (for example, underscores and percent signs), they serve as normal characters if they are preceded by a backslash. For details, refer to Wildcard characters. Click the X next to any filter to remove that filter. Click Reset Filters to produce an unfiltered list. If no filter is applied, the Filtered by bar displays Unfiltered. The filter selection in the columns will not persist the next time the page is accessed as the table will return to the default view.
The table density is set to condensed theme by default. To change it to relaxed theme, click the density toggle icon.  The selection will persist across all pages.
The number of results displayed can be specified by selecting the desired number from the pagination control. This selection will persist the next time the page is accessed.
Action buttons
To access all action buttons, click the Row Actions icon.
The action buttons are grayed out or become unavailable if no row is selected in the table or if the action button is not applicable to the selected rows. The check boxes allow you to select one or more rows. Select all rows shown on a page by selecting the check box in the table header. You can also use the drop-down arrow next to the check box in the table header to choose one of the following options: Select none, Select all on page, or Select all rows across all pages. If you choose to select all rows across all pages, the check boxes of the rows will not be selected; however, the page will indicate that all rows have been selected.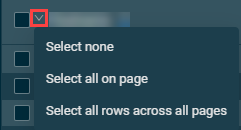
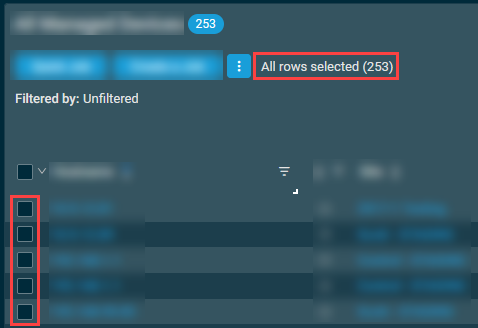
NOTE When all rows are selected across all pages, only certain action buttons are supported, which is indicated in the All Rows column in the table below.
| Action Button | All Rows | Description |
|---|---|---|
| Resolve |
|
Resolves the selected alert(s). If you have selected multiple alerts, a confirmation dialog box will appear. Click Confirm to execute the action or Cancel to close out of the dialog box. Once an alert is resolved, it will be removed from the table, and an update will appear in the Timeline card of the alert. Refer to Timeline. |
| Create a Job |
|
Refer to Scheduled jobs. NOTE This action button is unavailable if any selected alerts are for devices that are not servers, desktops, or laptops. |
| Quick Job |
|
Refer to Quick jobs. NOTE This action button is unavailable if any selected alerts are for devices that are not servers, desktops, or laptops. |
| Export Selected Rows to CSV | In the confirmation dialog box that appears, select whether to show table headers in the file by turning on the toggle for Show table headers in the exported CSV. Click Confirm to download the file or Cancel to close out of the dialog box. Any column selections, filters, and sorting that have been applied to the table will also be applied in the CSV file.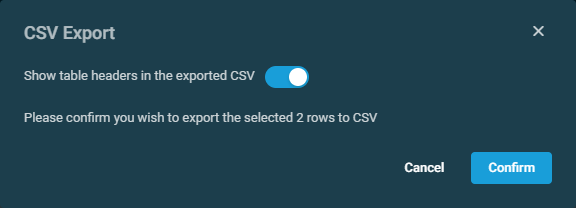 |
|
| Export All Rows to CSV |
|
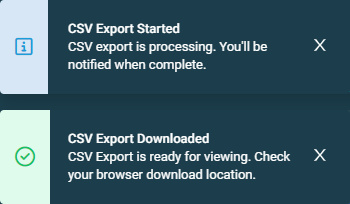
This action button is available only if all rows have been selected across all pages in the table. In the confirmation dialog box that appears, click Confirm to download the file or Cancel to close out of the dialog box. Pop-up notifications will inform you of the start and completion of the CSV export action. Click the X to close the notification; otherwise, the notification will automatically be cleared after five minutes. Any column selections, filters, and sorting that have been applied to the table will also be applied in the CSV file. |
| Uncheck All |
|
Clears all selected rows. The number of selected rows is indicated next to the Row Actions icon. NOTE This action button is not available if all rows have been selected across all pages in the table. To clear all selected rows across all pages, use the Select none option from the drop-down arrow next to the check box in the table header. |

Single alert view
More context, timeline information, and various action buttons are available for individual alerts on the Single Alert View page. Refer to Single Alert View.


