Security levels
PERMISSIONS Administrator
NAVIGATION Setup > Security Levels
About security levels
Security levels specify and limit the access users have when logged in to the Datto RMM web interface, the Agent Browser, or a Web Remote session or chat. Users can have more than one security level and change them as needed. Security levels can be added, edited, copied, and deleted. Users can switch security levels in the web interface and the Agent Browser.
IMPORTANT You must have the Administrator security level to be able to add, edit, copy, or delete a security level. For more information, refer to Users.
NOTE If integrated with KaseyaOne, and access groups are enabled, the following warning will appear at the top of the page: 
Refer to Automatically assign access to Datto RMM based on KaseyaOne groups.
Administrator security level
By default, the Administrator security level is assigned to the user who registers a Datto RMM account, and it is the only security level available to assign to new users until other security levels are created. The Administrator security level cannot be modified or edited in any way. Users who have this security level assigned have full and unlimited access to all Datto RMM functionality and can see and connect to all devices in the Datto RMM account.
Creating a security level
On the Security Levels page, click Create Security Level and specify the security level details.
Enter a name for the security level.
Enter a description for the security level.
NOTE This field is limited to 255 characters.
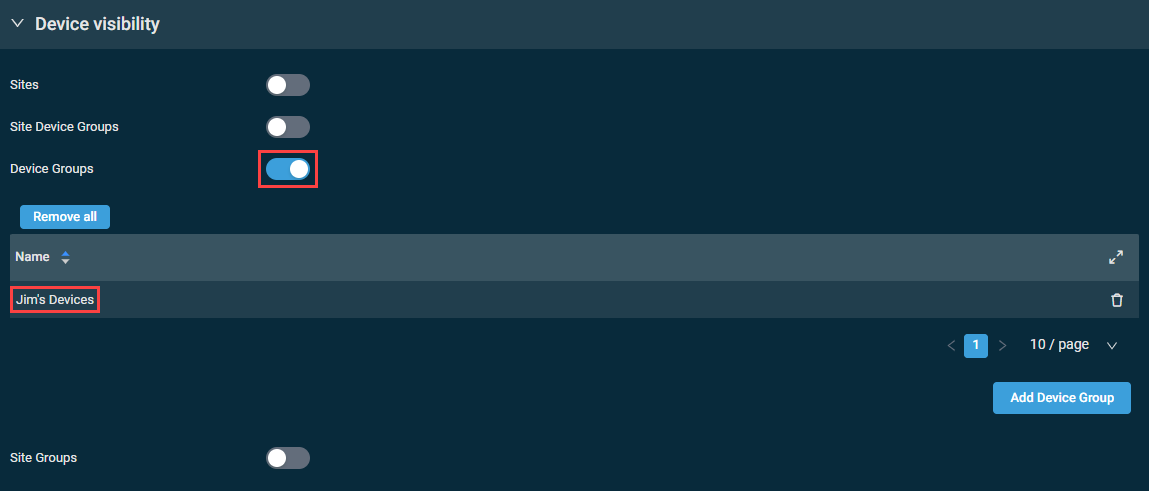
This section controls which devices the security level has access to. To include or exclude sites or groups, follow these steps:
- Configure any of the following sections:
- Enable Sites and then click Add Site.
- Enable Site Device Groups and then click Add Site Device Group.
- Enable Device Groups and then click Add Device Group.
- Enable Site Groups and then click Add Site Group.
IMPORTANT You can create a security level that grants remote takeover access to devices within selected Device Groups without giving access to the devices' sites as well. Refer to Device Groups security level.
- From within the pane that opens, click Add for each site or group you wish to include in this security level or click Add all to include all sites or groups. You can use the search bar to search for a site or group, or you can simply scroll down in the list. Click Remove for each site or group you wish to exclude from this security level. When you are finished, click X to close the pane.

- You can also remove sites or groups in bulk or individually on the Create Security Level page by clicking the Remove all button or the delete icon
 , respectively.
The table density is set to condensed theme by default. To change it to relaxed theme, click the density toggle icon.
The selection will persist across all pages.
The number of results displayed can be specified by selecting the desired number from the pagination control. This selection will persist the next time the page is accessed.
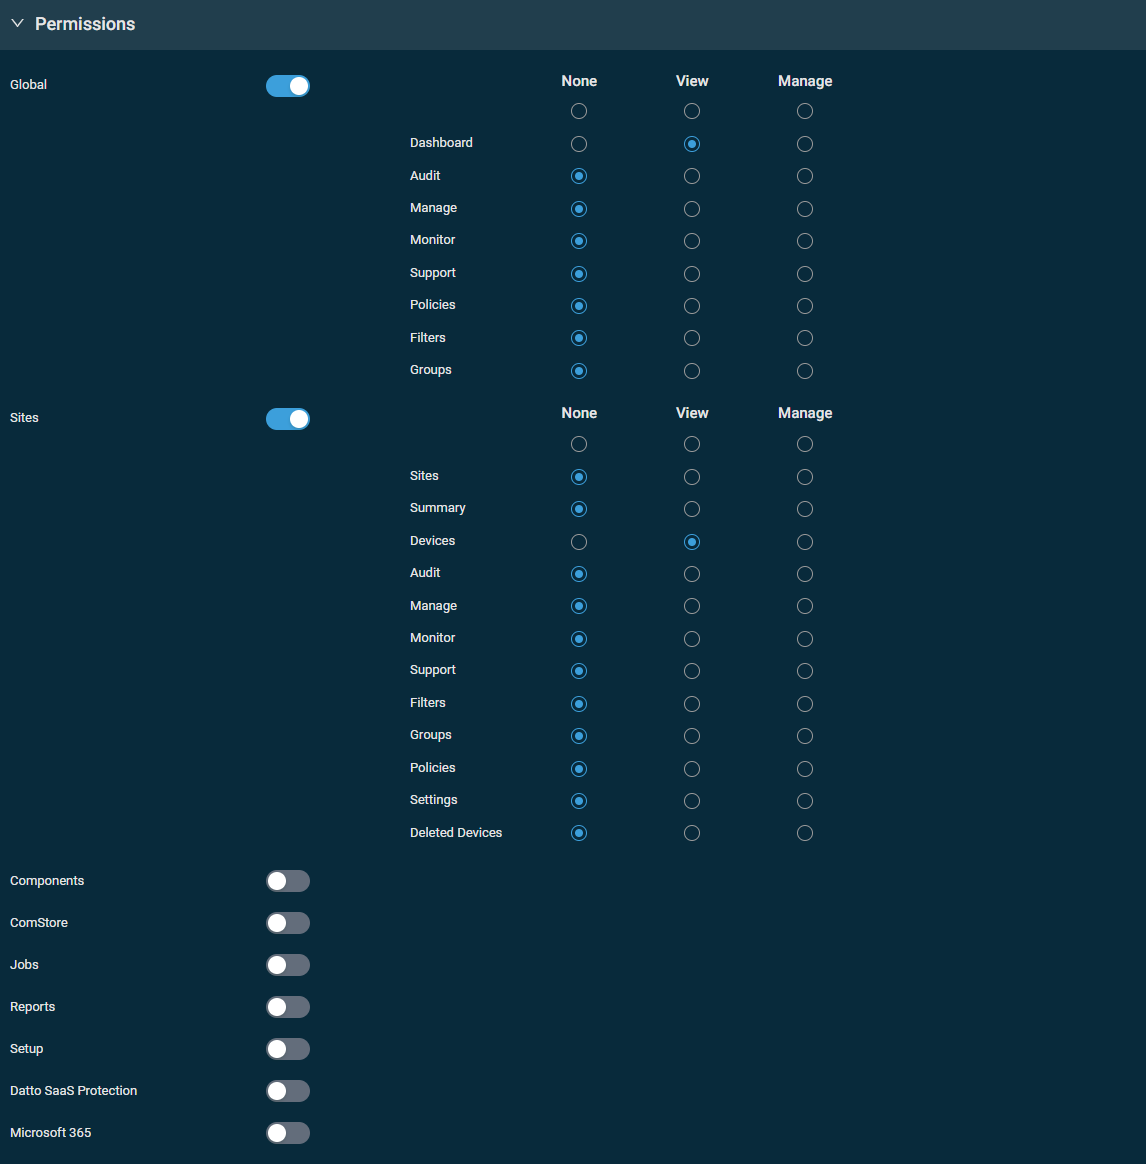
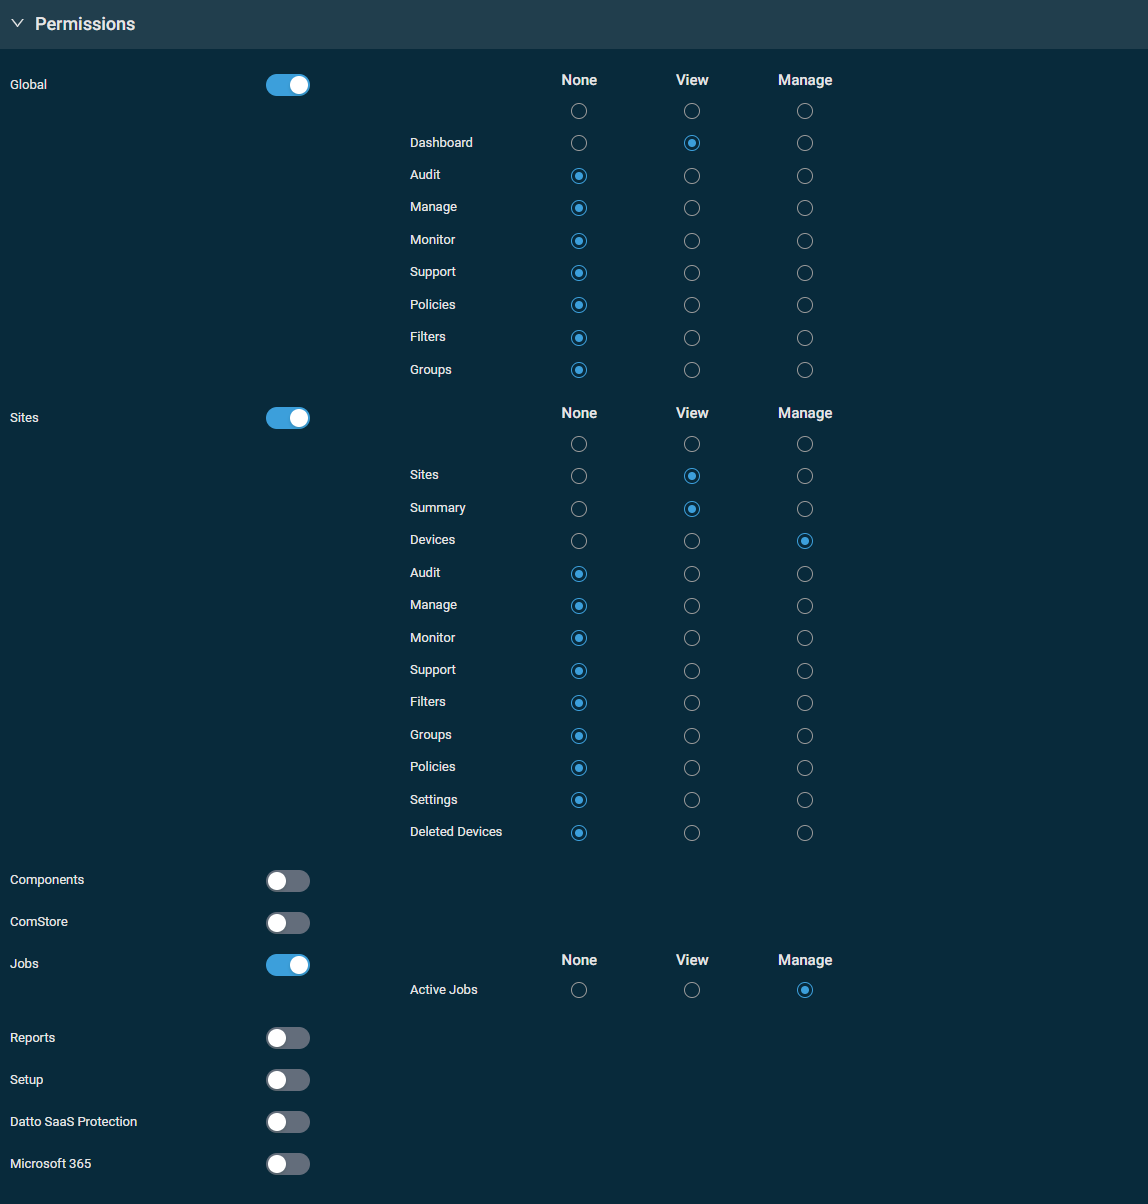
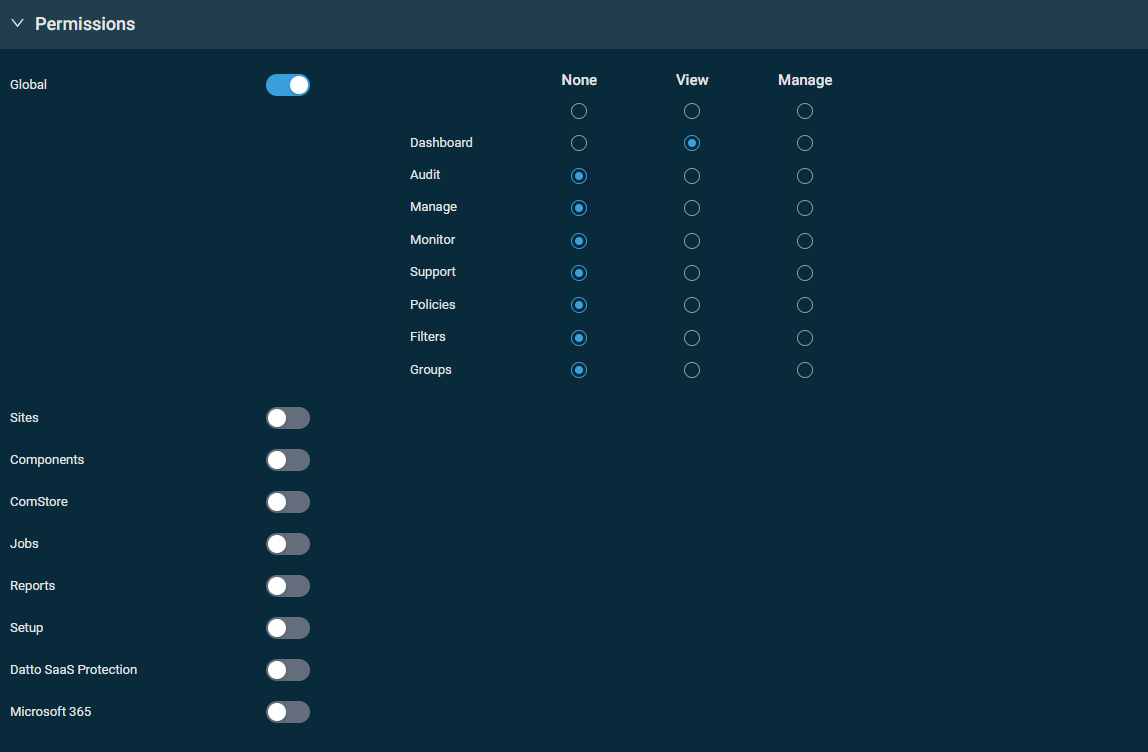
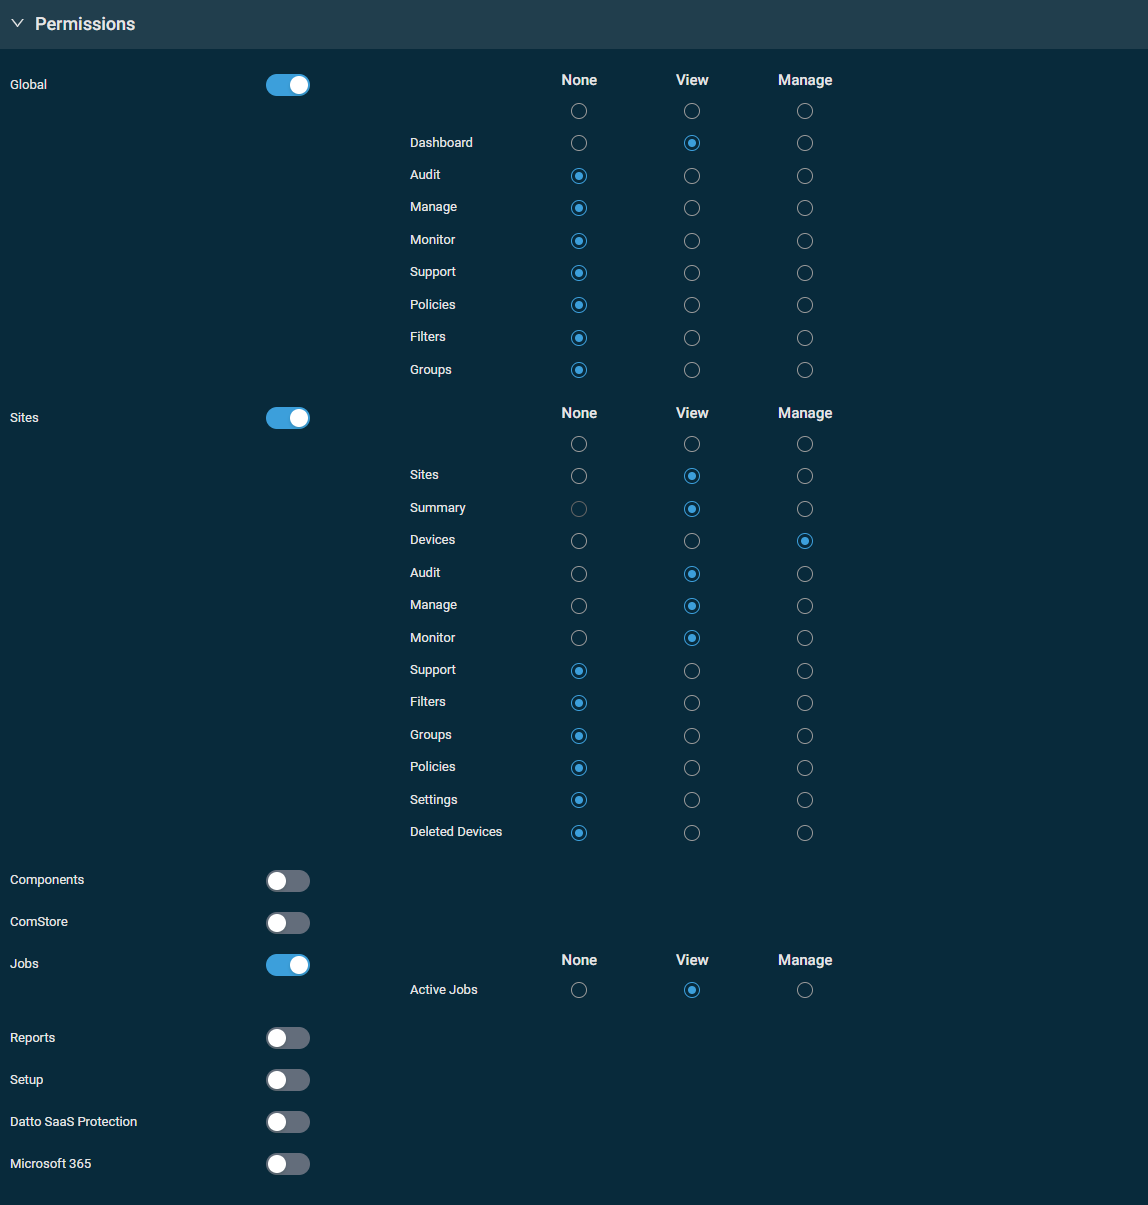
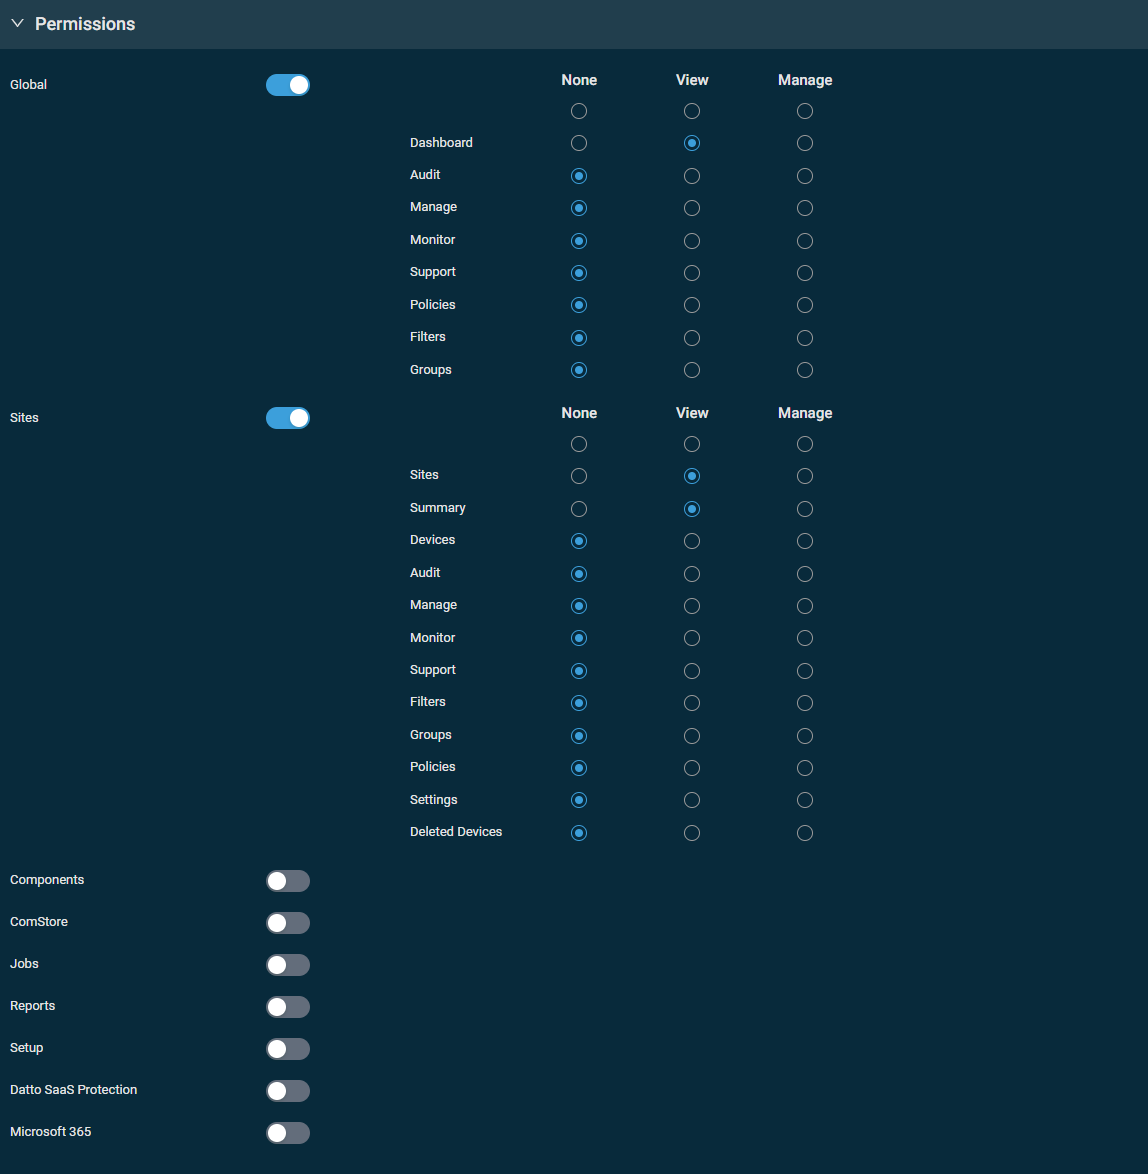
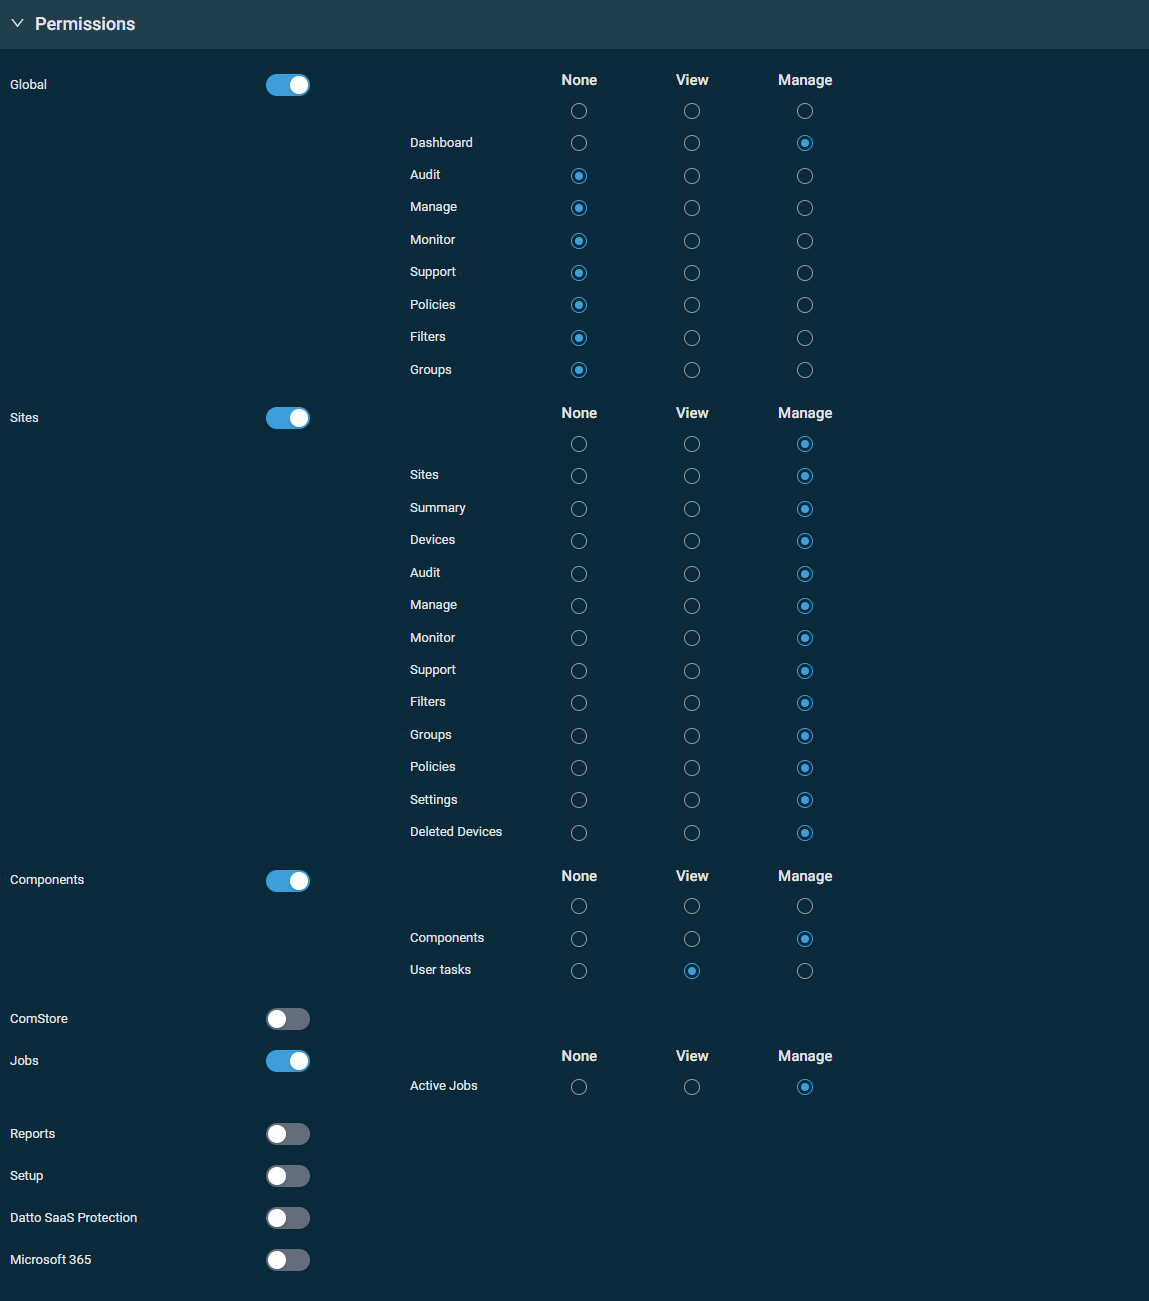
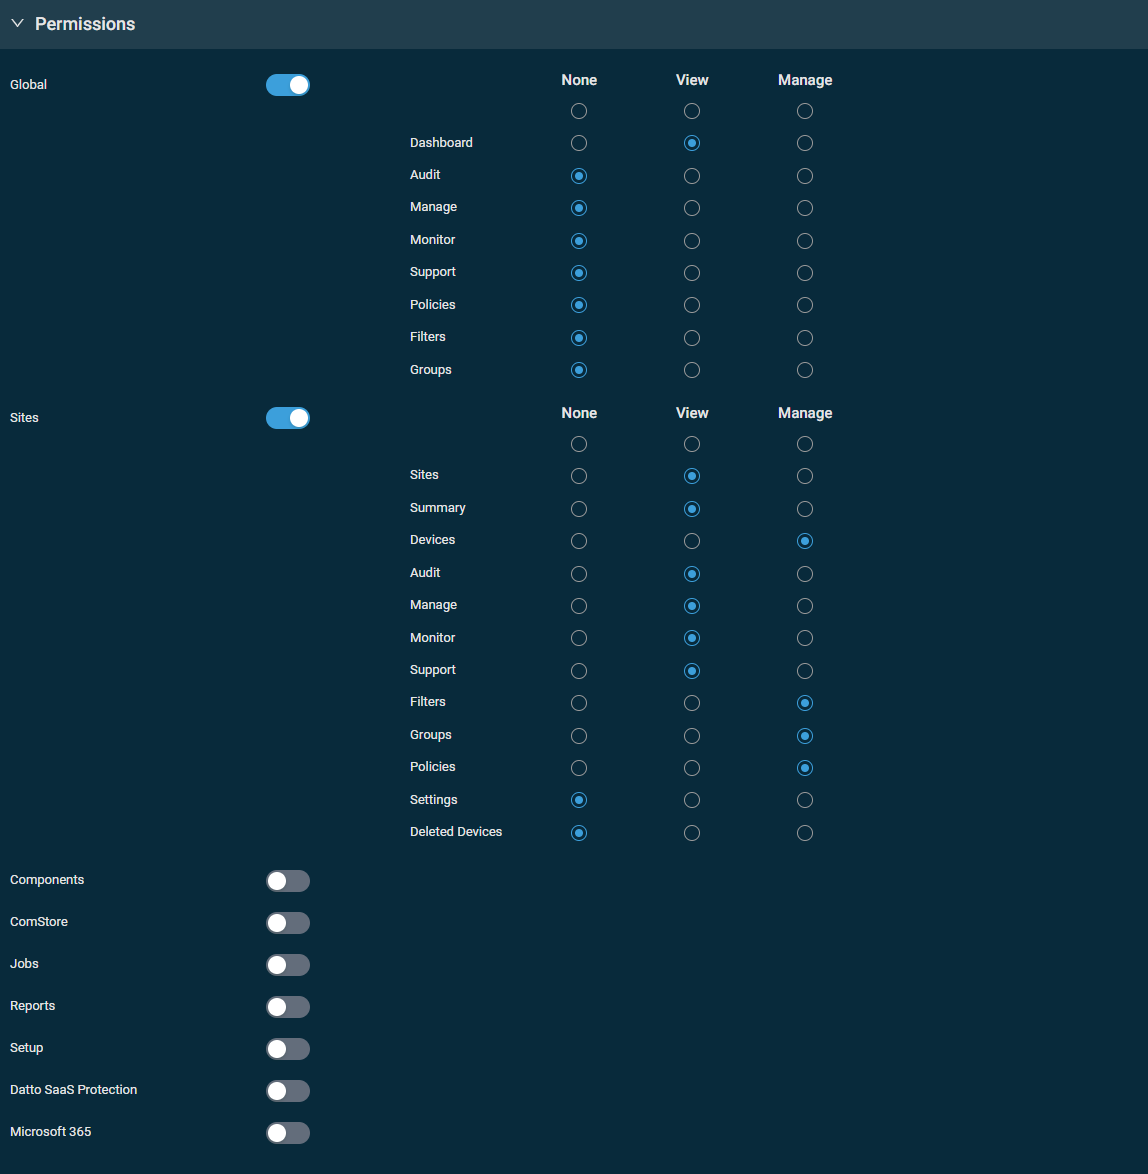
This section controls access to various areas of Datto RMM. Turn on the toggle for any of the sections and set the permission for each area to None, View, or Manage. You can configure the same permission for each area within a section with one click in the top row of the table. When creating a new security level, permissions are set to View for all areas by default.
IMPORTANT Users will be unable to log in if None permission is selected for all areas in their security level's Permissions section.
| None | View | Manage | |
|---|---|---|---|
| Dashboard |
NOTE The ability to share dashboards is restricted to the Administrator security level. Refer to Dashboard sharing. |
||
| Audit | The Global > Patches menu is not displayed. The Global > Software and Global > Hardware menus are not displayed. |
The Global > Patches menu is displayed. Refer to Global and site-level patches summary lists. The Global > Software and Global > Hardware menus are displayed. Refer to Software and Hardware. |
Same as for View permission. |
| Manage | The Global > Software Management menu is not displayed. | The Global > Software Management menu is displayed, but users cannot approve software updates unless they have Manage permission for Global > Policies. |
Same as for View permission. |
| Monitor | The Global > Alerts menu is not displayed. |
The Global > Alerts menu is displayed. Users that also have at least View permission for Sites > Sites and Sites > Devices can view and resolve a list of alerts and individual alerts for the sites they have access to. Users can run jobs from the Single Alert View page if they have Manage permission for Jobs > Active Jobs as well. |
Same as for View permission, but users can also create, edit, enable, disable, and delete monitors from the Monitors card on the device summary page as long as they also have Manage permission for Global > Policies. Users can create and edit webhooks. Users can create and end maintenance mode windows. |
| Support | N/A | N/A |
|
| Policies | The Global > Policies menu and the Policies menu are not displayed, and users cannot see the details of global policies, unless they have at least View permission for Sites > Sites as well as Sites > Policies. (Site and device visibility restrictions are respected.) Users cannot create new global policies or edit, delete, or copy existing ones. In the Policies card on the device summary page, users cannot click the name of a global policy. |
The Global > Policies menu and the Policies menu are displayed, but users cannot see the details of global policies unless they have at least View permission for Sites > Sites as well as Sites > Policies. (Site and device visibility restrictions are respected.) Users cannot create new global policies or edit, delete, or copy existing ones. In the Policies card on the device summary page, users can click the name of a global policy if they also have at least View permission for Sites > Policies. Users can view Managed software on the device summary page. Refer to Software. |
Same as for View permission, but users can also create, edit, delete, or copy global policies as well as export Monitoring policies. Users can enable or disable policies from the Policies card on the device summary page if they also have at least View permission for Sites > Policies. The Best Practices button is displayed on the Policies page and Sites > Policies page if users have Manage permission for ComStore > ComStore. The Import button is displayed on the Policies page and Sites > Policies page. Users can approve global Managed software updates. Refer to Software Management. NOTE If a global policy is created by a user with a security level that does not have access to all sites, the global policy will deploy only to devices the security level has access to. Refer to Device visibility. |
| Filters | Users cannot access or create Custom Device Filters; however, they can access Default Device Filters. | Users can access Custom Device Filters created by anyone that has shared those filters with the users' assigned security level; however, users cannot create Custom Device Filters. Users can access Default Device Filters. |
Same as for View permission, but users can also create, edit, and delete their own Custom Device Filters and those that have been shared with their assigned security level. |
| Groups | Users cannot view or create groups at the account/global level. | Users can view groups created at the account/global level by any user that has shared the group with their assigned security level. |
Users can view, edit, and delete groups created at the account/global level. |
| None | View | Manage | |
|---|---|---|---|
| Sites | The Sites menu is displayed, but users cannot access the list of sites. | Users can view the list of all sites they have access to, but they cannot create, edit, or delete sites although they may have group and filter access. Users can add a new device to the sites they have access to. Users can access Network Discovery. Refer to Networks. |
Same as for View permission, but users can also delete sites. Users can create sites and access site settings if they also have Manage permission for Sites > Settings. |
| Summary | Device Notes can be viewed, but not edited. | Same as for None permission. | Device Notes can be viewed and edited. |
| Devices | The Devices menu is not displayed. Users with at least View permission for Sites > Sites can see the Devices menu and they can add a new device to any site they have access to; however, they cannot access any device. |
The Devices menu is displayed, but users can only view devices if they also have at least View permission for Sites > Sites. Users can see device information but they cannot edit it or delete a device. Users can perform the Copy Device Information to Clipboard action. The users' ability to perform other device actions depends on their security level permissions for other areas of the web interface. Refer to the Security and navigation section in Device summary and Devices. Users can also approve software updates. Refer to Software. Users can also view and search for device-related activity in the Activity Log. Refer to Activity Log. |
Same as for View permission, but users can also edit device information and perform actions on a device if they also have at least View permission for Sites > Sites. Users can delete a device from any site they have access to if they also have at least View permission for Sites > Sites and Manage permission for Sites > Deleted Devices. Users can override patch approval status for individual patches. Users can change a device's device type if they also have Manage permission to Sites > Audit. NOTE Manage permission under Sites > Devices is required, in addition to Manage permission under Sites > Groups, if users assigned this security level will need to be able to add and remove devices from site device groups. |
| Audit | The Request Audit action button is not displayed on the device summary page and displayed but unavailable on device list pages. The Sites > Patches menu is not displayed. The Sites > Software and Sites > Hardware menus are not displayed. |
The Request Audit action button is not displayed on the device summary page and displayed but unavailable on device list pages. The Sites > Patches menu is displayed if users have at least View permission for Sites > Sites. Refer to Global and site-level patches summary lists. The Sites > Software and Sites > Hardware menus are displayed if users have at least View permission for Sites > Sites. Refer to Software and Hardware. |
Users can see the Request Audit action button on the device summary page and it is available on device list pages as well if they also have at least View permission for Sites > Sites and Sites > Devices. Users can request full and delta audits. The Sites > Patches menu is displayed if users have at least View permission for Sites > Sites. Refer to Global and site-level patches summary lists. The Sites > Software and Sites > Hardware menus are displayed if users have at least View permission for Sites > Sites. Refer to Software and Hardware. Users can change a device's device type if they also have Manage permission to Sites > Devices. |
| Manage |
The Sites > Software Management menu is not displayed. |
The Sites > Software Management menu is displayed, but they cannot approve software updates unless they have Manage permission for Global > Policies. |
Same as for View permission. |
| Monitor | The Alerts menu is not displayed at the site level. At the device level, users can view a list of alerts and monitors if they also have at least View permission for Sites > Sites and Sites > Devices. However, they cannot resolve alerts, create or edit monitors, or perform actions on monitors. Users can run jobs from the Single Alert View page if they have Manage permission for Jobs > Active Jobs, as well. |
The Alerts menu is displayed at the site level, and users can view and resolve a list of alerts and individual alerts. At the device level, same as for None permission, but users can resolve alerts. |
Same as for View permission, but users can also create, edit, enable, disable, and delete monitors that exist in site policies from the Monitors card on the device summary page as long as they also have Manage permission for Sites > Policies. Users can create and edit webhooks. Users can create and end maintenance mode windows. |
| Support |
N/A |
N/A |
|
| Filters | Users cannot access or create Site Device Filters. | Users can access Site Device Filters created by anyone that has shared those filters with the users' assigned security level; however, users cannot create Site Device Filters. | Same as for View permission, but users can also create, edit, and delete their own Site Device Filters and those that have been shared with their assigned security level. |
| Groups | Users cannot view or create site-level groups. | Users can use site-level groups that have already been defined, but they cannot add devices to the group and change group names. |
Users can view, edit, or delete groups created at the site level. NOTE Manage permission under Sites > Devices is required, in addition to Manage permission under Sites > Groups, if users assigned this security level will need to be able to add and remove devices from site device groups. |
| Policies | Policies at the site level are not displayed. On the device summary page, the Policies card is not displayed. Users cannot create new site policies. |
Policies at the site level and the Policies menu are displayed. On the device summary page, the Policies card is displayed. Users can view details of site policies with Global > Policies permission set to None, but they cannot click on global policies. Users can click on and view details of global policies as well if they also have at least View permission for Global > Policies. Users cannot create new site policies or edit, delete, or copy existing ones. Users can enable or disable policies from the Policies card on the device summary page if they also have Manage permission for Global > Policies. Users can view Managed software on the device summary page. Refer to Software. |
Same as for View permission, but users can also create, edit, delete, or copy site policies as well as export Monitoring policies. Users can also create, edit, enable, disable, and delete monitors from the Monitors card on the device summary page as long as they also have Manage permission for Sites > Monitor. Users can enable or disable policies from the Policies card on the device summary page. The Best Practices button is displayed on the Policies page and Sites > Policies page if users have Manage permission for ComStore > ComStore. The Import button is displayed on the Policies page and Sites > Policies page. Users can approve site-level Managed software updates. Refer to Software Management. |
| Settings | Users cannot view site settings. The Setup > Credentials menu is displayed; however, users cannot view or create site-level credentials. |
Users can view site settings if they also have Manage permission for Sites > Sites; however, they cannot edit or delete these settings. On the Setup > Credentials page, users can view site-level credentials for the sites they have access to if they also have at least View permission for Sites > Sites; however, they cannot create, edit, or delete site-level credentials. |
Users can create sites as well as view, edit, and delete site settings if they also have Manage permission for Sites > Sites. On the Setup > Credentials page, users can view, create, edit, and delete site-level credentials for the sites they have access to if they also have Manage permission for Sites > Sites. |
| Deleted Devices | Users cannot delete devices or access the Deleted Devices page even if they have Manage permission for Sites > Devices. | Users cannot delete devices even if they have Manage permission for Sites > Devices. Users can view the Deleted Devices page if they have at least View permission for Sites > Sites. |
Users can delete devices if they have Manage permission for Sites > Devices as well. Users can view the Deleted Devices page if they have at least View permission for Sites > Sites. |
| None | View | Manage | |
|---|---|---|---|
| Components | The Component Library is not displayed, and the list of components cannot be accessed. | The Component Library is displayed. Users can view components in the list, view individual component details including component scripts, search for components, and view component groups. Users can create jobs with selected components if they also have Manage permission for Jobs > Active Jobs. |
Same as for View permission, but users can also create, edit, update, copy, import, export, and delete components, add components to and remove components from groups, create new component groups, set components as User Tasks, and control the visibility of components in the Agent Browser. |
| User Tasks | Users can see if a component in the Component Library has been set as a User Task. | Same as for None permission. | Same as for None and View permission, but users can also set or unset components as a User Task if they also have Manage permission for Components > Components. |
| None | View | Manage | |
|---|---|---|---|
| ComStore | The Automation > ComStore menu is not displayed, and the list of components in the ComStore cannot be accessed. Users cannot add components from the ComStore to jobs. |
The Automation > ComStore menu is displayed. Users can browse the ComStore and search for components, but they cannot add the components on display to the Component Library. Users cannot add components from the ComStore to jobs. |
Same as for View permission, but users can also add components from the ComStore to the Component Library and to jobs. The Best Practices button is displayed on the Policies page, and users can add and configure ComStore policies if they also have Manage permission for Global > Policies (for global policies) and Sites > Policies (for site policies). Additionally, the Update needed category is displayed on the Component Library page. |
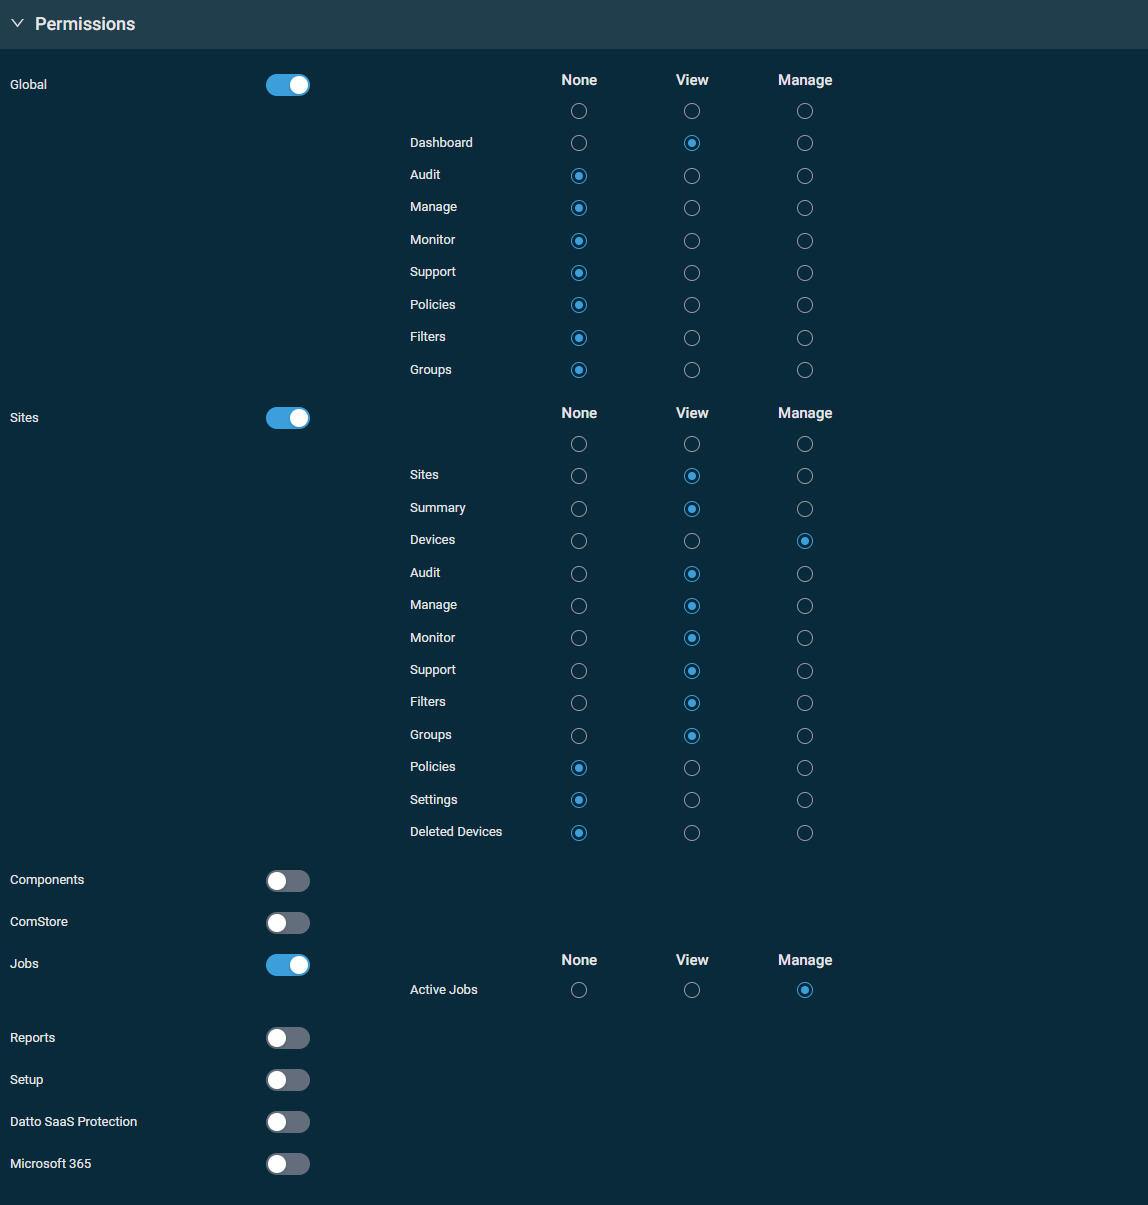
| None | View | Manage | |
|---|---|---|---|
| Active Jobs | The Automation > Jobs menu is not displayed, and jobs and quick jobs cannot be accessed, scheduled, or run. | The Automation > Jobs menu is displayed. Users can view jobs, but they cannot schedule, run, edit, copy, retire, or delete jobs and quick jobs. | Same as for View permission, but users can also schedule, run, edit, copy, retire, and delete jobs and quick jobs. When viewing the results of a job, users can select one or more devices and schedule a job, run a quick job, rerun a job, add or remove the devices to or from a group, create a new Device Group, and export StdOut (standard output) and StdErr (standard error) messages. Users can add components from the ComStore to jobs if they also have Manage permission for ComStore > Comstore. On the device summary page and in device lists (where applicable), users can perform the Quick Job, Create a Job, Patch Now, Schedule Reboot, Isolate, and Revert Isolation actions if they also have at least View permission for Sites > Sites and Sites > Devices. |
| None | View | Manage | |
|---|---|---|---|
| Active Reports | The Analytics > Reports menu is not displayed. The Quick Report action button cannot be accessed on the device summary page and on device list pages. | The Analytics > Reports menu is displayed. The Quick Report action button cannot be accessed on the device summary page and on device list pages. On the Reports page, users cannot create new reports. Users can access Active Reports and Completed Reports; however, they cannot edit or delete existing reports. |
Same as for View permission, but users can also create, edit, and delete reports. The Quick Report action button can also be accessed on the device summary page and on device list pages. |
| None | View | Manage | |
|---|---|---|---|
| Billing | The Setup > Licenses menu is not displayed. A banner is not displayed if the license limit has been exceeded. |
The Setup > Licenses menu is displayed. Users can view their license count and usage, but they cannot add licenses. A banner is not displayed if the license limit has been exceeded. |
Same as for View permission, but users can also add licenses. A banner is displayed if the license limit has been exceeded. |
| My Info | The Setup > My Settings menu is displayed but only the fields in the Preferences section are visible and editable. Users with a Datto Partner Portal account can click the View in Partner Portal button to open the User Settings page in Datto Partner Portal. |
Same as for None permission, but both the Preferences section and the Details section are visible. However, only the fields in the Preferences section are editable. Users can merge a Datto RMM account and a Datto Partner Portal account. |
Same as for View permission, but with the exception of Username and Email address, all fields in the Details section are also editable. |
|
Messages |
The Send Message action button is not displayed on the device summary page and displayed but unavailable on device list pages. | Same as for None permission. | Users can see the Send Message action button on the device summary page and it is available on device list pages as well if they also have at least View permission for Sites > Sites and Sites > Devices. |
|
Global Settings |
The Setup > Global Settings menu is not displayed. The Setup > Credentials menu is displayed, but users cannot view or create global credentials. |
The Setup > Global Settings menu is displayed. Users can view global settings, but they cannot configure the settings. The Setup > Credentials menu is displayed, and users can view global credentials, but they cannot create, edit, or delete global credentials. |
Same as for View permission, but users can also configure all settings on the Global Settings page and view, create, edit, and delete global credentials on the Credentials page. |
|
Integrations |
The Setup > Integrations menu is not displayed. | Same as for None permission. | The Setup > Integrations menu is displayed. Users can access and configure the integrations. |
Turn on this toggle to enable visibility of all Datto SaaS Protection data for the security level you are configuring.
A user with Manage permission for Setup > Integrations must enable the integration for the account from the Integrations page. For instructions, refer to Datto SaaS Protection Integration.
NOTE Unlike the other options in the Permissions section, the Datto SaaS Protection permissions are not tiered. If this toggle is off, the permissions are equivalent to None (no visibility of Datto SaaS Protection data in Datto RMM). If this toggle is on, the permissions are equivalent to Manage (full visibility of Datto SaaS Protection data in Datto RMM).
Enable this option to allow assigned users to approve or deny devices that are new or have had their encryption key changed. For information on device approvals, refer to Device approval.
A user with the Administrator security level must enable the integration for the account from the Integrations page. For instructions, refer to Enable the Microsoft 365 Integration.
| None | View | Manage | |
|---|---|---|---|
| Tenants | The Microsoft 365 menu is not displayed. | The Microsoft 365 menu and data are displayed, and the ability to perform user-related actions is dependent on the subsequent permission levels selected. | Same as for View permission. |
| Users | The Microsoft 365 > All Users menu item is not displayed. | The Microsoft 365 > All Users menu item is displayed and available to access the list of users and individual user details. Users cannot create, edit, and offboard Microsoft 365 users. |
Same as for View permission, but users can create, edit, and offboard users. |
| Details | On the user details page, the Details card is not displayed. | On the user details page, the Details card is displayed but cannot be edited. | On the user details page, the Details card is displayed and can be edited. |
| Groups | On the user details page, the Groups card is not displayed. | On the user details page, the Groups card is displayed but cannot be edited. | On the user details page, the Groups card is displayed and can be edited. |
| Roles | On the user details page, the Roles card is not displayed. | On the user details page, the Roles card is displayed but cannot be edited. | On the user details page, the Roles card is displayed and can be edited. |
| Licenses | On the user details page, the Licenses card is not displayed. | On the user details page, the Licenses card is displayed but cannot be edited. | On the user details page, the Licenses card is displayed and can be edited. |
| Sign-in Actions | On the user details page, the Signin Logs card is not displayed. | On the user details page, the Signin Logs card is displayed, but the Reset Password, Create Temporary Access Password, Block Sign In, Unblock Sign In, and Revoke all user sessions actions cannot be performed. | On the user details page, the Signin Logs card is displayed, and the Reset Password, Create Temporary Access Password, Block Sign In, Unblock Sign In, and Revoke all user sessions actions can be performed. |
| Devices | On the user details page, the Devices card is not displayed. If devices are mapped, the ability to click hostname links to open Microsoft 365 devices from Datto RMM (and vice versa) is not available. |
On the user details page, the Devices card is displayed. If devices are mapped, the ability to click hostname links to open Microsoft 365 devices from Datto RMM (and vice versa) is available. |
Same as for View permission. |
Enable this option to allow assigned users to view and use Activity Log Insights. Refer to Activity Log Insights.
Enable this option to allow assigned users to view and use Device Insights. Refer to Device Insights.
This section controls access to remote tools available in the web interface and the Agent Browser or in Web Remote sessions and chats. When creating a new security level, all tools listed in the table below are enabled by default. The table specifies which tools are available in the web interface and the Agent Browser and via Web Remote. Disabling any of the tools will inactivate that tool for the user who is a member of the security level.
NOTE Changes made in this section will come into effect only once the Agent Monitor application on the remote device has been exited and restarted.
Detailed information about how to access the tools can be found in the following topics:
To learn more about each tool and which device types they are available for, click the referenced sections in the table below.
| Field | Description | Web Interface | Agent Browser | Web Remote |
|---|---|---|---|---|
| Toggle all | Enabled by default for new accounts. Turn on the toggle to enable or disable access to all available remote control tools. |
|
||
| Chat | For the Agent Browser, refer to Chat. For Web Remote, refer to Initiate a Web Remote chat. |
|

|
|
| Command Shell | Refer to Command Shell. |
|
|
|
| Custom Connection | Refer to Connect (Custom Tunnel). |
|
|
|
| Drive Information | Refer to Drive Information. |
|
|
|
| Event Viewer | Refer to Event Viewer. |
|
|
|
| File Manager | For the Datto RMM Agent, refer to File Management. For Web Remote, refer to File Transfer. This option must be enabled for users, including users with support access enabled, to download a device's Agent logs. Refer to Download Agent Logs. IMPORTANT The File Manager tool requires SYSTEM permissions to any file or folder you wish to take actions against. Refer to How do I enable SYSTEM access to files or folders?. |
|
|
|
| HTTP | Refer to Connect (HTTP). |
|
|
|
| LAN Deploy | Refer to Agent Deployment. |
|
|
|
| Notes | Refer to Notes. |
|
|
|
| PowerShell | For the Agent Browser, refer to PowerShell. For Web Remote, refer to Initiate a Web Remote PowerShell session. |
|
|
|
| Quick Jobs | Refer to Quick Jobs. |
|
|
|
| RDP | Allows you to use RDP and Splashtop. Refer to RDP and Splashtop Remote Screen Share Integration. IMPORTANT The RDP tool must be enabled for the Agent Browser device action button to be available. Refer to Action buttons. |
|

|
|
| Registry Editor | Refer to Registry Editor. |
|
|
|
| Restart/Shutdown | Refer to Restart and Shut Down. |
|
|
|
| Screen Share | Refer to VNC. |
|
|
|
| Screenshot | Refer to Screenshot. |
|
|
|
| Services | Refer to Windows Services. |
|
|
|
| SSH/Telnet | Refer to Connect (Telnet/SSH). |
|
|
|
| Task Manager | Refer to Task Manager. |
|
|
|
| Thumbnail Screen | Refer to Thumbnail Screen. |
|
|
|
| Wake-on-LAN | Refer to Wake Up. |
|
|
|
| Web Remote | Refer to Web Remote. |
|
|
|
| Web Remote Autotask | Refer to Autotask companion in Web Remote. NOTE This toggle is turned on by default in existing security levels that had the Web Remote tool toggle turned on. |
|
|
|
| Web Remote Autotask Search | Refer to Autotask companion in Web Remote. NOTE This toggle is turned off by default in all existing security levels other than the Administrator security level. |
|
|
NOTE If integrated with KaseyaOne, and access groups are enabled, the following warning will appear at the top of the Membership section:
Refer to Automatically assign access to Datto RMM based on KaseyaOne groups.
This section allows you to assign the security level to a list of users. To include or exclude users, follow these steps:
- Click Add User.
- From within the pane that opens, click Add for each user you wish to include in this security level or click Add all to include all users. You can use the search bar to search for a user, or you can simply scroll down in the list. Click Remove for each user you wish to exclude from this security level. When you are finished, click X to close the pane.

- You can also remove users in bulk or individually on the Create Security Level page by clicking the Remove all button or the delete icon , respectively.
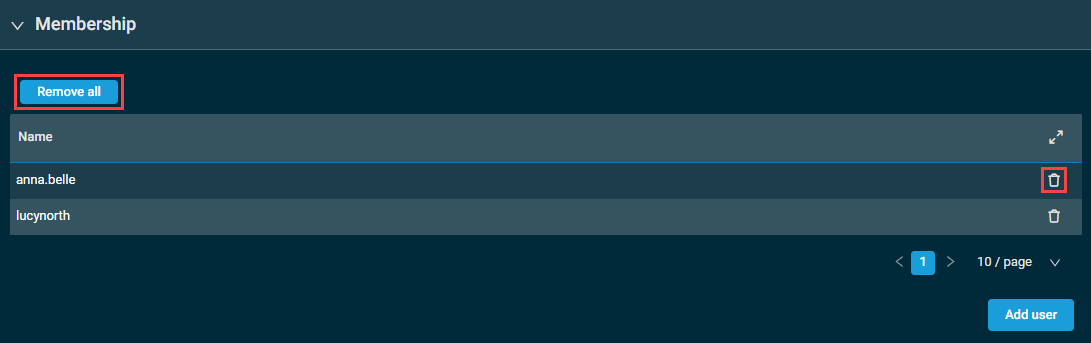
IMPORTANT You cannot remove a user from a security level if it is their default security level. When saving your changes, a warning message will appear listing all users that cannot be removed. Click the Add all button to add these users back to the members list.
You can update a user's default security level when editing the user. Refer to Editing a user.
The table density is set to condensed theme by default. To change it to relaxed theme, click the density toggle icon.
The number of results displayed can be specified by selecting the desired number from the pagination control. This selection will persist the next time the page is accessed.
When you are finished creating the security level, click Create Security Level. Once the security level has been saved, you will be redirected to the Security Levels page.
If you do not wish to save the security level, click Cancel.
When you create a new security level, we recommend that you assign it to yourself first to see if it restricts or allows everything you want it to. Testing a security level is important to ensure that users with that security level are able to access the tools or information they require to perform their daily tasks. It is also equally important to ensure that they don't have access to anything they shouldn't. To learn how you can change security levels to test them, refer to Switching security levels.
IMPORTANT If you give third-party users (such as your customers) access to the account, ensure that the security level restrictions meet your internal data security requirements.
You can create a security level that grants remote takeover access to devices within selected Device Groups without giving access to the devices' sites as well. This configuration may be useful in scenarios where users, technicians, or third-party software providers need to access one or more devices in one or more sites in order to provide remote support.
Configure the security level in the following way:
- Device visibility: Only enable Device Groups, and add Device Groups that members of this security level should be able to access.
- Permissions: Enable Sites with View permission for all areas.
- Remote control tools: Enable all tools.
- Membership: Add users that should be members of this security level.
The configuration described above allows members of this security level to access a restricted version of the web interface.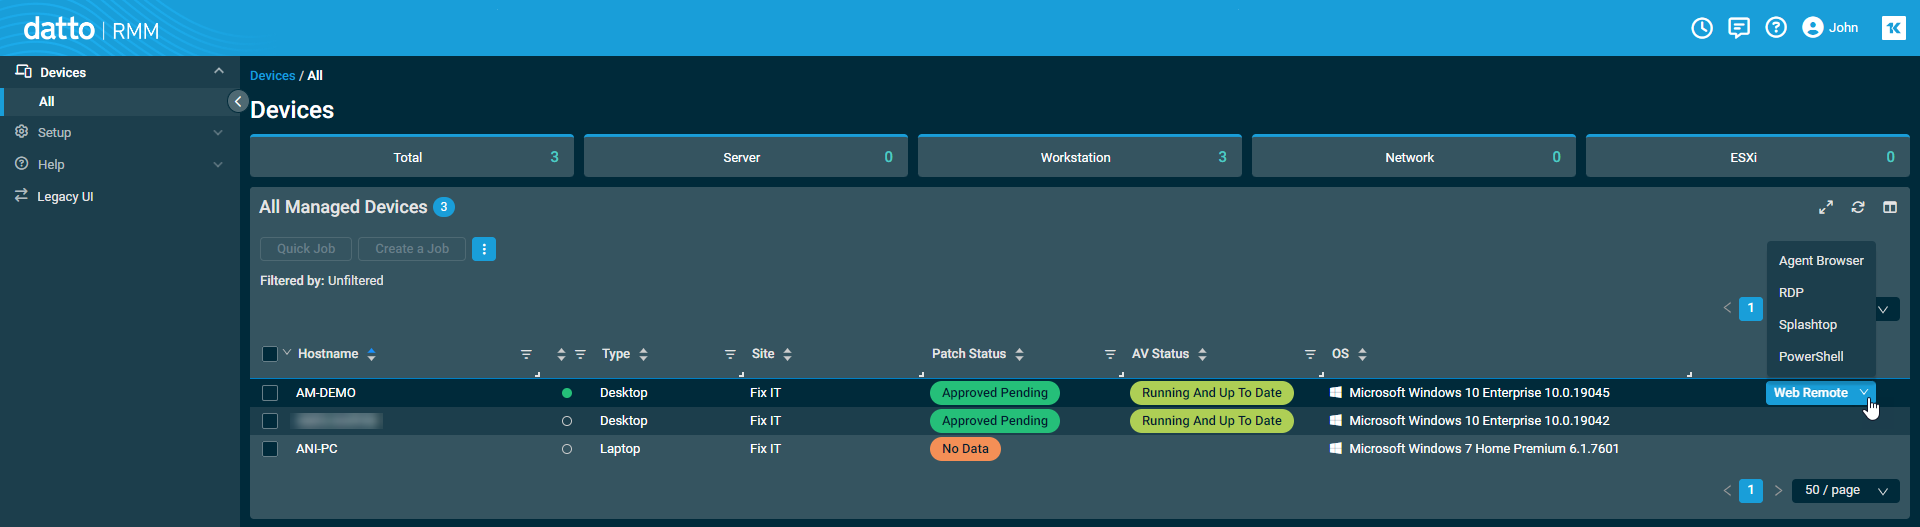
- Users will be able to see and export a list of devices that are included in the selected Device Groups.
- Users will be able to use remote actions and the Agent Browser tools.
- Users will not be able to access the devices' device summary page, jobs, dashboards, the ComStore, components, filters, policies, and reports.
NOTE Users with this type of security level setup will not be able to see the Global Search bar at the top of the screen.
NOTE Users will not be able to see alerts associated with devices as that would also require Sites to be enabled under Device Visibility.
Viewing and managing security levels
Navigate to the Security Levels page by following the navigation path described in Security and navigation.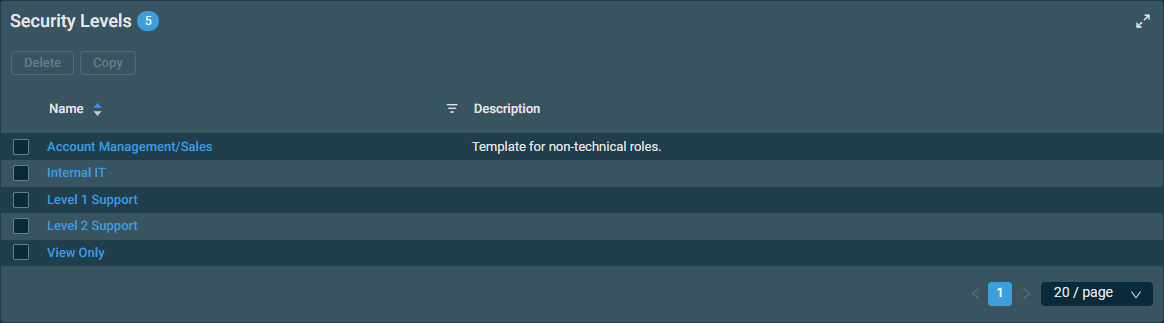
The table displays the following information:
| Field | Sortable? | Description |
|---|---|---|
| Name |
|
The name of the security level. To narrow the list, click the filter icon  , enter a term, and click Apply. To see the full list, click Reset. Click the name of the security level to edit the security level. Refer to Creating a security level. , enter a term, and click Apply. To see the full list, click Reset. Click the name of the security level to edit the security level. Refer to Creating a security level. |
| Description | The description of the security level. |
The table density is set to condensed theme by default. To change it to relaxed theme, click the density toggle icon. The selection will persist across all pages.
The number of results displayed can be specified by selecting the desired number from the pagination control. This selection will persist the next time the page is accessed.
Action buttons
The action buttons are unavailable if no row is selected. The check box allows you to select one row at a time. The table below lists all available action buttons.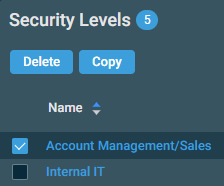
| Action Button | Description |
|---|---|
| Copy | Allows you to copy an already existing security level. You can then modify the security level details of the copy as necessary. The copy will be named Copy of [existing security level's name] by default. Refer to Creating a security level. |
| Delete |
Deletes the selected security level upon confirmation.
NOTE You can find this value in the Name line within the dialog box. 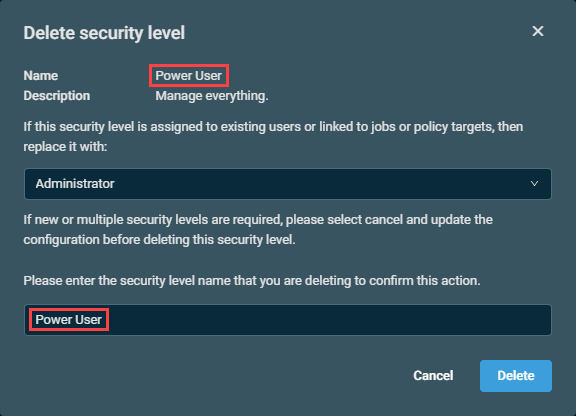
IMPORTANT The following actions are performed when a security level is deleted: |
Navigate to the Security Levels page by following the navigation path described in Security and navigation. You can edit a security level in the following ways:
- To update the details of a security level, click its name in the list. Refer to Creating a security level.
- To delete a security level, select it from the list and click Delete. Refer to Delete.
- To copy a security level, select it from the list and click Copy. Refer to Copy.
If a user has more than one security level assigned, they can change their security level in the web interface or in the Agent Browser.
Web interface
You can change your security level from any page by clicking your name. In the drop-down menu, click the name of the security level you want to use to change your current security level. Your current security level will have a check mark next to it.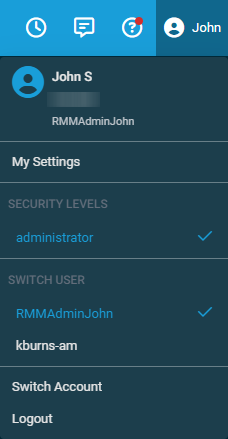
This can also be changed in the My Settings menu. Refer to Current Security Level in My Settings.
Agent Browser
- On the local device where Datto RMM is installed, right-click the Datto RMM Agent icon in the system tray and click Open.
- Log in with your credentials.
- Click the first menu option in the upper-left corner of the Agent Browser.
- Hover over Security Level and select the required security level from the list.
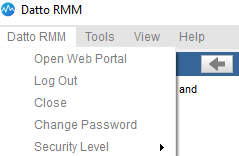
- You will be logged out of the Agent automatically.
- Log back in to be able to use the selected security level.
Best practices (security level templates)
Navigate to the Security Levels page by following the navigation path described in Security and navigation. Click Best Practices and then click Create next to one of the security level templates.
These templates serve as guides with recommended settings for common use cases; however, you can change any of the settings before saving the security level. Refer to Creating a security level.
In this scenario, one of your customers has an internal IT department and will use your RMM to service their devices. The template is configured the following way:
Name: Internal IT (Template)
Description: Template for internal IT team to access their own devices.
Configuration - Device Visibility:
| Field | Description |
|---|---|
| Sites | Enabled. Add sites that members of this security level should be able to access. |
| Site Device Groups | Disabled. |
| Device Groups | |
| Site Groups |
Configuration - Permissions:
| Area | Permissions |
|---|---|
| Global | Disabled. |
| Sites | Enabled. None: Monitor, Support, Filters, Groups, Policies, Settings, Deleted Devices View: Sites, Summary, Audit, Manage Manage: Devices |
| Components | Disabled.
|
| ComStore | |
| Jobs | |
| Reports | |
| Setup | |
|
Datto SaaS Protection |
|
|
Device Approvals |
|
|
Microsoft 365 |
Remote control tools: All tools are enabled except LAN Deploy and Notes.
Membership: No users are added. Add users that should be members of this security level.
In this scenario, your technicians have different access privileges based on role. This security level is suitable for screensharing and basic access. The template is configured the following way:
Name: Tier 1 Helpdesk (Template)
Description: Template for your Tier 1 or Helpdesk staff. This security level permits members to remotely control devices with limited other access.
Configuration - Device Visibility:
| Field | Description |
|---|---|
| Sites | Enabled. All sites are included. |
| Site Device Groups | Disabled. |
| Device Groups | |
| Site Groups |
Configuration - Permissions:
| Area | Permissions |
|---|---|
| Global | Enabled. None: Audit, Manage, Monitor, Support, Policies, Filters, Groups View: Dashboard Manage: N/A |
| Sites | Enabled. None: Policies, Settings, Deleted Devices View: Sites, Summary, Audit, Manage, Monitor, Support, Filters, Groups Manage: Devices |
| Components | Disabled. |
| ComStore | |
| Jobs | Enabled. None: N/A View: N/A Manage: Active Jobs |
| Reports | Disabled.
|
| Setup | |
|
Datto SaaS Protection |
|
|
Device Approvals |
|
|
Microsoft 365 |
Remote control tools: Chat, Quick Jobs, Screen Share, Screenshot, Task Manager, Thumbnail Screen, and Web Remote are enabled. The rest of the tools are disabled.
Membership: No users are added. Add users that should be members of this security level.
In this scenario, you have non-technical staff who need access to device information only. The template is configured the following way:
Name: Account Manager/Sales/Non-Technical (Template)
Description: Template for sales or non-technical staff. This security level permits members to view device information only with no remote control to devices.
Configuration - Device Visibility:
| Field | Description |
|---|---|
| Sites | Enabled. All sites are included. |
| Site Device Groups | Disabled. |
| Device Groups | |
| Site Groups |
Configuration - Permissions:
| Area | Permissions |
|---|---|
| Global | Enabled. None: Monitor, Support, Policies View: Dashboard, Audit, Manage, Filters, Groups Manage: N/A |
| Sites | Enabled. None: Monitor, Support, Policies, Settings, Deleted Devices View: Sites, Summary, Devices, Audit, Manage, Filters, Groups Manage: N/A |
| Components | Disabled. |
| ComStore | |
| Jobs | |
| Reports | Enabled. None: N/A View: N/A Manage: Active Reports |
| Setup | Disabled. |
|
Datto SaaS Protection |
|
|
Device Approvals |
|
|
Microsoft 365 |
Remote control tools: All tools are disabled.
Membership: No users are added. Add users that should be members of this security level.
Potential configurations for co-managed environments
Some of the users you invite to your Datto RMM account may require security level configurations that accommodate specific employee or customer roles and tasks. These configurations accomplish a combination of fully granting, somewhat restricting, or completely denying access to relevant features and functions in Datto RMM. In any co-managed scenario, you can restrict or grant global access to each feature of Datto RMM (for example, permission to view dashboards). This granularity is useful, as you may want to restrict certain users to accessing only what is relevant to their site and not accessing any global settings. Dashboards, for example, will reflect data of only the devices the logged-in user has access to. For any user that has access only to devices and not to full sites, dashboards are completely hidden, even with View permission for Global dashboards enabled.
IMPORTANT The following configurations are recommended best practices. When you create any customized security level, Datto RMM highly recommends adding your own user account in the Membership section, switching your user account to that security level, and testing out the configuration before officially assigning other users to the security level. Refer to Switching security levels.
Use case
A user needs access to one or more devices that reside within one or more sites but not all devices that belong to any one site. The user only needs to be able to remote into these devices using Datto RMM and requires no other access.
Explanation
This security level allows the user to log in to Datto RMM and see only the names of devices that are in the Device Group they are given access to and remote into them. The user will not be able to view device details, monitoring data, and so forth. The Web Remote option in the list of devices will be available for devices that are online. Refer to Web Remote.
NOTE Datto RMM recommends that you mock up this security level with no Device visibility options enabled and save it as a template, as you will have to create a separate security level with a different Device Group specified for access for each user that requires access to their own machines.
While this security level is extremely restrictive, keeping users out of the device summary page itself, users can still modify the Column Chooser. This allows them to see information like operating system, patch status, domain, AV product, UDF values, and so forth. Refer to Column Chooser - Devices.
Suggested configuration
Enable access to a Device Group that contains the device(s) the user needs to remote into.
NOTE Do not turn on the Site Device Groups toggle, as access to Site Device Groups will not work in this scenario.
Global
- Dashboard > View
- None for all other options
Sites
- Devices > View
- None for all other options
Turn on only the Web Remote toggle. Turn off all other toggles.
Use case
You need to provide basic access to Datto RMM to one of your technicians, including the ability to run components against devices the technician user has access to.
Explanation
This security level is a suggested minimum setting configuration for an L1 user, including the ability to run jobs against devices.
Users with this security level will have high visibility of information for the devices, sites, and groups they have access to, but they will not be able to modify any settings or perform any actions other than creating new jobs against devices and deleting or moving devices in Datto RMM.
NOTE You do not need to grant access to components or the ComStore for a user to be able to view components. Component access is controlled by the component level, so a user with this security level must be assigned the applicable component level. Refer to Component Level in Users.
In addition to component level, for any custom components that are created, you can limit which sites a component should be used against. As a result, if a user does not have access to a certain site, then they won’t be able to use that component even if they're assigned the appropriate component level.
For more information on limiting components by site, refer to Sites in Creating a component.
Suggested configuration
Enable access only to the sites, devices, and groups the technician needs to support.
Global
- Dashboard > View
Sites
- Sites > View
- Summary > View
- Devices > Manage
- Audit > View
- Manage > View
- Monitor > View
- Support > View
- Filters > View
- Groups > View
Jobs
- Active Jobs > Manage
Turn on only the following toggles:
- Chat
- Event Viewer
- Quick Jobs
- Screen Share
- Task Manager
- Screenshot
- Thumbnail Screen
- Web Remote
Turn off all other toggles.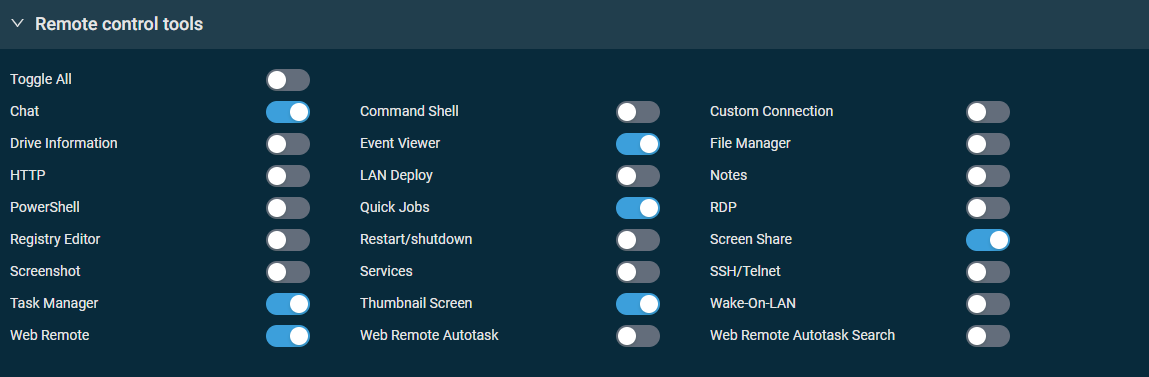
Use case
You need to provide basic access to Datto RMM, specifically for the ability to run components against devices for a specific site.
Explanation
This scenario is a pared-down version of scenario 2, focusing on what is needed to run jobs against devices only.
The user will have permission to run what they have access to but not to create their own components.
As in scenario 2, the component level assigned to the user drives this scenario (as well as the selected sites on any component downloaded from the ComStore or created manually).
When creating a component, you can hide it from users of any component level who don’t have access to certain sites. Simply edit that component to be available for only those sites as opposed to all sites.
Suggested configuration
Enable access only to the sites, devices, and groups the technician needs to support.
Global
- Dashboard > View
Sites
- Sites > View
- Summary > View
- Devices > Manage
Jobs
- Active Jobs > Manage
Turn off all toggles.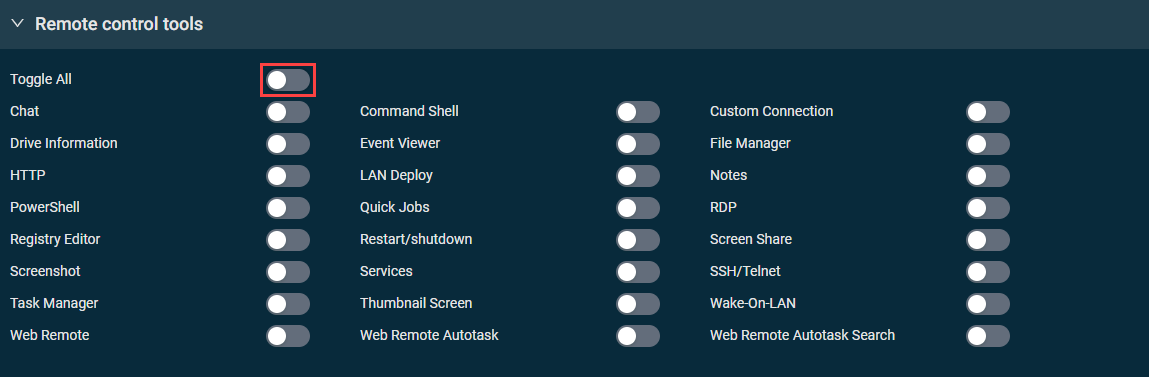
Use case
A user should have access to only dashboards. For general details about dashboards, refer to Dashboards.
EXAMPLE The user needs to be able to present Datto RMM dashboards on a TV in the office, but they require no other access to Datto RMM.
Explanation
This security level requires only View permission for dashboards.
If the user should be able to create or edit dashboards, they should have Manage permission instead. Alternatively, another user can configure dashboards and then share them with this security level. Refer to Dashboard sharing.
Suggested configuration
Enable access to all sites and devices the user should be able to view or present data on.
NOTE You can use Device Groups to create a specific subset of devices for which a dashboard will show metrics. For example, a dashboard could show if any devices from a Device Group consisting of mission-critical devices are offline.
Global
- Dashboard > View
Turn off all toggles.
Use case
Local IT would like to use Datto RMM to help manage their own machines. Their access to Datto RMM ensures they only have access to the devices and features they need for their day-to-day operations.
Explanation
This security level is a minimum recommended configuration for any user that needs some access to handle co-managed devices for their site(s). The permissions can be changed or elevated based on need, but if you deviate from the recommended settings, you should test the security level to make sure you are not granting more access than desired. If they need to be able to manage devices, monitors, and so forth, a good rule of thumb is to limit Global permissions and instead grant permissions for Sites. In that case, they only see data in relation to the sites and devices they need to manage.
Suggested configuration
Enable access only to the sites, devices, and groups the user needs to support.
Global
- Dashboard > View
Sites
- Sites > View
- Summary > View
- Devices > Manage
- Audit > View
- Manage > View
- Monitor > View
Jobs
- Active Jobs > View
Ensure the following toggles are turned on:
- Chat
- Event Viewer
- Screen Share
- Screenshot
- Task Manager
- Thumbnail Screen
Turn off all other toggles.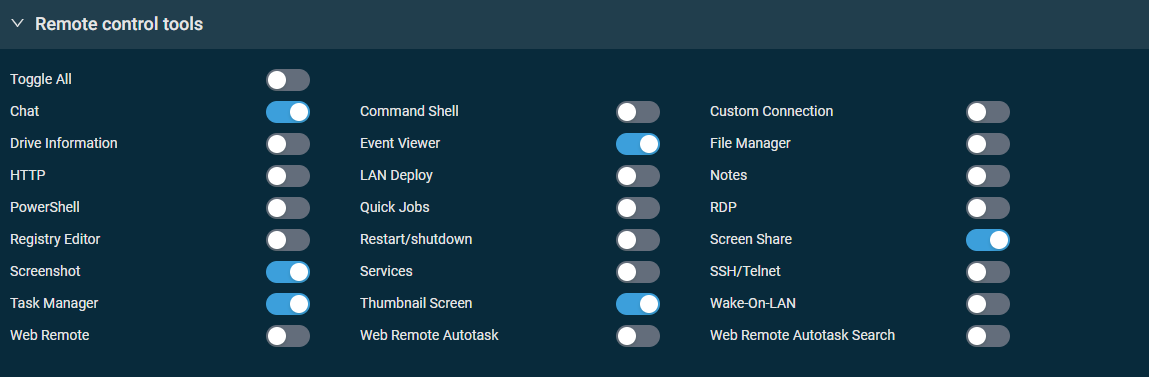
Use case
A user needs access to Datto RMM to view how many devices are in each customer site.
Explanation
This security level will allow users to see sites and the number of devices that belong to those sites. They will be able to see all device names and other device information available in site-level or global device lists. Refer to Devices. If they click a device hostname, they will see that the device does not exist, as they won't have access to view further device details on the device summary page. Refer to Device summary.
NOTE While this is an ideal way to allow users in to perform their own at-a-glance counts, if they don’t need persistent access to this data (for example, they only need the device counts at the end of the month for billing), then a scheduled report emailed to the user that needs that information may suffice.
The Site Device Count export provides total counts per site and per device type, which typically encompasses all information needed for billing purposes. Refer to Site Device Count export.
Suggested configuration
Enable access to all sites and devices.
Global
- Dashboard > View
Sites
- Sites > View
- Summary > View
Turn off all toggles.
Use case
A user requires as much as access as possible to the functions and features of Datto RMM for one or more sites without possessing more access than necessary.
Explanation
This security level ensures the user cannot execute changes globally.
NOTE If this user is creating their own components, they must ensure they restrict them to their site(s) in the Sites section when building. Any components this user creates may be viewable/usable by other users who have access to run jobs.
Suggested configuration
Enable access only to the sites, devices, and Device Groups the user needs to support.
Global
- Dashboard > Manage
Sites
- Sites > Manage
- Summary > Manage
- Devices > Manage
- Audit > Manage
- Manage > Manage
- Monitor > Manage
- Support > Manage
- Filters > Manage
- Groups > Manage
- Policies > Manage
- Settings > Manage
Components
- Components > Manage
- User Tasks > View
Jobs
- Active Jobs > Manage
Device Approvals
-
Enabled
Ensure all toggles are turned on.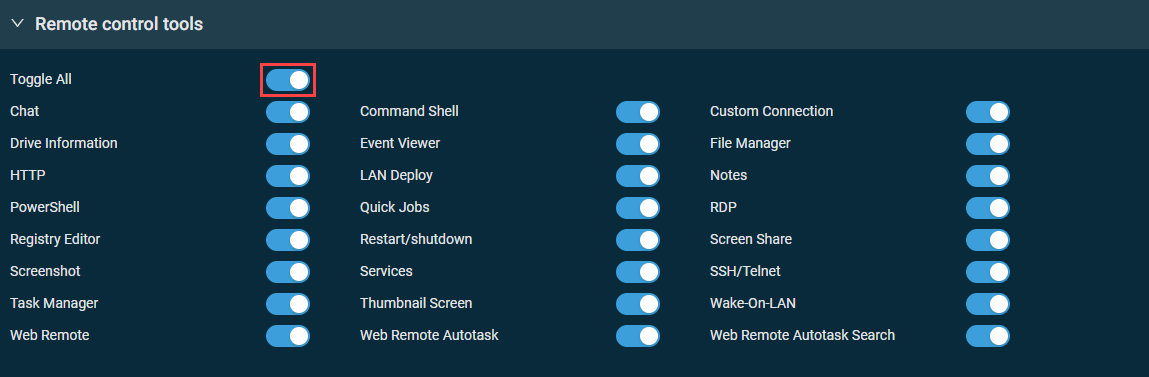
Use case
A user needs to access Datto RMM to view and create policies for the site(s) they should manage.
Explanation
This security level allows users to view and modify any policies created at the site level for sites they can access. If any user needs to have access to view or manage policies for a site, they must have full access to that site.
In this case, the user is granted access to modify filters and groups at the site level so they can create their own targets for policies. This way, the user is not limited to the Default Device Filters available to all users. If the user won't require this permission, View access to filters should suffice, and you can remove group access.
NOTE This user will be able to see the names, targets, scopes, sites, and types of all policies in the account but can only view and modify policies specific to sites they have access to.
Suggested configuration
Enable access to any sites necessary.
NOTE The user must have access to a full site to manage policies for that site.
Global
- Dashboard > View
Sites
- Sites > View
- Summary > View
- Devices > Manage
- Audit > View
- Manage > View
- Monitor > View
- Support > View
- Filters > Manage
- Groups > Manage
- Policies > Manage
Turn off all toggles.


