Site lists - Legacy UI
PERMISSIONS Permission to view Sites
NAVIGATION Legacy UI > Sites
Refer to Sites.
When logging in to Datto RMM, you land on the Sites page, which lists all the sites you currently have in your account.
You can also access a list of your sites by opening a group they are associated with. For more information, refer to Groups - Legacy UI.
To add a new site to your account, refer to Adding a site - Legacy UI.
For further information about site types, refer to Site types: Managed and OnDemand.
Sites tab
Click the Sites tab to see a list of your sites in your Datto RMM account. By default, the following information is displayed:
| Field | Description |
|---|---|
| Name | The name of the site. Click the hyperlink to open the Site summary - Legacy UI page. You can edit the site's name in the General section of Site Settings - Legacy UI. |
| Description | Click to update the description of the site. You can also update it in the General section of Site Settings - Legacy UI. |
| ID | The unique identifier of the site. This field cannot be edited as it is hard-coded. |
| Devices | Shows the total number of devices that have this site's Agent installed. Click the hyperlinked number to be directed to the list of devices. |
| Offline | Shows the number of devices that have this site's Agent installed and are offline. Click the hyperlinked number to be directed to the list of devices. |
| Proxy | Shows the site's proxy settings that you can configure in Site Settings - Legacy UI. |
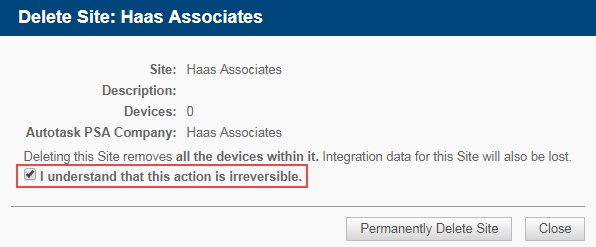
| Delete site | The Delete site icon The following will also be deleted along with the site:
NOTE Filters and groups that were exclusively using the deleted site as a criterion, targeting the deleted site, or targeting devices in the deleted site will also be deleted. However, if a filter or group is in use by multiple sites, only the deleted site will be removed.  For information about deleted devices, refer to Manage deleted devices. |
You can perform the following actions:
| Field | Description |
|---|---|
| Column Chooser |
The Column Chooser allows you to select which columns should be visible in the list. |
| Search | A dynamic search field that allows you to search for your sites. As you type, the search results are narrowed to match your search string. |
| Show entries | Select to show 10 / 25 / 50 / 100 entries per page. |
| Context menu |
Hover over the context menu and select one of the following Shortcuts: • Summary - Refer to Site summary - Legacy UI. • Device List - Refer to Device lists - Legacy UI. • Audit - Refer to Audits - Legacy UI. • Manage1 - Refer to Patch Management - Legacy UI. • Monitor1 - Refer to Manage alerts - Legacy UI. • Support - Refer to (Deprecated) Managing tickets - Legacy UI. • Policies1 - Refer to Managing policies - Legacy UI. • Settings - Refer to Site Settings - Legacy UI. |
| Previous / Next | Click on Previous / Next to see the previous or next page of results. |
1 Not available for OnDemand sites.
There are a number of extra buttons available in the Action bar:
| Icon | Name | Description |
|---|---|---|
|
|
Add site(s) to Site Group | Add the selected site(s) to a Site Group. Refer to Groups - Legacy UI. |
|
|
Edit description of selected sites | Edit the description of the selected site(s). Refer to Site Settings - Legacy UI. |
|
|
Schedule a job | Schedule a job for the selected site(s). Refer to Job scheduler - Legacy UI. |
|
|
Run a quick job | Run a component through a quick job for the selected site(s). Refer to Quick jobs - Legacy UI. |
|
|
Export to CSV | Allows you to export a list of the devices in the selected sites in .CSV format. Make sure to select/clear the columns you want to include/exclude in the export. NOTE Microsoft Excel is unable to properly display UTF-8 compliant CSV files when they contain non-English characters. |
|
|
Send a message to the selected devices | Send a message to all the devices in the selected site(s). The message will pop up on the devices once they are online. Supported device types: Windows and macOS. Note: It usually takes a few minutes for the message to appear. |
|
|
Schedule reports | Schedule one or more reports for the selected site(s). Refer to Report scheduler - Legacy UI. |
|
|
Map site(s) to Autotask PSA company | Map the selected site(s) to an Autotask company. Once you have clicked on the icon, the Map Sites page will open. For more information about the options on this page, refer to Adding a site - Legacy UI. NOTE This icon is only displayed if your Datto RMM account has been integrated with Autotask. Refer to Autotask Integration. |
|
|
Refresh | Refreshes the current view. This will show your sites' most up-to-date status. |


