Autotask Integration
 Security and navigation
PERMISSIONS In Datto RMM, default security level of Administrator. In Autotask, security level of API User. Refer to Permissions.
NAVIGATION Setup > Integrations > Autotask
Permissions
IMPORTANT You must have a default security level of Administrator in Datto RMM when configuring the integration. If you have more than one security level, ensure Administrator is selected as your default security level. For more information, refer to Creating a user.
IMPORTANT You must use an Autotask sync account when running the integration setup wizard, and this Autotask user account must have a security level of API User, and Datto RMM must be selected as the Integration Vendor. Refer to this topic in the Autotask Help system: Adding or editing an API user. Make sure that in the security level settings, the Not required to change password (password does not expire) check box is selected. Refer to this topic in the Autotask Help system: Other security settings. Also ensure that the API user's domain matches the primary domain of your Autotask database.
IMPORTANT In Autotask, ensure that all Protected Data Permissions are enabled for the sync account. You can do this in Autotask by navigating to Autotask PSA menu > Admin > Company Settings & Users > Resources/Users (HR) > Security > Protected Data Permission. For more information, refer to this topic in the Autotask Help system: Viewing protected data.
About the integration
The advanced integration of Autotask and Datto RMM introduces a truly unified business management platform, featuring the following:
- Map Autotask organizations to one or multiple Datto RMM sites.
- Each monitor type and the end client Agent tickets can be configured to create tickets in Autotask in designated queues with configurable issue, sub-issue, work type, and ticket note defaults. The defaults can be overridden for specific monitors.
- Tickets can be manually created for alerts that do not automatically create a ticket.
- Datto RMM device types can be mapped to Autotask products and configuration item types.
- Datto RMM device user-defined fields (UDFs) can be mapped to Autotask configuration item UDFs.
- Datto RMM alerts can automatically be closed if the Autotask alert ticket is completed using an Autotask workflow rule and extension callout. Workflow rules in Autotask automatically perform certain updates and actions when specific events happen and conditions are met. You have a number of attributes that are specific to Datto RMM and that are available for use in Autotask workflow rules.
For more information, refer to this topic in the Autotask Help system: Navigating from the Autotask organization to the RMM site.
To learn how to add and edit workflow rules, refer to the workflow rules topics in the Autotask Help system: Autotask workflow rules.
- The single sign-on (SSO) functionality allows you to be automatically logged in to Datto RMM if you are already logged in to Autotask and you click an SSO-enabled link from within Autotask.
- You can make your workflow simpler by having your Autotask alert ticket be automatically resolved when the corresponding Datto RMM alert is resolved. You can also specify when a Datto RMM alert should be considered repeating or related to another alert.
- You can use attributes that are specific to Datto RMM in Autotask workflow rules.
- Datto RMM alert and device dashboard tabs are available in Autotask. The dashboards are configured based on the additional device data that is synced between Datto RMM and Autotask.
- Datto RMM devices can be mapped to billing contracts in Autotask. Datto RMM devices appear in Autotask in real time without a manual device discovery process. On the Endpoint Management Configuration Item Mapping page in Autotask, you can assign a contact, a billing contract and, for recurring service contracts, a service or bundle to the device. You can also set the device as Reviewed for Contract (which removes it from the page).
- You can access a number of Datto RMM tools right from Autotask using right-click and context menus.
- You can access and manage Autotask tickets from within a Web Remote session. Refer to Autotask companion in Web Remote.
For more information, refer to this topic in the Autotask Help system: Mapping discovered devices to a contact and contract.
IMPORTANT Kaseya recommends that only one Datto RMM account be synchronized to an Autotask database. Connecting an additional Datto RMM account to the same Autotask database will remove the original link, and the existing integration will no longer function.
IMPORTANT If you plan on changing the domain of your Autotask database, make sure this integration is disabled first. You can re-enable the integration after the domain change is completed. Refer to Disable the Autotask integration.
Best practice for integrating Autotask, Datto RMM, and IT Glue
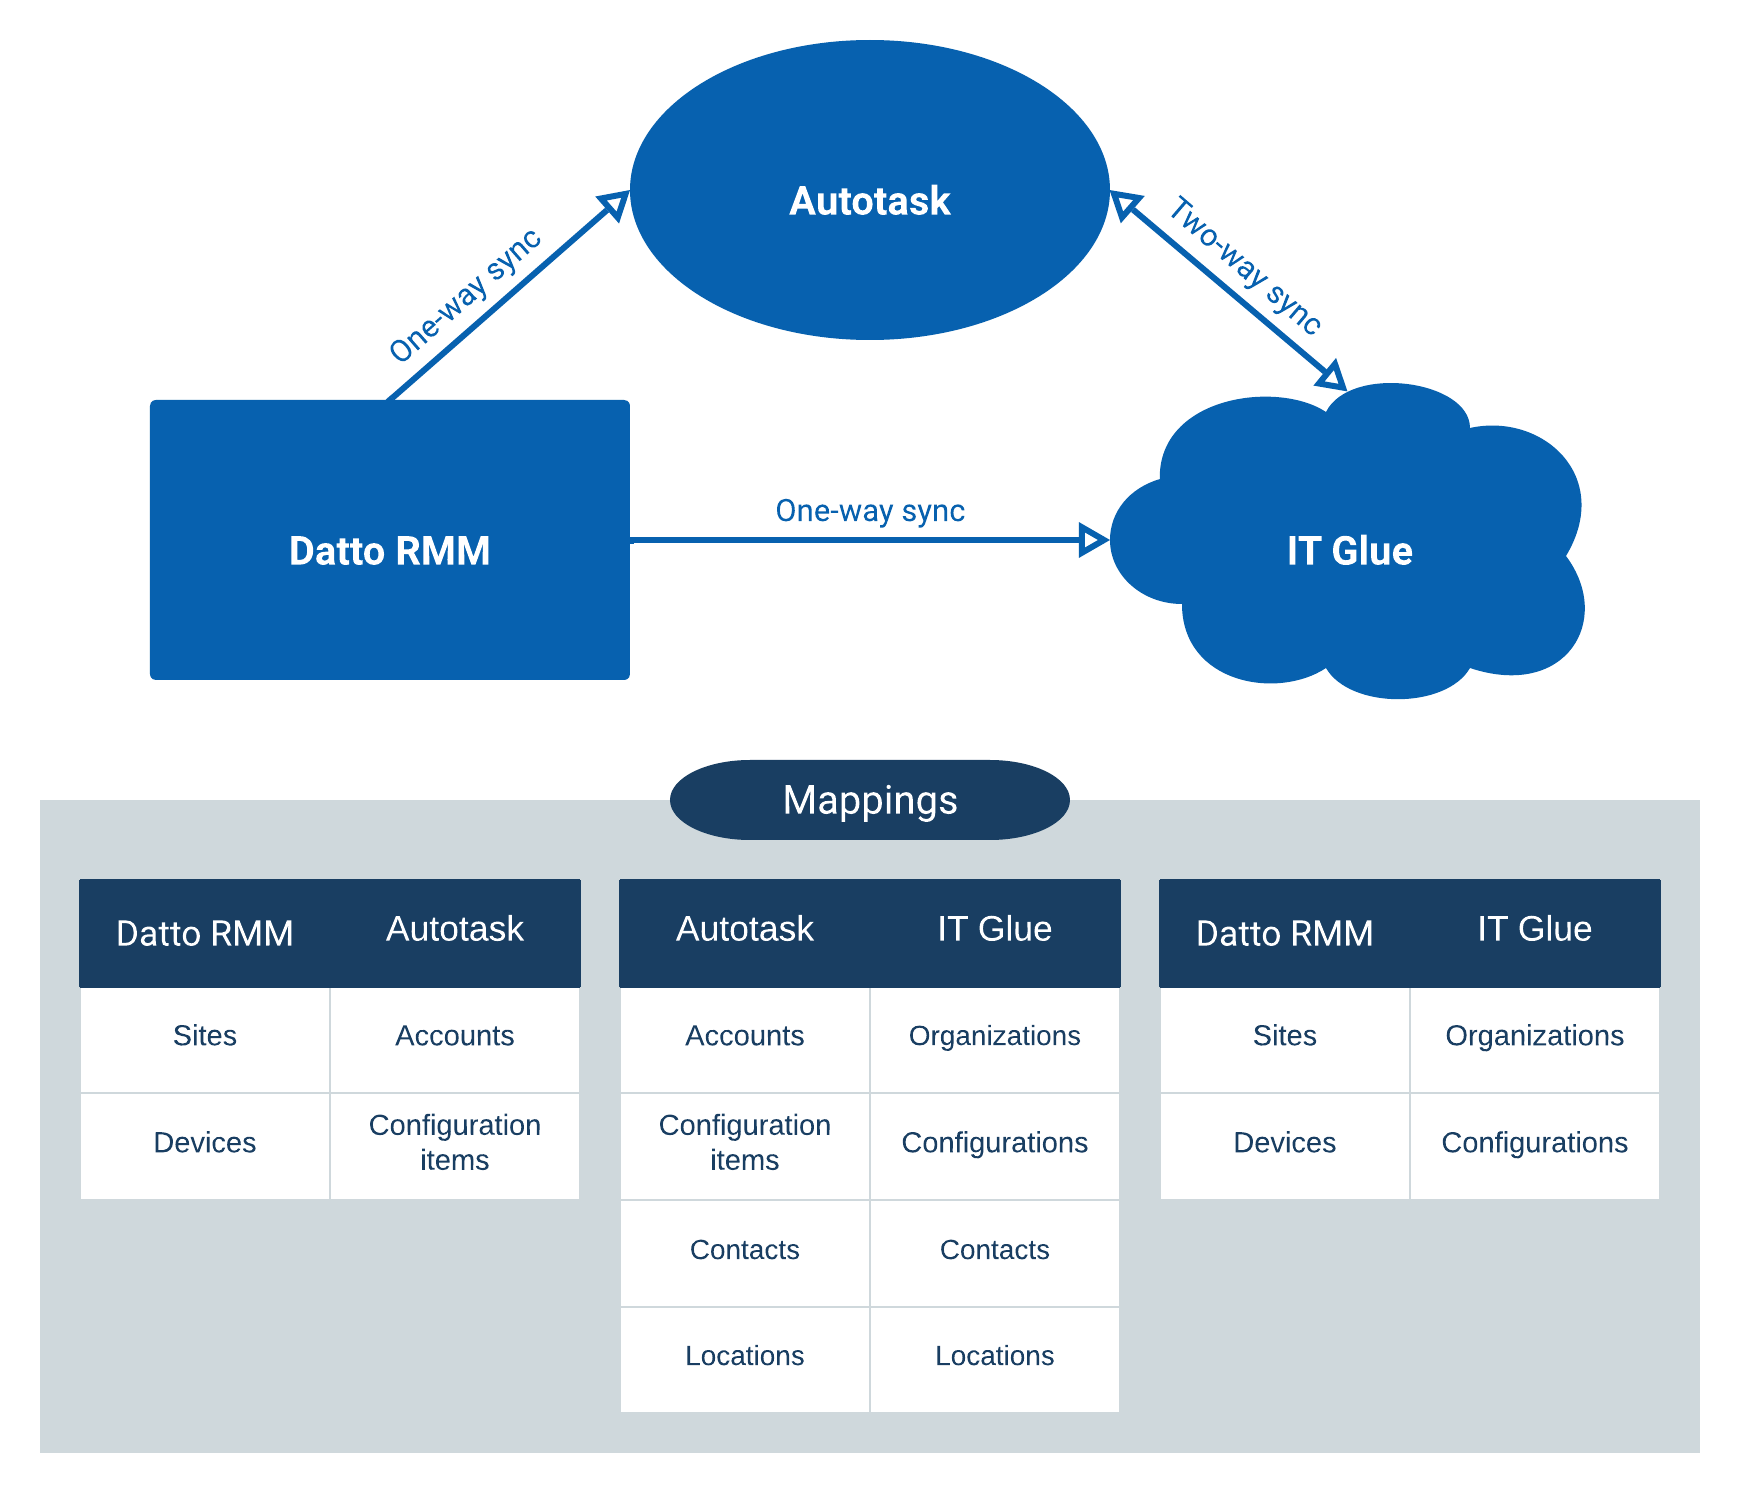
Before integrating these three tools simultaneously, it's important to understand which tools have authoritative data and where. This concept should drive decision-making when it comes to defining your provisioning processes.
The data from Datto RMM is authoritative within Datto RMM. When Datto RMM records are mapped to Autotask, Datto RMM is authoritative on those records within Autotask. This topic contains more details about the data that syncs from Datto RMM to Autotask. When Autotask records are mapped to IT Glue, Autotask is authoritative on those records within IT Glue. In the IT Glue documentation, refer to the list of data synced from Autotask to IT Glue.
As a result, data from Datto RMM travels via the integration to a mapped configuration item within Autotask and then travels via the integration to a mapped configuration asset within IT Glue. IT Glue views Autotask as authoritative on the configuration asset, while Datto RMM data is connected in a sequence (daisy chain).
None of the data synced from Datto RMM to IT Glue is authoritative when following the best practices described, so Kaseya strongly recommends the integration from Datto RMM to IT Glue is turned on last. Refer to IT Glue Integration. In the IT Glue documentation, refer to the list of data synced from Datto RMM to IT Glue.
IMPORTANT In summary, Kaseya strongly recommends that Datto RMM is integrated with Autotask first, then integrating Autotask with IT Glue, and finally integrating Datto RMM with IT Glue, to avoid issues with syncing device records. For a detailed guide on integrating Datto RMM, IT Glue, and Autotask, refer to Integrating Autotask, Datto RMM, and IT Glue in the KaseyaOne help.
More resources in the Autotask Help system
For more information about the features of this integration in Autotask, refer to this topic in the Autotask Help system: Integration workflows. Also refer to the Autotask setup section of this topic.
How to...
Enable the Autotask integration
NOTE Only the API Credentials tab is active until the integration connection succeeds.
Complete the following steps in Datto RMM:
- Navigate to Setup > Integrations > Autotask.
- In the API Credentials tab selected by default, click Turn On.
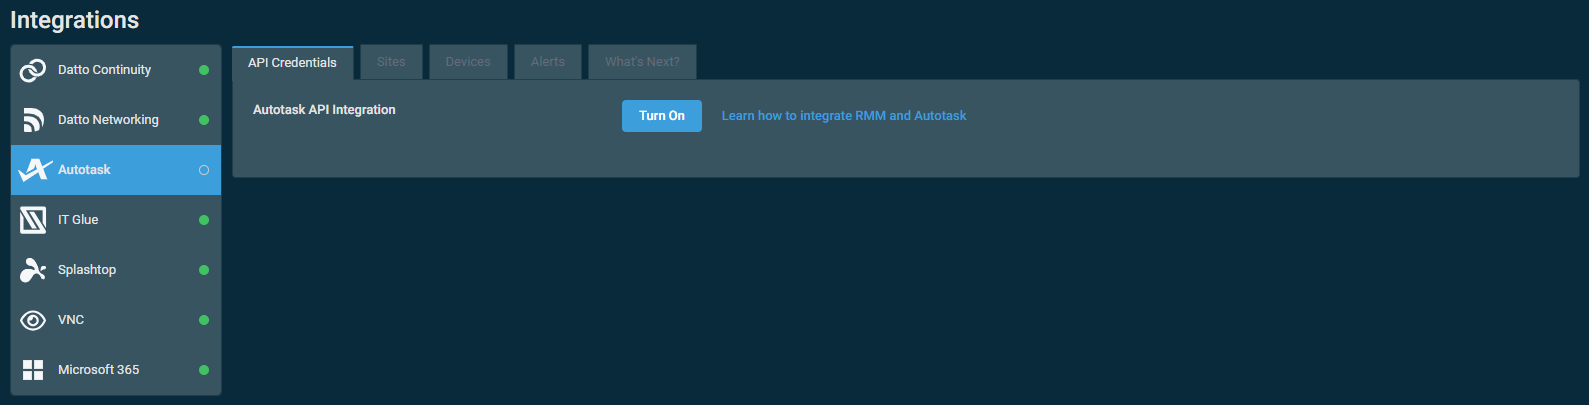
- Enter your Autotask Username (Key) and Password (Secret) to enable the integration between Datto RMM and Autotask.
- Select which account types from Autotask you wish to map to Datto RMM in the Account Types to Map field.

NOTE You must select at least one Autotask account type in order to save this configuration.
- Click Save and check now.
NOTE Once you click Save and check now, the other tabs in the integration will be temporarily disabled while the data from Autotask is loaded.
- Upon successful connection, the authentication button will be disabled and will display Saved and authenticated. As long as the integration is not turned off, the authentication details will be saved and the integration will remain connected per user account.
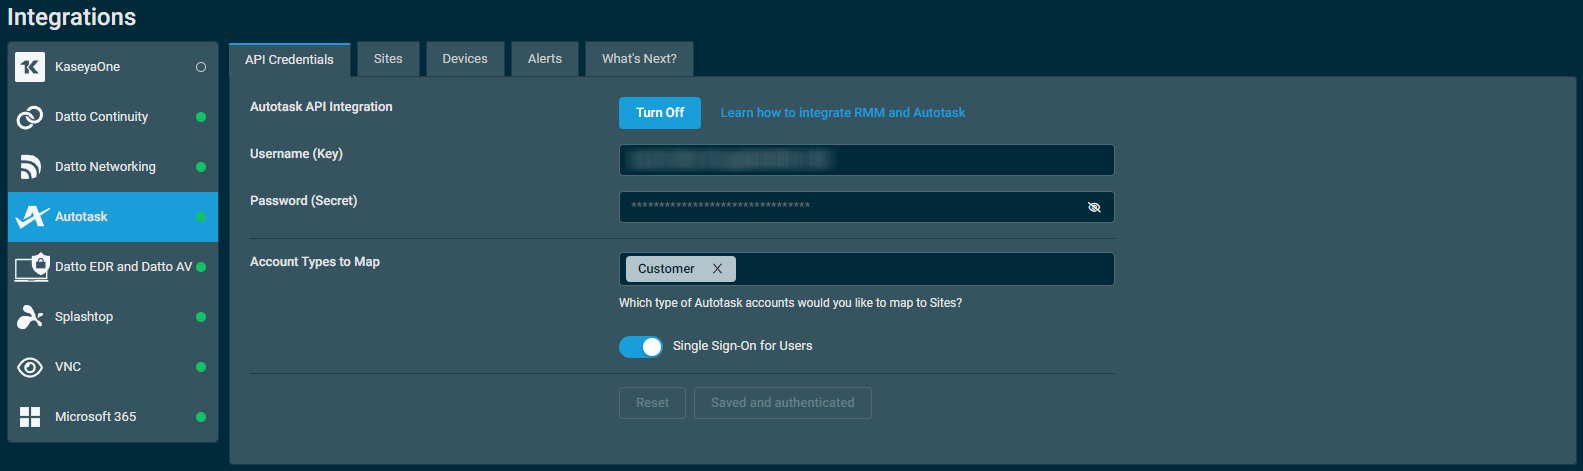
- To learn about the Single Sign-On for Users toggle, refer to the next section, Configure SSO.
IMPORTANT You must use an Autotask user account with a security level of API User (a non-billed Autotask resource) to enable the integration. Refer to Permissions. This will help you avoid difficult situations, such as when the resource whose credentials were used for the integration changes their password or leaves the company. For more information about the API User, refer to these topics in the Autotask Help system: API User (system) and The API tracking identifier.
Configure SSO
Single sign-on (SSO) is an authentication process that allows a user to enter one username and password to access multiple (connected) systems.
To permit users to automatically log in to Datto RMM when clicking an SSO-enabled link from Autotask, navigate to Setup > Integrations > Autotask and ensure the Single Sign-On for Users toggle in the API Credentials tab is turned on.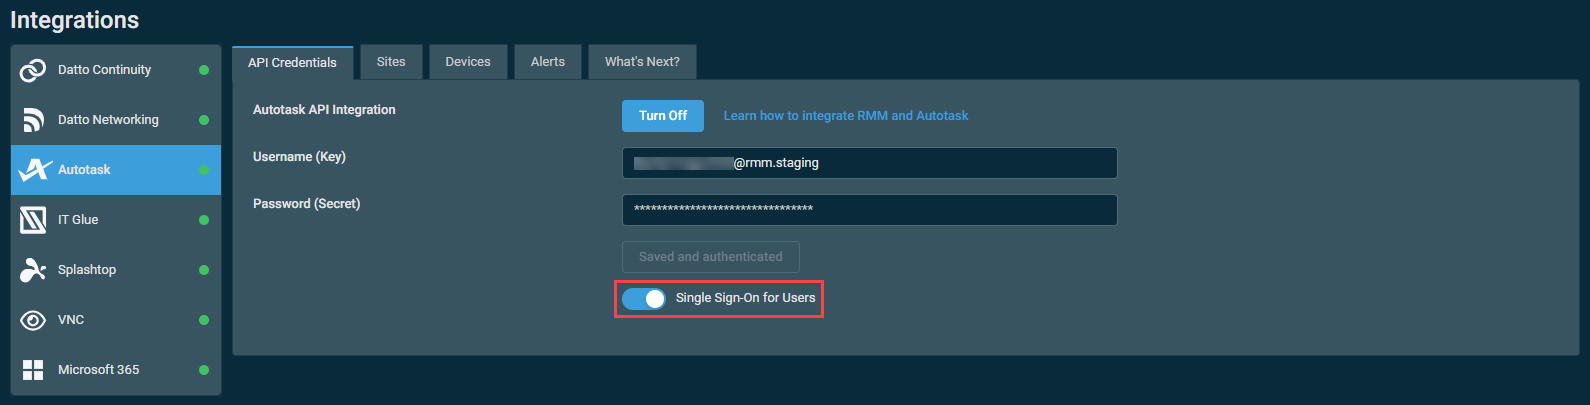
TIP Two-factor authentication, while enabled by default in Datto RMM, should be enabled in Autotask so users are always prompted for a one-time password when they log in to either application. Refer to Managing two-factor authentication for a resource in the Autotask help.
NOTE The first time you are logged in to Autotask after enabling the SSO functionality and you click a link to access Datto RMM, you will be asked to log in to your existing Datto RMM account to set up the link. Going forward, you will automatically be logged in to Datto RMM when clicking an SSO-enabled link from Autotask. When establishing the SSO link, make sure that you link your Autotask database to the correct Datto RMM account; that is, ensure that the Datto RMM login credentials you enter belong to the Datto RMM account integrated with your Autotask database.
To remove the link in Datto RMM, refer to Editing a user.
To learn how to link or unlink your Autotask user profile and Datto RMM user account in Autotask, refer to this topic in the Autotask Help system: Linking or unlinking your Autotask and RMM user profiles.
Configure organization (site) mapping
IMPORTANT Refer to the Permissions section in this topic to learn about the required security level settings in both Datto RMM and Autotask.
After enabling the integration, the next step is to map your Autotask companies to your Datto RMM sites. In the integration setup card, click the Sites tab.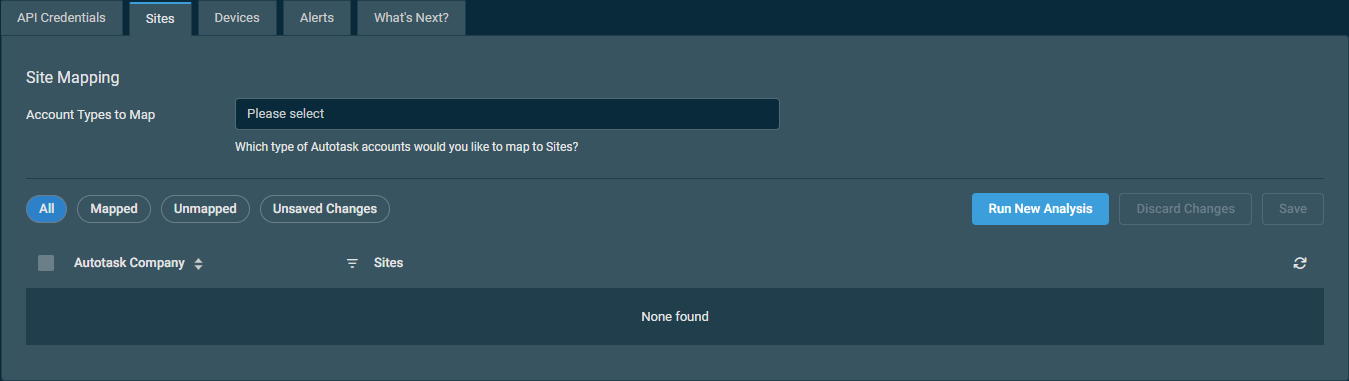
NOTE This area allows you to configure the mappings in a draft state. Changes are not pushed until clicking Save, and the option to discard all changes is also available. You also have the option to delete existing mappings and remap all or selected items at any time. These safeguards are described in more detail in this section.
NOTE After you have configured site mapping here, you can edit or add company mapping in the site settings when editing a site. Refer to PSA Mapping.
Populating results in the list of potential mappings
In the Account Types to Map field, you can select any number of Autotask organization types you want to retrieve, depending on which types are associated with your Autotask account:
- Select all: Populates all available organization types.
- Customer: An organization to which you are selling products or services.
- Lead: An organization type used to indicate a potential customer.
- Prospect: An organization type used to indicate a likely customer.
- Dead: A lead that never became a customer.
- Cancellation: An Autotask organization type denoting a former customer.
- Vendor: An organization type whose primary business relationship with your company is to provide goods and services.
- Partner: An organization type assigned to organizations like VARs, outsourcing partners, and so forth.
Click the X next to any organization type to remove that selection from the results, or click the X to the far right of the selection box to remove all selections.
List of potential mappings
The list of Autotask organizations will be populated based on your Account Types to Map selections. The selections will persist the next time the Sites tab is accessed.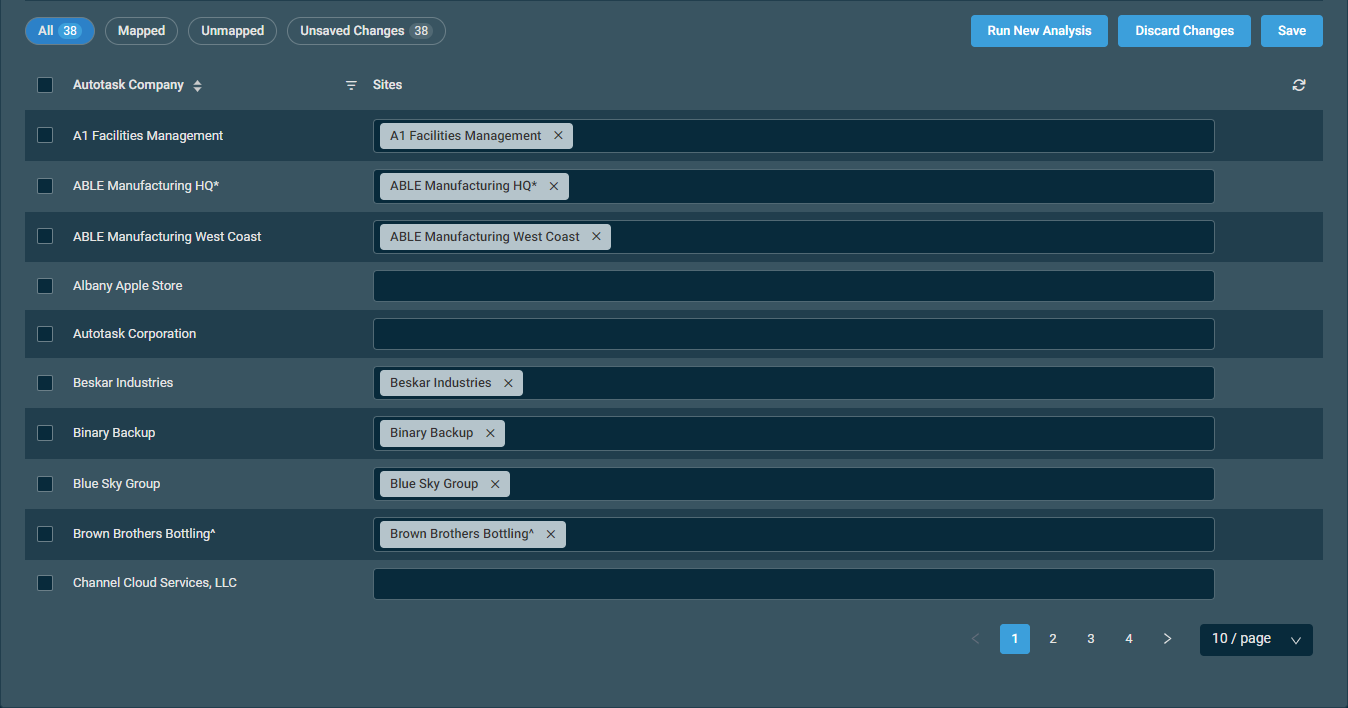
| Field | Sortable? | Description |
|---|---|---|
| Autotask Company |

|
Displays the Account Name as configured in your Autotask account. To narrow the list, click the filter icon  , enter a term, and click Apply. To see the full list, click Reset. , enter a term, and click Apply. To see the full list, click Reset. |
| Sites |
Displays a site in your Datto RMM account that matches the name of the Autotask organization, if one exists. If no site match exists, the field may appear blank. Selecting this field will yield two or three options, New - [Sitename] to create a new site in Datto RMM, Do not Map to keep the company unmapped, and, if a site match exists, the name of that site. If you want to manually select an existing site to map, start typing in this field to search your unmapped Datto RMM sites. If one exists, click a site in the drop-down results to map that site to the corresponding Autotask company. Only sites that are not already mapped to an Autotask organization (either in a draft state or saved state) are available for selection. NOTE An Autotask organization can be mapped to more than one Datto RMM site. To achieve this, select multiple values for an item. Creating new sites to mapYou have the option for the system to create a new Datto RMM site for an Autotask organization with no mapping. To do so, click the drop-down menu and select the option prefixed with New -. These selections are displayed in a light blue color for easier identification. Opting not to map an organizationIn this column, click the drop-down menu and select Do not map. Items with this selection are categorized as Mapped because they have an assignment. These selections are displayed in a slightly darker gray color for easier identification. |


Click the X next to a site name to remove that selection, or click the X to the far right of the selection box to clear all selections.
NOTE Changing a Datto RMM site name will not rename the mapped Autotask organization and vice versa. If a Datto RMM site is already mapped to an Autotask organization and you change the name of either the site or the organization, you need to re-run the mapping analysis to see the updated name. The mapping will still be based on the Autotask organization ID, but the new name will only appear if you re-run the analysis. Refer to Run New Analysis.
You can filter the Autotask Company column with the filter icon . If a filter search term includes wildcard characters (for example, underscores and percent signs), they serve as normal characters if they are preceded by a backslash. For details, refer to Wildcard characters.The filter selection in the columns will not persist the next time the page is accessed as the table will return to the default view.
The Refresh data button allows you to populate the list of Autotask companies based on the most recent data retrieved from the Autotask API. Upon a successful refresh, the Unsaved Changes filter results are displayed.
The number of results displayed can be specified by selecting the desired number from the pagination control. This selection will persist the next time the page is accessed.
Available filters in the list of potential mappings
The filter categories display the number of items that apply to that category, if any.
| Filter | Description |
|---|---|
| All | Displays all mapped and unmapped results in the list. |
| Mapped | Displays any mapped results in the list. A list item will be categorized as mapped if unsaved changes are saved with at least one value entered in the Sites column for that item, including one or more site selections or the Do not map selection. To create mappings, save or change prepopulated values in the Sites column or enter values where empty. Refer to Action buttons to learn how to manage unsaved changes. |
| Unmapped | Displays any unmapped results in the list. A list item will be categorized as unmapped if unsaved changes are saved when no value has been entered in the Sites column for that item. Refer to Action buttons to learn how to manage unsaved changes. |
| Unsaved Changes | Upon changing the value(s) in the Sites column or upon adding a missing value, the list item is automatically moved to this tab. Refer to Action buttons to learn how to manage unsaved changes. |
Action buttons

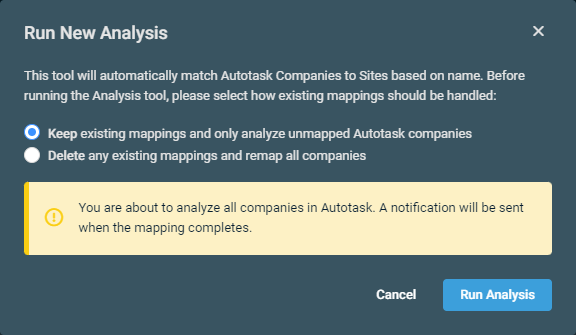
NOTE Clicking any one of these buttons will disable all of them until the previously requested action has finished.
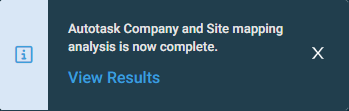
The following action buttons are available for the mappings:
 Configure device synchronization
The next step is to configure the device synchronization between Datto RMM and Autotask. In the integration setup card, click the Devices tab.
NOTE It is best practice to configure organization site mapping before you enable device synchronization. Refer to Configure organization (site) mapping. Configuring device synchronization before finalizing your Datto RMM site to Autotask company can lead to duplicate configuration items in Autotask if site mapping is changed or devices move sites, as configuration items in Autotask are not deleted when a device is moved or deleted in Datto RMM.
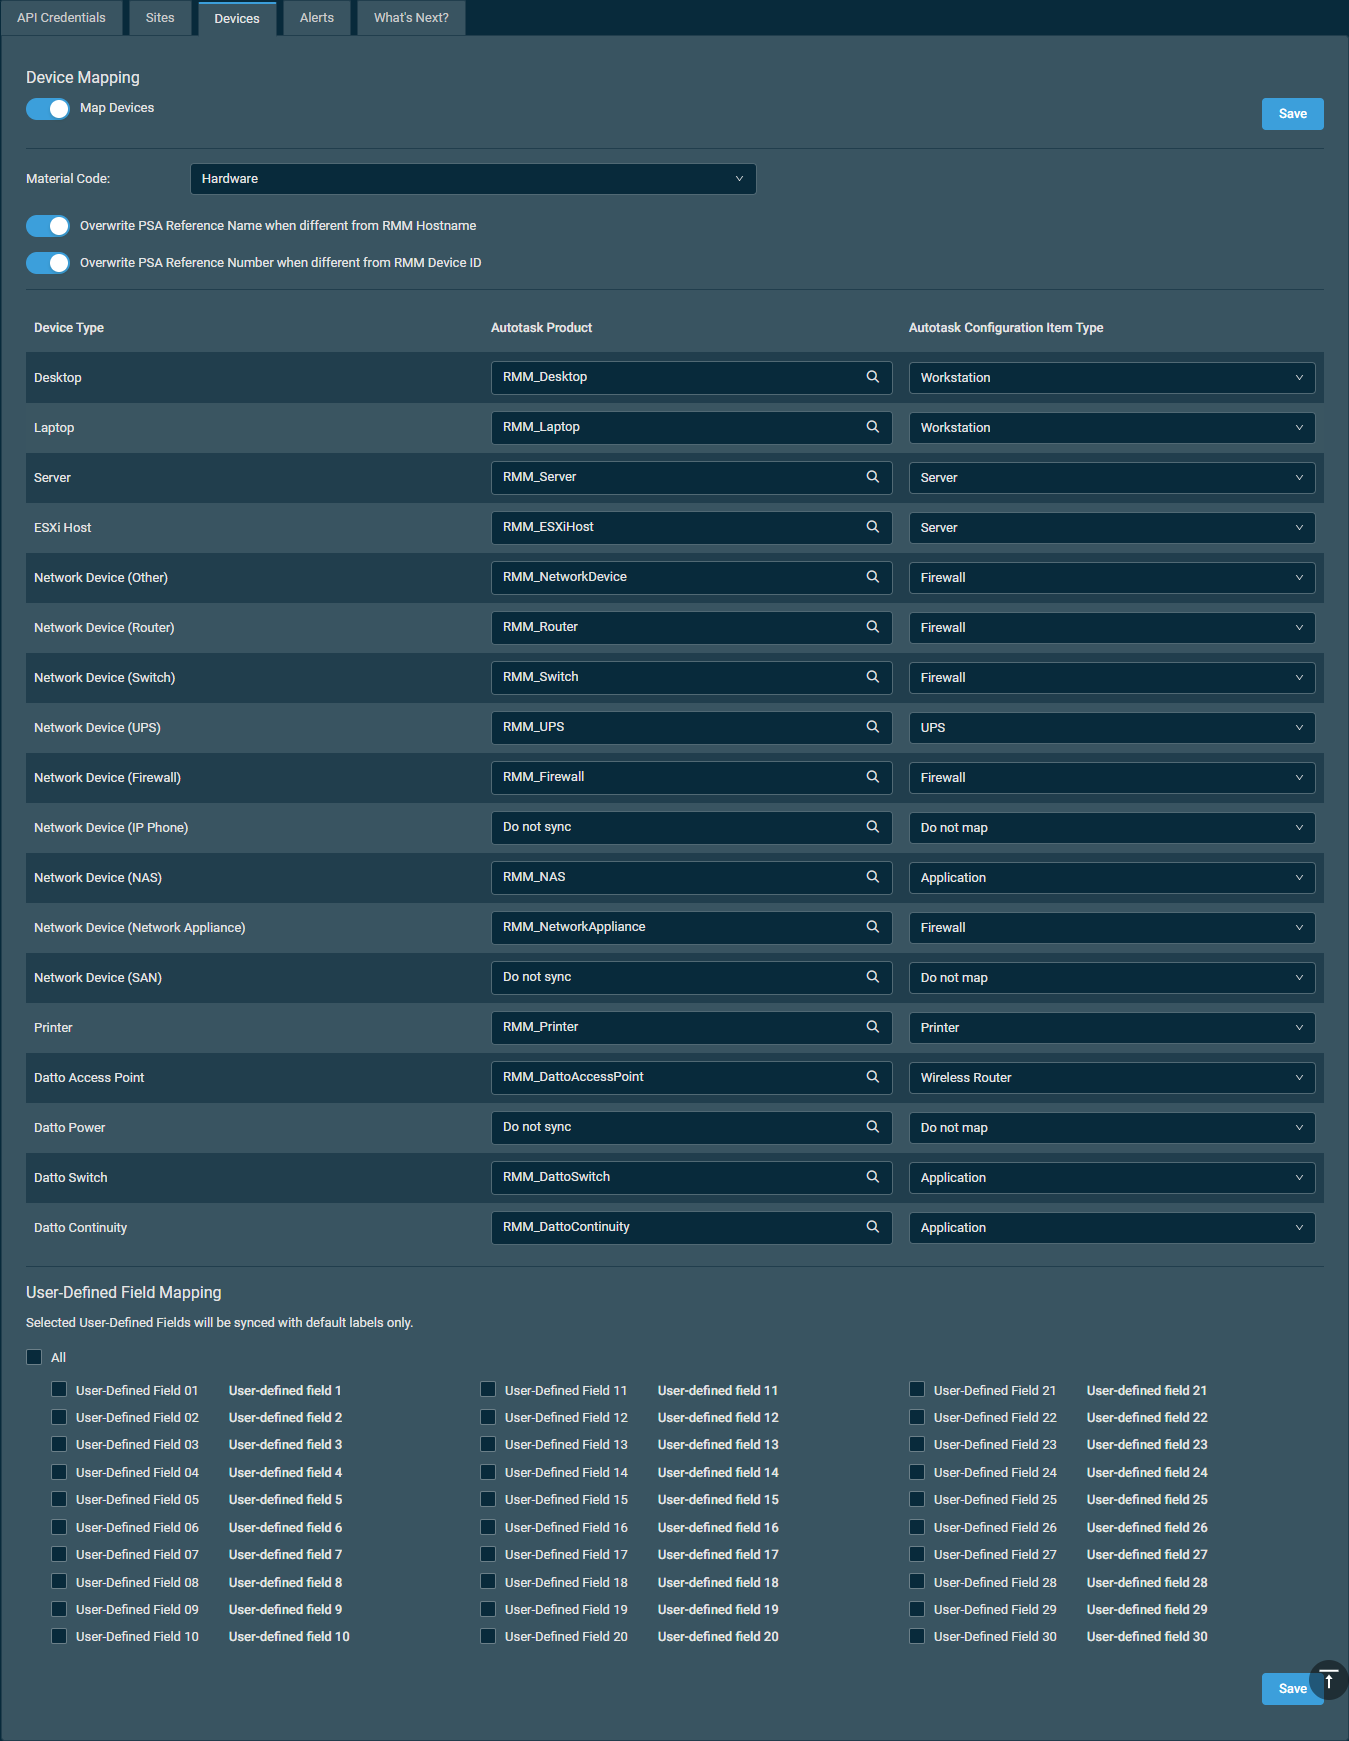
NOTE In Autotask, devices that are installed for a customer company are called configuration items. As all configuration items are based on a product, Datto RMM devices must be mapped to Autotask at the product level.
- You can turn the Map Devices toggle on or off at any time to control whether or not the device synchronization is active. Your selected setting will be saved and will persist the next time the page is accessed without needing to click the Save button.
- In the Material Code drop-down menu, select the Autotask material code that will be used for all devices mapped from Datto RMM to Autotask.
- Specify how Datto RMM should sync device information to Autotask configuration items. You can turn the toggles on or off for either of the following options:
- Overwrite PSA Reference Name when different from RMM Hostname (selected by default)
- Overwrite PSA Reference Number when different from RMM Device ID (selected by default)
- Next, map the Datto RMM device types to Autotask products and configuration item types.
- In the User-Defined Field Mapping section, select the check boxes for the UDFs you would like to map as Autotask configuration item UDFs. Select the All check box to select all the UDFs. Select All again to remove all selections, or select individual UDF check boxes again to remove individual selections. To learn about UDFs, refer to User-Defined Fields in Global Settings.
-
When finished, click Save in the upper-right or lower-right corner of the page to preserve your changes, send your mapping configuration to the database, and initiate the synchronization.
NOTE You may wish to keep this toggle off while working on your configuration and saving your changes. Then, you can turn the toggle on whenever you are ready to officially initiate the device synchronization with your updates.
Material Code is a required field in Autotask. It is a billing code used for billing products associated with tickets, contracts, or projects.
EXAMPLE At the initial sync, if Datto RMM finds a matching Autotask configuration item for a Datto RMM device and that configuration item has a reference name, the value in the Reference Name field will be overwritten if the Overwrite PSA Reference Name when different from RMM Hostname toggle is turned on. The same logic will be applied at any subsequent sync.
NOTE If the overwrite options are not turned on in Datto RMM and the Reference Name and Reference Number fields for the matching configuration item are empty in Autotask, the fields will be populated with the device's hostname and device ID at the initial device sync.
| Field | Description |
|---|---|
| Device Type | Device type as displayed in Datto RMM. |
| Autotask Product | Select an existing Autotask product to map to your Datto RMM device type. You might not see all of your Autotask products by scrolling through the Autotask Product drop-down menu, but you can search for any product using the search bar. Opt to not sync a device type by selecting Do not sync. If you do so, you should also select Do not map in the Autotask Configuration Item Type column. Alternatively, you can allow the system to create a matching product in Autotask for you by selecting Create New. The name of the new product will be prefixed by RMM_ (for example, RMM_Laptop). This will help to differentiate Datto RMM products from existing Autotask products. TIP Kaseya recommends that you allow the system to create a matching product if you do not see the corresponding Autotask product. NOTE Product names created by the system (for example, RMM_Laptop, RMM_Desktop, and so forth) will not have product categories in Autotask by default. The devices will be grouped in an uncategorized product category. To change this, follow these steps in Autotask: Navigate to Autotask PSA Menu > Admin > Features & Settings > Products, Services, & Inventory > Products > search for the product name (for example, RMM_Laptop) > select the context menu next to the product and click Edit Product > select the context button next to product category > assign a product category > Save & Close. This will assign the selected product category to both existing and future devices of this product name. NOTE Before the Datto RMM 12.0.0 release, the prefix used was AEM_ (for example, AEM_Laptop). Existing product mappings where the AEM_ prefix is used remain unchanged, but all new automatically created products will use the RMM_ prefix. For information on how the Product field is synchronized for new and existing configuration items, refer to Device sync logic and frequency. |
| Autotask Configuration Item Type | Optionally, select a matching Autotask configuration item type for each Datto RMM device type or select Do not map. The drop-down menu contains all configuration item types as configured in Autotask. In Autotask, a configuration item type is the classification of a configuration item. It also determines which available UDFs you can apply. |
NOTE When mapping user-defined fields, if a field with the same name already exists, you cannot select another field with the same name. This restriction applies only to Autotask user-defined fields, which must have unique names. In contrast, Datto RMM user-defined fields do not have this naming restriction.
NOTE If a UDF that is enabled to sync to Autotask is renamed in Global Settings, its counterpart must be renamed right after in Autotask to prevent a new UDF from being created when the next device sync job runs.
Device sync logic and frequency
Device sync logic
Datto RMM will attempt to find a matching Autotask configuration item by applying the following device sync logic:
- Check if the device has been audited or if it meets the audit exclusion criteria.
- If the answer is no, skip the device.
- If the answer is yes, go to the next step.
- Check if the device is already mapped to an Autotask configuration item.
- If a match is found, sync the device.
- If no match is found, go to the next step.
- Search for an Autotask configuration item whose native field of RMMDeviceUID matches the Datto RMM device ID.
- If a matching configuration item is found and is active, map and sync the device. If it is inactive, activate it, then map and sync the device.
- If no match is found, go to the next step.
- In the Autotask organization mapped to the Datto RMM site or sites, search for an Autotask configuration item that has the same hostname (in Autotask: Reference Name) and serial number as the Datto RMM device.
NOTE For Datto Networking devices, the serial number is populated as the MAC address.
- If only one matching configuration item is found and is active, populate the Autotask native field of RMMDeviceUID with the Datto RMM device ID, then map and sync the device.
If the configuration item is inactive, activate it, populate the native field of RMMDeviceUID, then map and sync the device. - If more than one matching configuration item is found and they are active, identify the oldest, populate the Autotask native field of RMMDeviceUID with the Datto RMM device ID, then map and sync the device.
If the configuration items are inactive, identify the oldest, activate it, populate the native field of RMMDeviceUID, then map and sync the device. - If no match is found, go to the next step.
- If only one matching configuration item is found and is active, populate the Autotask native field of RMMDeviceUID with the Datto RMM device ID, then map and sync the device.
- Check if there are multiple devices with the same serial number in the Datto RMM site or sites that are mapped to the Autotask organization.
- If multiple matching devices are found, go to step 7.
- If only one matching device is found, go to the next step.
- If no match is found, go to step 7.
- Search for an Autotask configuration item that has the same serial number as the Datto RMM device.
- If a match is found, repeat the same checks as in steps 4.a and 4.b.
- If no match is found, go to the next step.
- Create a new Autotask configuration item, populate the native field of RMMDeviceUID, then map and sync the device.
NOTE The following device types are excluded from the audit requirement: Datto Networking devices, Datto Continuity devices, and network devices added to Datto RMM more than 24 hours ago.
NOTE The Autotask native field of RMMDeviceUID is not visible in the Autotask user interface, and it cannot be edited.
A few notes to consider
- When a device is moved from one site to another in Datto RMM, and the new site is mapped to an Autotask organization, the matching Autotask configuration item will be inactivated in the original Autotask organization. In the new Autotask organization, either an existing configuration item with a matching RMMDeviceUID will be made active or a new configuration item will be created. The new configuration item will have a note at the top with a link showing where it was moved from, but the inactivated configuration item in the old site will not have a note.
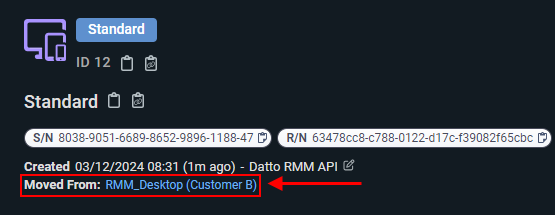
- When a device is moved from one site to another in Datto RMM, and the new site is not mapped to any Autotask organization, the formerly linked Autotask configuration item will remain in the original Autotask organization and will be inactivated.
- When the Datto RMM site an Autotask organization is mapped to is changed in the integration settings, the configuration items in Autotask PSA will maintain their linked status.
- When a device is deleted in Datto RMM, the corresponding Autotask configuration item will be inactivated.
- If an Autotask configuration item has been set to inactive, but the Datto RMM device is still syncing with it, the configuration item will be made active again.
- The Product and Configuration Item Type fields of an Autotask configuration item are only synchronized (applied) when a new configuration item is created. When an existing configuration item is synchronized, the Product and Configuration Item Type fields will not be overwritten.
- If you change the default label of a UDF in Global Settings in Datto RMM, you need to re-run the device synchronization setup to ensure the UDF mapping is updated in Autotask. Refer to Configure device synchronization.
Device sync frequency
New (unsynced) devices will sync immediately after an initial audit has occurred.
For existing (previously synced) devices, Datto RMM triggers a device sync once every 24 hours. If, at the time of synchronization, the existing mapping is no longer valid (for example, the configuration item has been deleted, details have changed, etc.), the device sync logic will be re-applied.
Configure alert priority mapping
Alert rules allow you to handle Datto RMM alerts and their corresponding Autotask alert tickets. In the integration setup card, begin by configuring your alert priority mapping in the Alert Mapping section of the Alerts tab.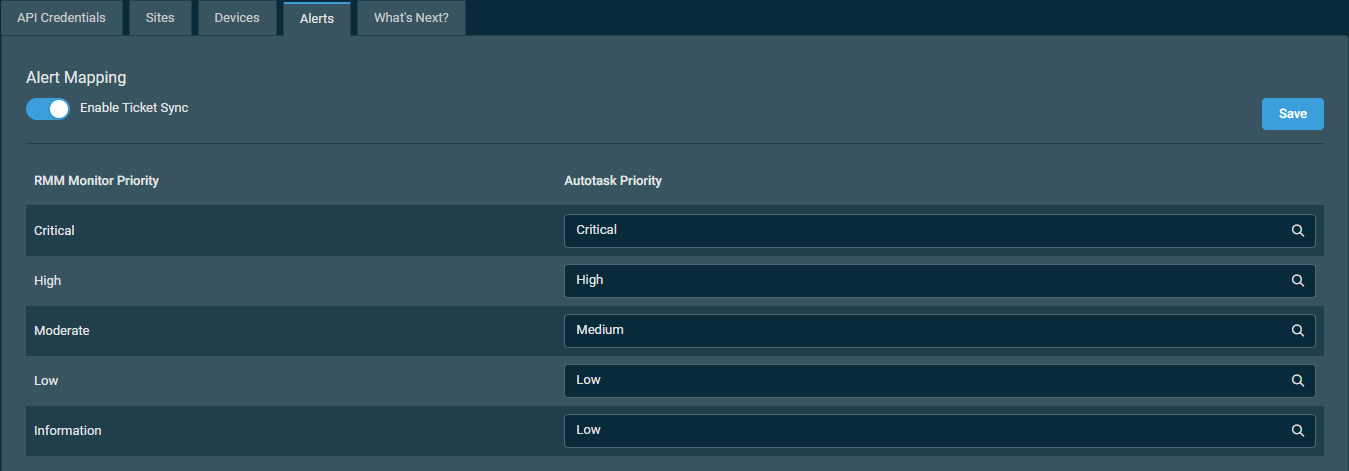
You can turn the Enable Ticket Sync toggle on or off at any time to control whether or not the ticket synchronization is active. Your selected setting will be saved and will persist the next time the page is accessed without needing to click the Save button.
NOTE You may wish to keep this toggle off while working on your configuration and saving your changes. Then, you can turn the toggle on whenever you are ready to officially initiate the ticket synchronization with your updates.
You can select the default values for the ticket priority that will be mapped from Datto RMM to Autotask, as follows:
| Field | Description |
|---|---|
| RMM Monitor Priority | Displays the priorities of alerts that are raised in Datto RMM. Refer to Alerts. The priorities are assigned via monitors. Refer to Monitors. |
| Autotask Priority | Select an Autotask ticket priority from the drop-down menu to map it to the corresponding Datto RMM alert priority. You can also search for a specific priority using the search bar. |
To save this mapping, click Save in the upper-right or lower-right corner of the page.
Next, you will configure ticket settings in this tab. Refer to the next section.
Configure ticket settings
In the integration setup card, after configuring alert priority mapping, you can configure ticket settings in the Alerts tab.
You can turn the Enable Ticket Sync toggle on or off at any time to control whether or not the ticket synchronization is active. Your selected setting will be saved and will persist the next time the page is accessed without needing to click the Save button.
NOTE You may wish to keep this toggle off while working on your configuration and saving your changes. Then, you can turn the toggle on whenever you are ready to officially initiate the ticket synchronization with your updates.
Ticket Settings section
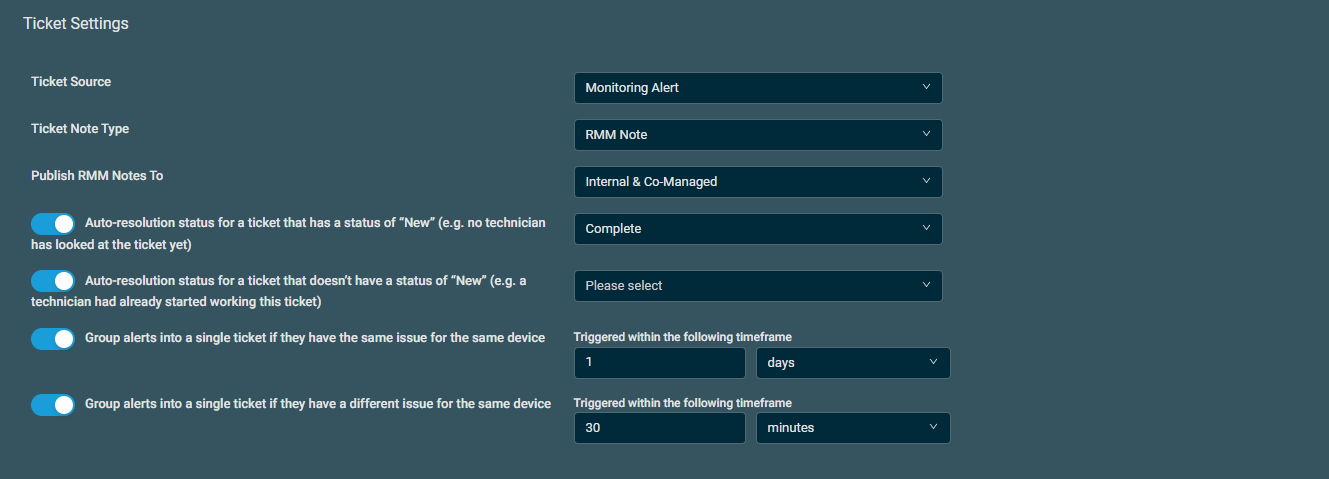
| Field | Description |
|---|---|
| Ticket Source | From the drop-down menu, select the Source you would like to assign to all alert tickets created in Autotask by Datto RMM. Refer to this topic in the Autotask Help system: Ticket sources. |
| Ticket Note Type | Datto RMM users may manually add notes to Autotask tickets created via Datto RMM. From the drop-down menu, select the default note type to be used for user-created notes. NOTE Notes automatically created by Datto RMM will use the system note type RMM Note. |
| Publish RMM Notes To | Datto RMM users may manually add notes to Autotask tickets created via Datto RMM. From the drop-down menu, select one of the following options to set as the default publish setting for user-created notes:
NOTE Notes automatically created by Datto RMM will be published to internal users only. |
| Auto-resolution status for a ticket that has a status of "New" (for example, no technician has looked at the ticket yet) | Turn on the toggle for Autotask alert tickets with the status of New to be automatically resolved when the corresponding Datto RMM alert is resolved. From the drop-down menu, select the default status you would like to assign to the ticket when automatically resolved. The drop-down menu contains all active statuses as configured in Autotask. IMPORTANT In Autotask, only the system status Complete will actually close a ticket. Tickets in any status other than Complete will need a workflow rule or manual intervention to be closed. Refer to completing tickets in the Autotask help. |
| Auto-resolution status for a ticket that doesn't have a status of "New" (for example, a technician had already started working this ticket) | Turn on the toggle for Autotask alert tickets with any status other than New to be automatically resolved when the corresponding Datto RMM alert is resolved. From the drop-down menu, select the default status you would like to assign to the ticket when automatically resolved. The drop-down menu contains all active statuses as configured in Autotask. IMPORTANT In Autotask, only the system status Complete will actually close a ticket. Tickets in any status other than Complete will need a workflow rule or manual intervention to be closed. Refer to completing tickets in the Autotask help. |
| Group alerts into a single ticket if they have the same issue for the same device | Turn the toggle on or off to group such alerts into a single ticket or opt not to group such alerts into a single ticket, respectively. You will map issue types in the subsequent section, Default Ticket Settings. You can set the time threshold in which the grouping will occur. Enter a number in the field. In the drop-down menu, select minutes, hours, or days. The threshold is based off the original alert. NOTE The maximum value in each of the fields is 60 days / 99 hours / 999 minutes. You can only use integers. NOTE If an alert attempts to be grouped into a ticket that has already closed, a new ticket will be created. |
| Group alerts into a single ticket if they have a different issue for the same device | Turn the toggle on or off to group such alerts into a single ticket or opt not to group such alerts into a single ticket, respectively. You will map issue types in the subsequent section, Default Ticket Settings. You can set the time threshold in which the grouping will occur. Enter a number in the field. In the drop-down menu, select minutes, hours, or days. The threshold is based off the original alert. NOTE The maximum value in each of the fields is 60 days / 99 hours / 999 minutes. You can only use integers. NOTE If an alert attempts to be grouped into a ticket that has already closed, a new ticket will be created. |
To save these settings, click Save in the upper-right or lower-right corner of the page.
Default Ticket Settings section
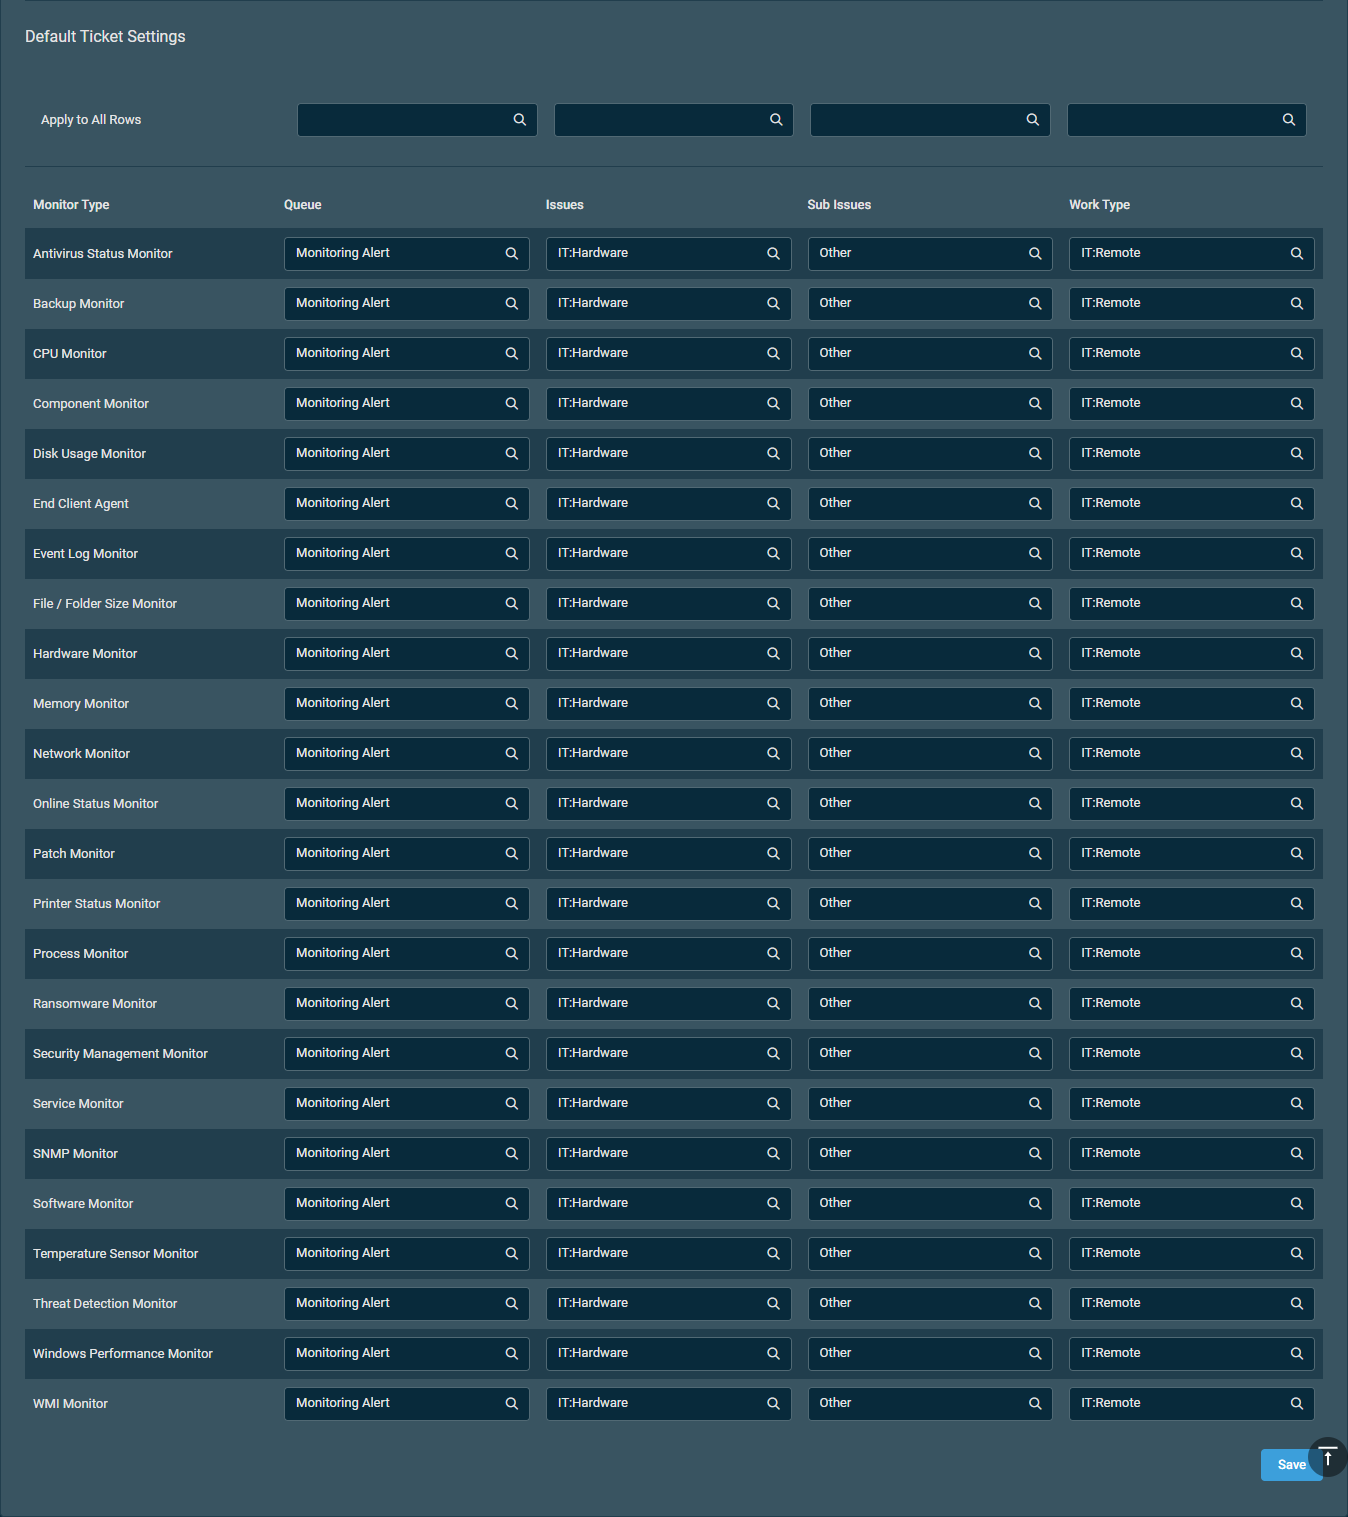
The Monitor Type column displays all monitor types in Datto RMM and an option for end client Agent ticket configuration (that is, tickets created from a device via the Agent installed). Refer to Monitor types and Agent ticketing for end users. The row for end client Agent tickets is named End Client Agent.
For each monitor type and the End Client Agent row, you can set the default values in the Autotask alert tickets created from that monitor type's alerts and from end client Agent tickets, respectively:
| Setting in Datto RMM | Result in Autotask |
|---|---|
| Queue column. NOTE This is the only column that requires values to be set. |
Sets the default values for the Queue field in Autotask tickets. |
| Issues column. | Sets the default values for the Issue Type field in Autotask tickets. |
| Sub Issues column. IMPORTANT If you choose to select an issue type, you must also select a sub-issue type. Otherwise, tickets will be created with neither. |
Sets the default values for the Sub-Issue Type field in Autotask tickets. |
| Work Type column. | Sets the default values for the Work Type field in Autotask tickets. |
The drop-down menus list all active values as configured in Autotask. Use the drop-down menus to make selections, or enter values in the search bars to easily select the specific results you are looking for. You can use the same methods in the Apply to All Rows row at the top of the list to set the same selection in all corresponding rows.
To save these settings, click Save in the upper-right or lower-right corner of the page.
NOTE Kaseya recommends you review your ticket settings after every Datto RMM release to ensure your monitor types are properly configured.
NOTE In case a new monitor type is introduced in Datto RMM and you have not yet reconfigured the ticket integration for that monitor type, tickets created through that monitor will be assigned to the Monitoring Alert queue in Autotask by default.
NOTE By default, tickets created from alerts are not assigned to any resource in Autotask.
NOTE If a monitor is configured to create a ticket when an alert is raised but the device cannot get synchronized to Autotask (for example, the contract or contact of the Autotask configuration item is inactive, the device sync is switched off, and so forth), Datto RMM will queue the device sync event and will attempt to create a ticket three times (every time a device sync is triggered, approximately once every minute). If the device fails to synchronize within this time frame, a ticket will still be created for the corresponding Autotask organization containing the device name and ID and a link to the device in Datto RMM. In case the Datto RMM site is no longer mapped to an Autotask organization, a ticket will be created for the zero account.
NOTE If an Autotask configuration item synced with a Datto RMM device has a contact assigned, but that contact is inactive, the ticket creation will fail.
NOTE If the ticket creation fails (for example, because of changes made to credentials, queues, categories, security settings, and so forth), a notification email will be sent to the email addresses set to receive alerts. If no email address listed under Setup > Global Settings > Email Recipients has Alerts selected, then the failed ticket email will default to the email address configured under Setup > Account Settings > Account email. Refer to Email Recipients in Global Settings. The notification email will specify the error message and the reason for the error.
Configure additional functionality
Be sure to review the What's Next tab in the integration setup card to learn about next steps for maximizing the integration, including video tutorials and links to pertinent instructions in the Datto RMM Help system and Autotask Help system.
Disable the Autotask integration
If you disable the integration, you can choose to store or delete all of the integration and authentication settings. You can re-enable the integration at any time.
- In Datto RMM, navigate to Setup > Integrations > Autotask.
- The API Credentials tab is selected by default. Click Turn Off.
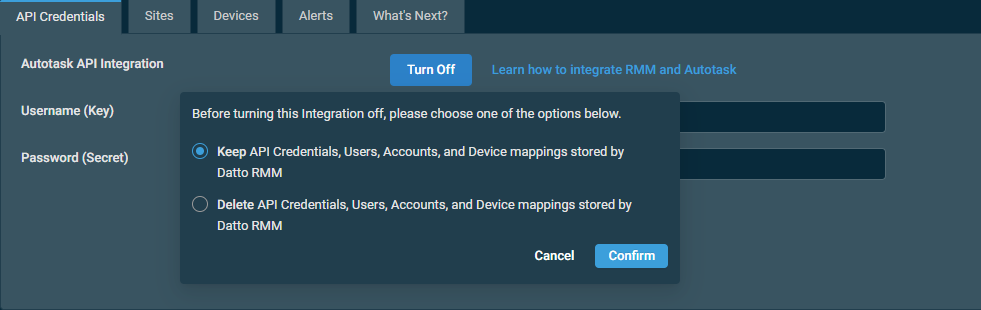
- Select one of the following options:
- Keep API Credentials, Users, Accounts, and Device mappings stored by Datto RMM: These settings will be retrieved should you choose to re-enable the integration in the future.
- Delete API Credentials, Users, Accounts, and Device mappings stored by Datto RMM: You will reconfigure these settings should you choose to re-enable the integration in the future.
- Click Confirm to execute the action or Cancel to close out of the dialog box.
You can also disable individual settings by turning off the enablement toggles in the integration setup tabs or by removing individual mappings.
Autotask setup
After the initial setup of the integration within Datto RMM, additional settings must be configured within Autotask.
Configure resource permissions
After you have configured the integration in Datto RMM, you must grand permissions within Autotask to allow your resources to access the additional features from within Autotask.
Refer to this topic in the Autotask Help system: Resource permissions for the Datto RMM Integration.
Configure SSO
After you have enabled SSO in Datto RMM and configured resource permissions in Autotask, you will be able to link your Autotask user profile and your Datto RMM user account.
Refer to this topic in the Autotask Help system: Linking or unlinking your Autotask and RMM user profiles.
Additional features in Autotask
Autotask alert ticket information and information specific to Datto RMM
If a monitor is configured to create a ticket when an alert is triggered for a Datto RMM device, and the device had already been mapped to an Autotask configuration item, Autotask will attempt to pull the following information from the configuration item:
- Contact
- Contract
- Service/Bundle
- Service Level Agreement (SLA)
Once the Autotask alert ticket has been created, the following information specific to Datto RMM will be available:
| Section | Description |
|---|---|
|
The ticket is automatically assigned the AEM Alert ticket category and the Alert ticket type. The ticket title will be constructed as follows: [Monitor Alert] ([Monitor Trigger]) for [Hostname] Click View Datto RMM Alert to open the alert in Datto RMM. |
Description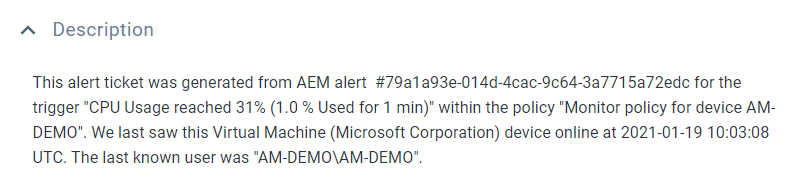 |
The description will be constructed as follows: This alert ticket was generated from AEM alert #[Alert Number] for the trigger "[Monitor Alert] ([Monitor Trigger])" within the policy "[Policy]". We last saw this [Model] ([Manufacturer]) device online at [Last Updated] UTC. The last known user was "[Last User]". NOTE The Datto RMM date/time format is used in the ticket description. |
Activity tab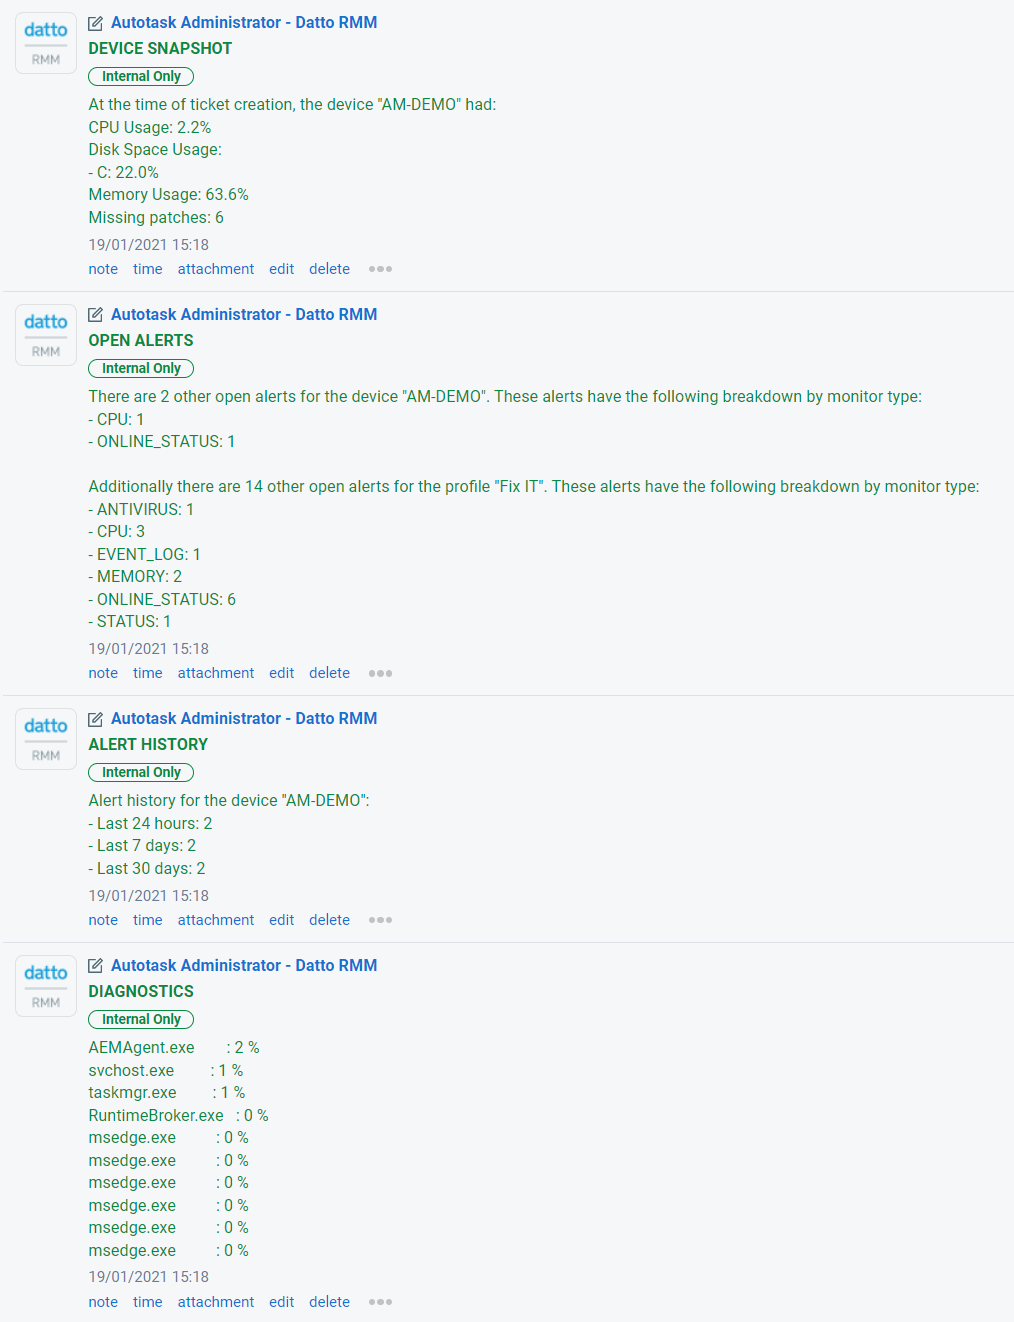 |
When an alert ticket is opened in Autotask, the following notes will be added to it by default: • Device Snapshot: Outlines metrics such as CPU Usage, Disk Space Usage, Memory Usage, and Missing Patches. • Open Alerts: Shows other open alerts for the same device and for the same site. • Alert History: Displays the device's alert history in the last 24 hours/7 days/30 days. • Diagnostics: Displays diagnostic information about the device up to 32,000 characters. This note is added to the alert ticket only if diagnostic details are available in the alert. Refer to Single Alert View. |
Datto RMM Device Insight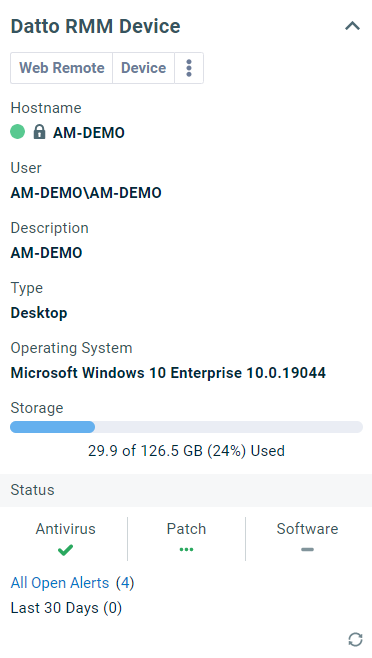 |
The Datto RMM Device Insight displays a variety of details about the device. It also allows you to use Datto RMM tools directly from within the Autotask alert ticket. Refer to Datto RMM and BCDR Device insights and Using Datto RMM and BCDR tools from Autotask in the Autotask Help system. |
Configuration Item Insight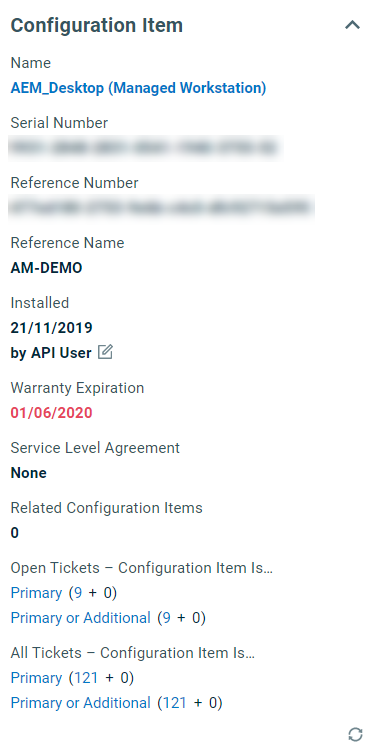 |
The Configuration Item Insight displays a variety of details about the configuration item in Autotask. Refer to Ticket insights in the Autotask Help system. |
For more information, click the question mark icon in the upper-right corner of the Autotask page. You will automatically be directed to the appropriate topic in the Autotask Help system.
Autotask alert ticket completion and automatic Datto RMM alert closure
If your Autotask alert ticket is completed via a workflow rule, you can use the same workflow rule to trigger an extension callout to resolve your original Datto RMM alert (and all related alerts, as well). Or, if the Autotask alert ticket is not completed via a workflow rule, you can create a workflow rule to trigger an extension callout when an Autotask alert ticket is set to complete.
Extension callouts provide data for automatic (round trip) ticket closure for Datto RMM integrations. One of the actions a Service Desk workflow rule can perform in Autotask is to trigger an extension callout. The association of workflow rules with extension callouts allows you to trigger extension callouts when needed and only when needed.
To have a complete understanding of workflow rules and extension callouts, Kaseya strongly recommends reviewing the following topics in the Autotask Help system:
IMPORTANT Automatic Datto RMM alert closure will not occur unless, at the time the Autotask alert ticket is completed, an extension callout has been set up and has been associated with either the workflow rule that closes the ticket or a separate workflow rule that fires when an Autotask alert ticket is completed.
Step 1: Configure the extension callout
- Log in to Autotask.
- Navigate to Autotask menu > Admin > Extensions & Integrations > Other Extensions & Tools > Extension Callout (Tickets).
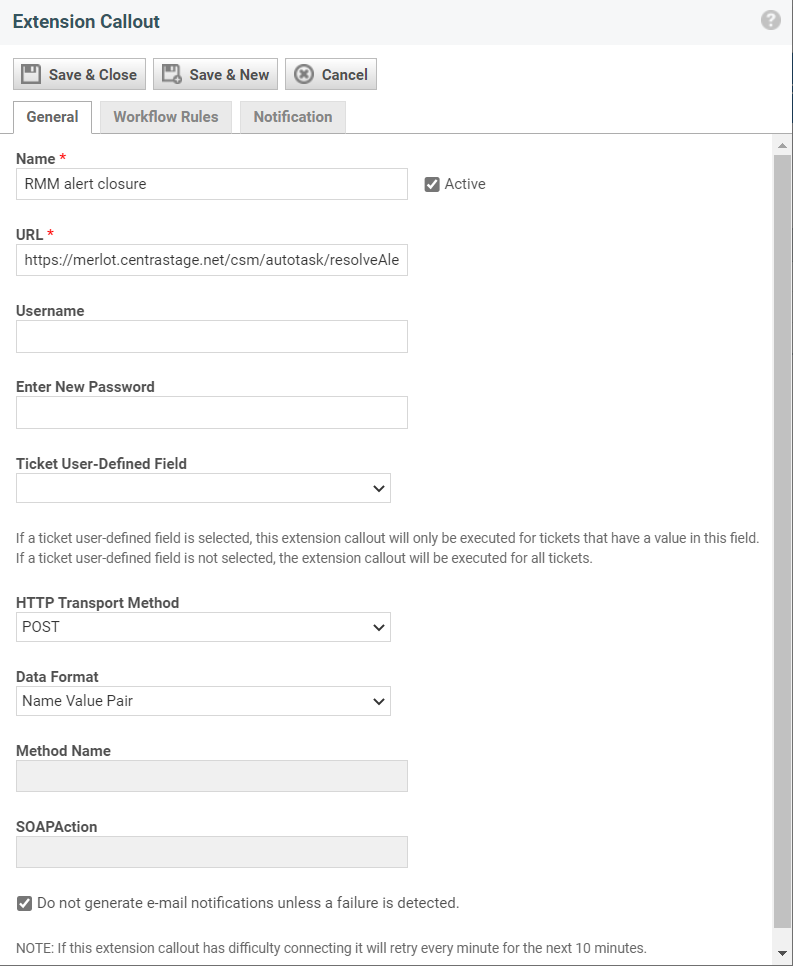
- Click New Extension Callout.
- Enter a Name for the extension callout.
- Enter your Datto RMM CSM URL in this format: <your-rmm-url>/csm/autotask/resolveAlert
EXAMPLE For example, if you are on the Merlot platform, the URL should look like this: https://merlot.rmm.datto.com/csm/autotask/resolveAlert
- Set the HTTP Transport Method to POST.
- Leave all of the other fields at their default selection. Ensure the Active check box is selected.
- Click Save & Close.
Step 2: Associate the extension callout with a workflow rule
- Make sure you have an Autotask Service Desk workflow rule that is set up to close your Autotask alert ticket or a workflow rule that is set up to fire when the Autotask alert ticket is completed. You can create a new rule or edit an existing one.
EXAMPLE In this example, the workflow rule is set up to fire when the status of a ticket that was created from a Datto RMM alert changes to Complete.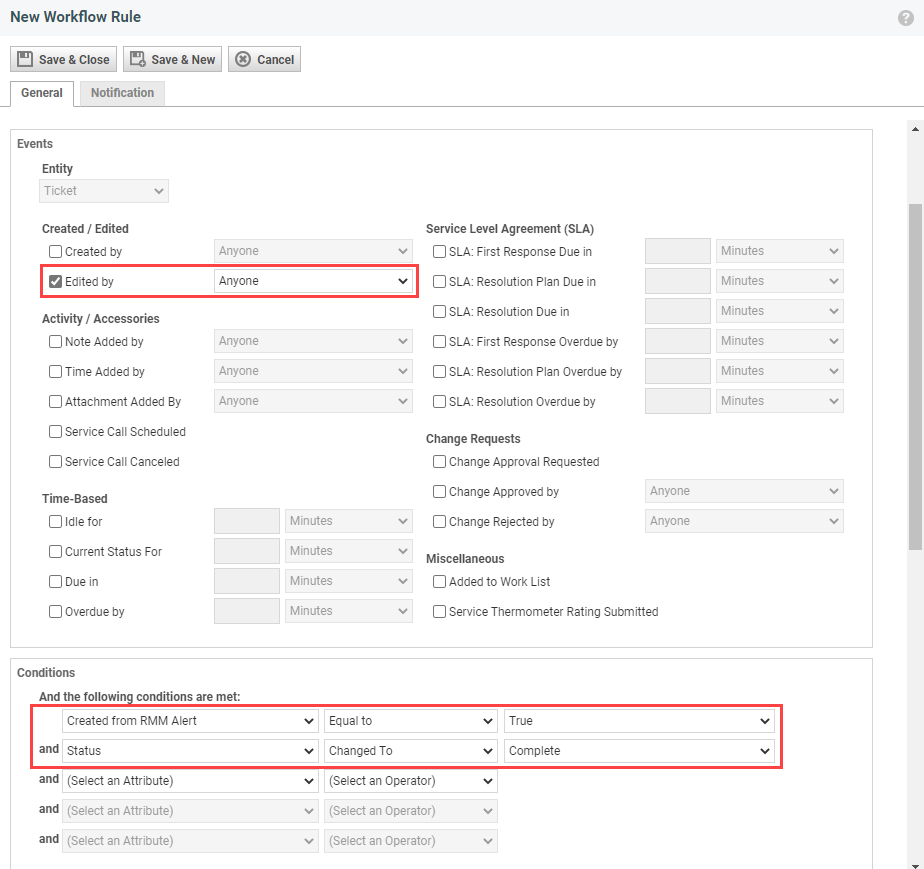
NOTE Only Autotask alert tickets with a status of Complete will be resolved by Datto RMM. If it has any other status when the workflow rule fires, it will be ignored by Datto RMM, and the alert will not be resolved.
- In the Actions area of the workflow rule, select the correct extension callout from the Then Execute Extension Callout list.
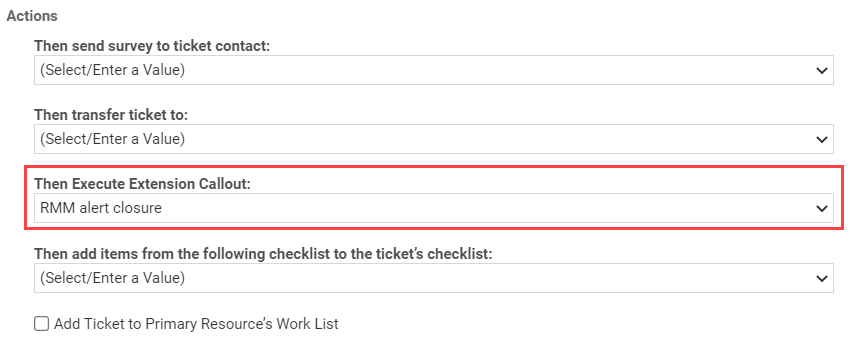
- Click Save & Close.


