Global Settings
 Security and navigation
PERMISSIONS Refer to Setup > Global Settings in Permissions.
NAVIGATION Setup > Global Settings
Global Settings in Datto RMM apply across all areas of your Datto RMM account. The following sections are available within Global Settings to configure:
- Access Control: Control access to your Datto RMM account.
- Inactive User Logout: Set the amount of time that a user can be inactive before they are automatically logged out.
- Custom Agent Settings: Define how Agents communicate with the platform and perform network scans.
- Email Settings: Specify a From Name and a Reply-To Address for email notifications sent by your Datto RMM account.
- Email Recipients: Specify one or more email recipients and define what type of email notifications they should receive.
- Variables: Specify default variables that can be used when writing custom components.
- Import Site Variables: Update one or more of your Managed sites' existing variables or add new variables by uploading a CSV file.
- User-Defined Fields: Rename the default labels of the user-defined fields (UDFs).
IMPORTANT The settings described in this topic apply to your entire Datto RMM account.
Refer to My Settings for information about individual user details and preferences. Refer to Account Settings for information about Datto RMM account details.
Access Control
This section allows you to control access to your Datto RMM account. Turn the options on or off as required or edit the Restricted IP List. Configure the fields and click Save. Click Confirm to execute the action or Cancel to close out of the dialog box. To discard the changes, click Cancel.
| Field | Description |
|---|---|
| Enable API Access | Enables access to the Datto RMM API. By default, API access is disabled. Once it is enabled, API keys can be generated on a user-by-user basis. Refer to Editing a user |
| New Device Approval | This option is disabled by default. When it is enabled, any new device added to the Datto RMM account will require approval by a user with the Device Approvals permission enabled in their security level before the device can participate in the account activity. Disabling this option will immediately authorize all new devices currently pending approval. For more information, refer to New Devices. |
| IP Address Restriction | Restricts access to the web interface to specific IP addresses. This option is disabled by default. Once this option is enabled, your current public IP address will automatically be added to the Restricted IP List. You can add more than one IP address to the list. IMPORTANT If IP Address Restriction is enabled and all Administrator users for that account are unable to log in, you will need to contact Support to regain access. |
| Agent IP Address Restriction | Restricts access to the Agent Browser to specific IP addresses. This option is disabled by default. Once this option is enabled, your current public IP address will automatically be added to the Restricted IP List. You can add more than one IP address to the list. Refer to Agent Browser. |
| Restricted IP List | When you enable the IP Address Restriction or Agent IP Address Restriction options, your current public IP address will automatically be added to the Restricted IP List. Click the plus or minus sign to update the list. One IPv4 Address may be entered on each line. Access to the web interface and the Agent Browser will be restricted to the IP addresses that appear in this list. An error message will be displayed if an invalid entry has been entered. Refer to Agent Browser. |
Inactive User Logout
This section allows you to set the amount of time that a user can be inactive before they are automatically logged out of Datto RMM:
NOTE Full-screen dashboards are excluded from the inactivity timer. For information about using dashboards in full-screen mode, refer to Dashboards toolbar.
| Field | Description |
|---|---|
| Logout Inactive User After | Set the amount of time a user can be inactive in Datto RMM: • 15 minutes • 30 minutes • 1 hour • 2 hours • 4 hours • 8 hours |
Custom Agent Settings
This section allows you to define how Agents communicate with the platform and perform network scans. Configure the fields and click Save. Click Confirm to execute the action or Cancel to close out of the dialog box. To discard the changes, click Cancel.
| Field | Description |
|---|---|
| Use alternative settings for Agent | Enable this to be able to configure the settings listed below. |
| Control Channel Address | By default, this field should be left blank. In case a specific control channel address is needed for your account, contact your Datto RMM implementation manager. |
| Control Channel Port | By default, this field should be left blank. In case a specific control channel port is needed for your account, contact your Datto RMM implementation manager. The port can be configured between 1 and 65,534. |
| Web Service Address | By default, this field should be left blank. In case a specific web service address is needed for your account, contact your Datto RMM implementation manager. |
| Tunnel Server Address | A tunnel server acts as an interface between devices for remote takeover sessions. Specify an IP or domain and a port to be used for the relayed connection by default. The IP or domain should be separated from the port by a colon (for example: 123.45.6.789:443). For more information about the tunnel server grid, refer to Connecting Agents through the tunnel server grid. |
| Network Subnet Limit |
Limits the size of the scan an Agent performs in a single subnet. By default, the limit is set to 65,534, which is also the maximum number of IP addresses that an Agent is able to scan in a subnet. To disable network scanning for the entire account, set the value to 0. NOTE It is not possible to disable network scanning at the site level. For further information about network scanning, refer to Network configuration and discovery. |
| Network Scan Limit | The limit of devices that an Agent can scan on the subnet of the device. By default it is set to 1,024. Minimum value: 0; maximum value: 2,048. For further information about Network Discovery, refer to Network configuration and discovery. |
Email Settings
This section allows you to specify a From Name and a Reply-To Address for email notifications sent by your Datto RMM account. These will be used in the From and To fields for response emails only. Configure the fields and click Save. To discard the changes, click Cancel.
NOTE The Email Settings section can be saved if both fields contain values, if both fields are empty, or if the Reply-To Address field contains a valid email address and the From Name field is empty.
The Email Settings section cannot be saved if the From Name field contains a value and the Reply-To Address field is empty.
| Field | Description |
|---|---|
| From Name |
Enter a name to be used in the From field of emails (for example: IT Support). NOTE Avoid entering an email address in this field, as it can confuse the email service and prevent the notifications from sending successfully. Enter an email address in the next field instead. |
| Reply-To Address | Enter an email address to which you want your recipients to reply. NOTE The email field accepts the following characters: |
Email Recipients
This section allows you to specify one or more email recipients and define what type of email notifications they should receive.
NOTE The user who registered the account is added as an email recipient by default, and all notification types are selected for this user.
NOTE Email recipients of a particular site can be specified in the Email Recipients section in Creating or editing a site or the Email Recipients section in Site Settings.
To delete an email recipient, click the delete icon  at the end of the row. To add one, click Add Email Recipient. Configure the fields and click Save. Click Confirm to execute the action or Cancel to close out of the dialog box. To discard the changes, click Cancel.
| Field | Description |
|---|---|
| Name | Enter the recipient's name. |
| Address | Enter the recipient's email address. NOTE The email field accepts the following characters: |
| Type | Select the preferred email format for this recipient: Both, HTML, or Text. |
| Receives | Select any of the notification types this recipient should receive: Alerts, ComStore Components, New Devices, or Reports. NOTE Selecting ComStore Components will opt you in to a Component Update Digest email notification. Refer to ComStore. |
Variables
You can specify variables that can be used when writing custom components. The variables can be defined with a specific value that the Agent will use when executing the script. How you refer to the variables in your script will be defined by the scripting language you apply (for example, in batch scripts, you can refer to a variable in the format of %VariableName%).
NOTE Global variables used in components will be passed to jobs and monitors but will be overridden by site variables of the same name. You can specify site variables on the Site Settings page. Refer to Variables. You can also update multiple sites' variables in bulk using a CSV template. Refer to the Import Site Variables section of Global Settings.
To delete a variable, click the delete icon at the end of the row. To add one, click Add Variable. Configure the fields and click Save. Click Confirm to execute the action or Cancel to close out of the dialog box. To discard the changes, click Cancel. 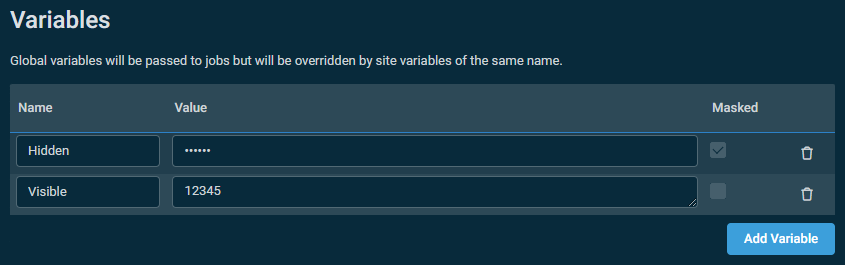
| Field | Description |
|---|---|
| Name | Enter a name. Make sure there is no space in the name of the variable. This field can be edited after saving the variable. While site variables may share the same name as global variables, variable names must be unique at the site level and at the global level. |
| Value | Enter a value. Variable value limit: 20,000 characters. This field can be edited after saving the variable. |
| Masked | Select the check box to hide the value of the variable. Once a variable has been saved, this field can no longer be edited. IMPORTANT When extended logging is activated for log components, masked variables will be visible in clear text in the log file. Refer to Adding extended logging to Datto RMM. |
Import Site Variables
Update one or more of your Managed sites' existing variables or add new variables by uploading a CSV file.
NOTE Sites with OnDemand devices cannot be updated with variables.
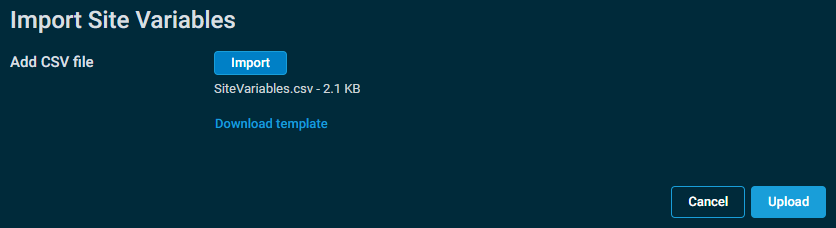
You can upload any file with the .csv extension saved on your device. You may opt to use the pre-populated CSV template that contains every site you have permission to view in your Datto RMM account. The template is useful for quickly adding a single variable or for adding multiple variables at once to any number of sites. Complete the following steps to download, edit, and upload the site variables CSV template:
- Click Download Template.
- Open the CSV file you downloaded, and add the following information:
| Field | Description |
|---|---|
| Site ID | The Site ID (site identifier) is hard-coded and cannot be changed or updated. |
| Site Name | The name of your site. The name cannot be updated through the CSV file; however, it can be changed in Site Settings |
| Site Description | The description of your site. The description cannot be updated through the CSV file; however, it can be changed in Site Settings |
| Variable Name | Enter the name of the variable. It can be a new variable or an already existing one. NOTE This field is mandatory. |
| Variable Value | Enter the value of the variable. It can be a new value or an already existing one. Variable value limit: 20,000 characters. NOTE This field is mandatory. |
| Variable is Hidden | If you would like to mask the variable value, enter 1. If you would not like to mask the variable value, enter 0. NOTE When adding a new variable and leaving this field blank, the variable value will not be masked. |
NOTE The variable_name and variable_value values in the CSV file are both mandatory in order for a site variable to be successfully imported.
NOTE In order for the import to be successful, the column headings must not be edited or rearranged.
- Save the file in CSV format.
- Click Import, and select the file you have just saved.
- Click Upload, and you will see a message that the site variables uploaded successfully. Or, click Cancel to remove any selected file.
NOTE The Upload button is unavailable until a valid CSV file is imported.
The variables will appear in the Variables section in Site Settings.
User-Defined Fields
This section allows you to define the global label and data type of 300 user-defined fields (UDFs). The UDFs can be populated with information that is not picked up in the device audit to provide additional targeting for jobs and policies. You can enter and edit UDF information manually on the Device summary page, or it can be populated by the Datto RMM Agent. For further information, refer to User-defined fields.
IMPORTANT UDF 1 is set to display a notice when a device has been isolated using the standalone Datto RMM Ransomware Detection, and will overwrite any other data stored in that UDF. Refer to Standalone Datto RMM Ransomware Detection.
UDF labels
A UDF label is a descriptor of the information that field holds.
EXAMPLE A UDF with the label Last On-Site Service Date can be updated by a technician manually with the date of the device's last physical service.
To rename the UDF label, update the Global Label field. The change will be saved automatically. To reset a UDF label to its default value, click the Reset to default value icon at the end of the row.
NOTE UDF labels have a limit of 22 characters.
UDF data types
UDF data types dictate the format of the information stored in the field. The following data types are available:
- Text: Any string up to 255 characters.
- Number: An integer of up to 22 digits, or a decimal with up to 15 digits after the decimal place.
- Boolean: Can have the values of True, False, or Empty.
- Date: A date in the ISO 8601 format, for example: 2026-07-23.
To change what type of data the UDF holds, select it from the Data Type drop-down. If that UDF has already been assigned a value on one or more devices, a pop-up message will display asking if you want to confirm the change. This pop-up shows how many devices will be affected.
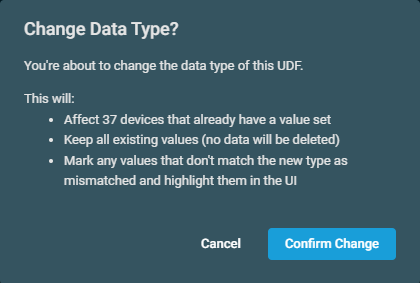
NOTE When the data type of a UDF is changed, any existing values will not be deleted. Any values that don't match the new type will be highlighted in the UI.
Invalid data types
When editing the value of a UDF in the UI, you will be restricted to only input data that matches it's data type. However, if the value of the UDF is edited via script, component, or API, any value can be assigned, even if it does not confirm to the assigned data type. When this happens, the UDF will display a warning marking the data as invalid.
This warning will display on the device details page, and UDFs with invalid data will also have a warning icon next to them in the device list, if visible.
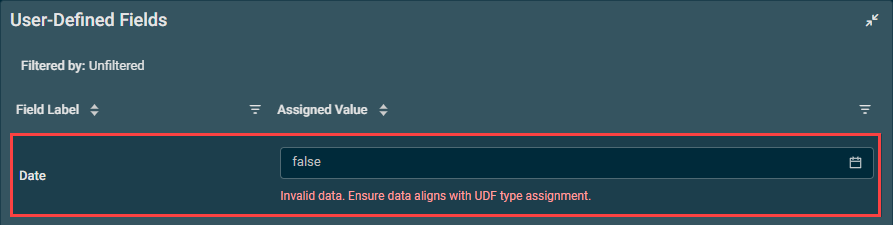
Saved filters referencing a mismatched UDF display a warning icon across all surfaces. Editing a filter with a mismatched criterion highlights it with a red border and blocks saving until it's corrected.
You can easily search for devices with incorrectly formatted data in a UDF by creating a filter and using the is type mismatch restriction for that UDF.


