Creating or editing a site
PERMISSIONS Refer to Sites > Sites in Permissions.
NAVIGATION Sites > All Sites > Create Site
Creating a site
Enter a name for the site.
NOTE The Name field has a limit of 255 characters.
Enter a description for the site.
Map the site to an existing Autotask company.
NOTE This option is displayed only if the Autotask Integration is enabled. Refer to Autotask Integration.
Select Managed or OnDemand for the site type. Refer to Site types.
IMPORTANT Switching a site's type from Managed to OnDemand will cause all current and future Agents in the site to enter the OnDemand state. Agents will only connect once every seven days to update their audit data and they cannot be targeted by monitors, policies, or jobs. A remote user can use an OnDemand Agent to request support from the system tray icon.
If a site's type is changed from OnDemand back to Managed, the devices in the site will remain in their OnDemand state until the Agents next check in to Datto RMM. However, you can speed up this process by requesting support from the system tray icon of the devices. For more information, refer to Managed and OnDemand Agents.
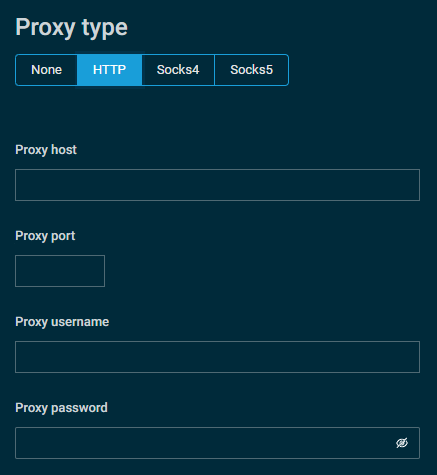
Select None if you do not wish to use a proxy for this site. Select HTTP, Socks4, or Socks5 if the devices you're going to install an Agent on within this site will use a proxy server to connect to the internet. 
For Proxy Types other than None, complete the following fields as required by your proxy server to ensure the devices are already configured when you install the Agent: Proxy Host, Proxy Port, Proxy Username, and Proxy Password.
NOTE Site proxy settings will not apply to devices that had already been in the site before the proxy settings were configured. Existing devices with an Agent installed will need to be manually configured for the proxy.
For more information or to learn how to configure these settings in the Datto RMM Agent, refer to Proxy settings in Datto RMM.
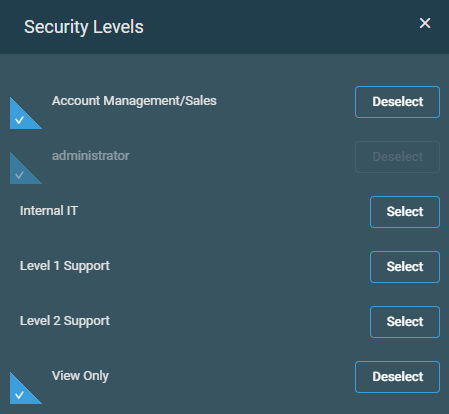
Click the Add Security Level button to select the security levels for which this site should be accessible. Refer to Security levels. From within the Security Levels pane, click Select or Deselect for each security level you wish to include or exclude. When you are finished, click X to close the pane.
NOTE The administrator security level is included by default.
NOTE Non-administrator users will only be able to add security levels that they are members of to sites they create.
To remove access to this site for a security level, you can also click the delete icon ![]() next to the security level. Removing a security level from this list will not delete the security level itself.
next to the security level. Removing a security level from this list will not delete the security level itself.
This section allows you to specify one or more email recipients and define what type of email notifications they should receive. Email recipients set up here will receive notifications from this site only.
Click Add Email Recipient and configure the following fields:
| Field | Description |
|---|---|
| Name | Enter the recipient's name. |
| Address | Enter the recipient's email address. NOTE The email field accepts the following characters: |
| Type | Select the preferred email format for this recipient: Both, HTML, or Text. |
| Receives | Select any of the notification types this recipient should receive: Alerts, ComStore Components, New Devices, or Reports. NOTE Selecting ComStore Components will opt you in to a Component Update Digest email notification. Refer to ComStore. |
To add another email recipient, click Add Email Recipient. To delete an email recipient, click the delete icon ![]() at the end of the row.
at the end of the row.
NOTE Email recipients for the entire account can be specified in the Email Recipients section in Global Settings.
NOTE The Variables section is not available for OnDemand sites.
You can specify variables that can be used when writing custom components. The variables can be defined with a specific value that the Agent will use when executing the script. How you refer to the variables in your script will be defined by the scripting language you apply (for example, in batch scripts, you can refer to a variable in the format of %VariableName%).
NOTE Site variables used in components will be passed to jobs and monitors and will override any global variables of the same name. For a site variable to successfully override an existing global variable, the site variable information entered must perfectly match the original global variable information, including the letter case of the name and value. You can specify global variables in the Variables section in Global Settings. You can also update multiple sites' variables in bulk using a CSV template. Refer to the Import Site Variables section of Global Settings.
Click Add Variable and configure the following fields:
| Field | Description |
|---|---|
| Name | Enter a name. Make sure there is no space in the name of the variable. This field can be edited after saving the variable. While site variables may share the same name as global variables, variable names must be unique at the site level and at the global level. |
| Value | Enter a value. Variable value limit: 20,000 characters. This field can be edited after saving the variable. |
| Masked | Select the check box to hide the value of the variable. Once a variable has been saved, this field can no longer be edited. IMPORTANT When extended logging is activated for log components, masked variables will be visible in clear text in the log file. Refer to Adding extended logging to Datto RMM. |
To delete a variable, click the delete icon ![]() at the end of the row.
at the end of the row.
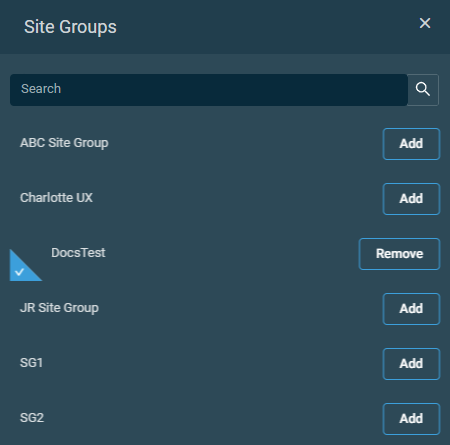
Click the Add Site Group button to select a Site Group the new site should be added to. This step is optional. Refer to Group types. From within the pane that opens to the right, click Add for each Site Group you wish to add this site to. When you are finished, click X to close the pane. 
To remove a Site Group, select the delete icon ![]() next to the Site Group you wish to remove.
next to the Site Group you wish to remove.
Click the Add button to enter additional subnets. Subnet ranges must not overlap with any existing defined subnet ranges. The subnet in which a site's network node resides is automatically defined for network discovery and should not be entered here. For more information, refer to Initiate Network Discovery.
To remove a subnet, select the delete icon ![]() next to the subnet you wish to remove.
next to the subnet you wish to remove.
Select which device types Datto RMM should attempt to automatically onboard to this site. For new sites, all types will be selected by default. For existing sites, no selections are made by default. For more information, refer to Network Discovery.
NOTE All options require credentials to be configured before onboarding. Refer to Credentials.
NOTE Devices without a MAC address can be manually onboarded but not automatically onboarded.
NOTE ESXi hypervisors are no longer included in automatic onboarding to prevent unintended lockouts of ESXi accounts when credentials are regularly tested from one or more Network Nodes on a site during Network Discovery scans.
When you are finished, click Create Site to create the site or Cancel to discard the new site progress and return to the Sites page.
NOTE The Name field is required for the Create Site button to become available.
Click Confirm to create the site or Cancel to close out of the dialog box. A confirmation dialog box will confirm that the site has been created successfully.
Editing a site
To update the settings for the site you have created, click Settings in the left navigation menu. Refer to Creating a site for individual setting descriptions. The following additional setting is displayed only when editing a site:
Site ID
The Site ID (site identifier) is hard-coded and cannot be changed or updated.


