Users
PERMISSIONS Administrator
NAVIGATION Setup > Users
About users
Users in Datto RMM are individuals with a user account. On the Users page, you can create new user accounts, and view and manage existing ones.
NOTE The New UI is automatically set as the default interface for users that are created in the New UI.
NOTE Ensure you have at least View permission for Global > Dashboard to prevent an Access denied error message when you log in to your account. Refer to Permissions.
Creating a user
On the Users page, click Create User to configure a new user account.
NOTE If you are using KaseyaOne Unified Login, you have the option to enable Automatic User Creation. Refer to Unified Login with KaseyaOne.
Configure the following fields: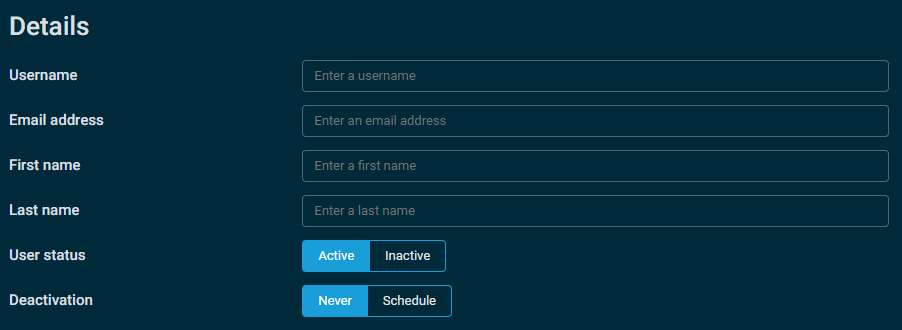
Configure the following fields:
| Field | Description |
|---|---|
| Component Level | Determines which components the user can view in the Component Library. Refer to Component Library. Low (2) is selected by default; however, you can choose from the following options: • Basic (1) • Low (2) • Medium (3) • High (4) • Super (5) EXAMPLE For example, a user whose component level is set to Super (5) will be able to view all components in the Component Library; while a user whose component level is set to Medium (3) will only be able to view components with a component level of Medium (3), Low (2), or Basic (1). When editing a component's component level, a user can only select a component level that is available to them based on their component level in their user settings. |
| Security Levels |
Assign the user at least one of the available security levels. A user with more than one security level can switch to any of them for the duration of their login session. NOTE If integrated with KaseyaOne, and access groups are enabled, the following warning will appear: |
| Default Security Level | This field is only available when at least one security level is selected in the Security Levels field. The drop-down menu lists all security levels assigned to the user. Select the user's default security level which will be used when they log in to their account. |

Once you have configured the new user account, click Create User. A pop-up notification will appear if the action was successful. Otherwise, click Cancel to return to the Users page.
NOTE Further configuration options are available when editing the user. Refer to Editing a user.
NOTE An email from noreply@datto.com will be sent to the new user's email address so that they can complete the login process. The email will contain a temporary link for the user to log in and change their password. The link will expire after 24 hours, and the user account will get deactivated if the user does not configure a password and two-factor authentication within seven days of receiving the email.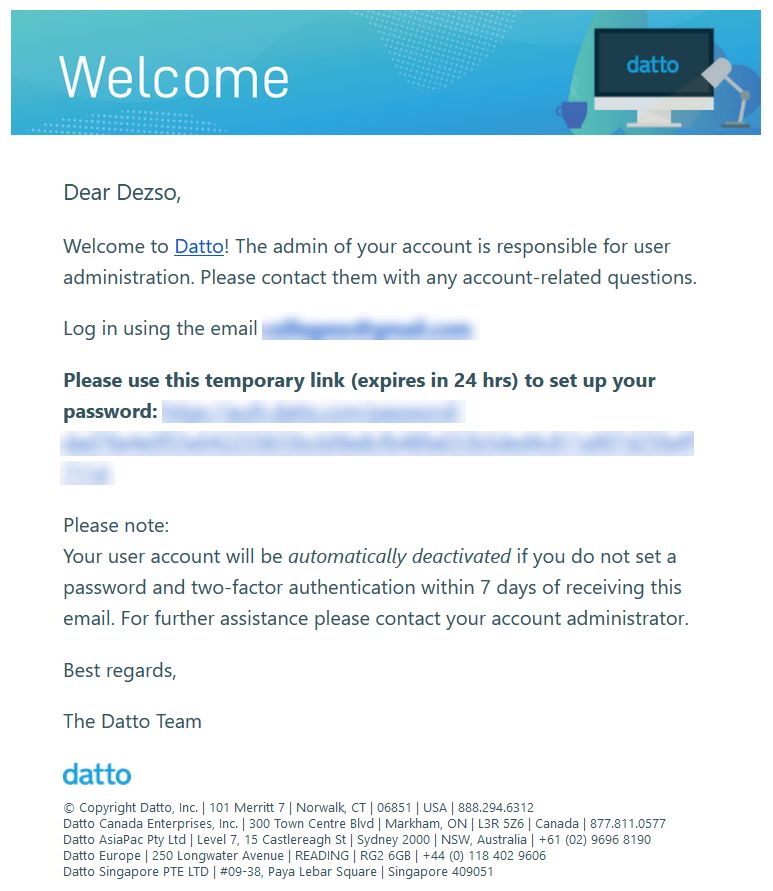
Viewing and managing users
Navigate to the Users page by following the navigation path described in Security and navigation.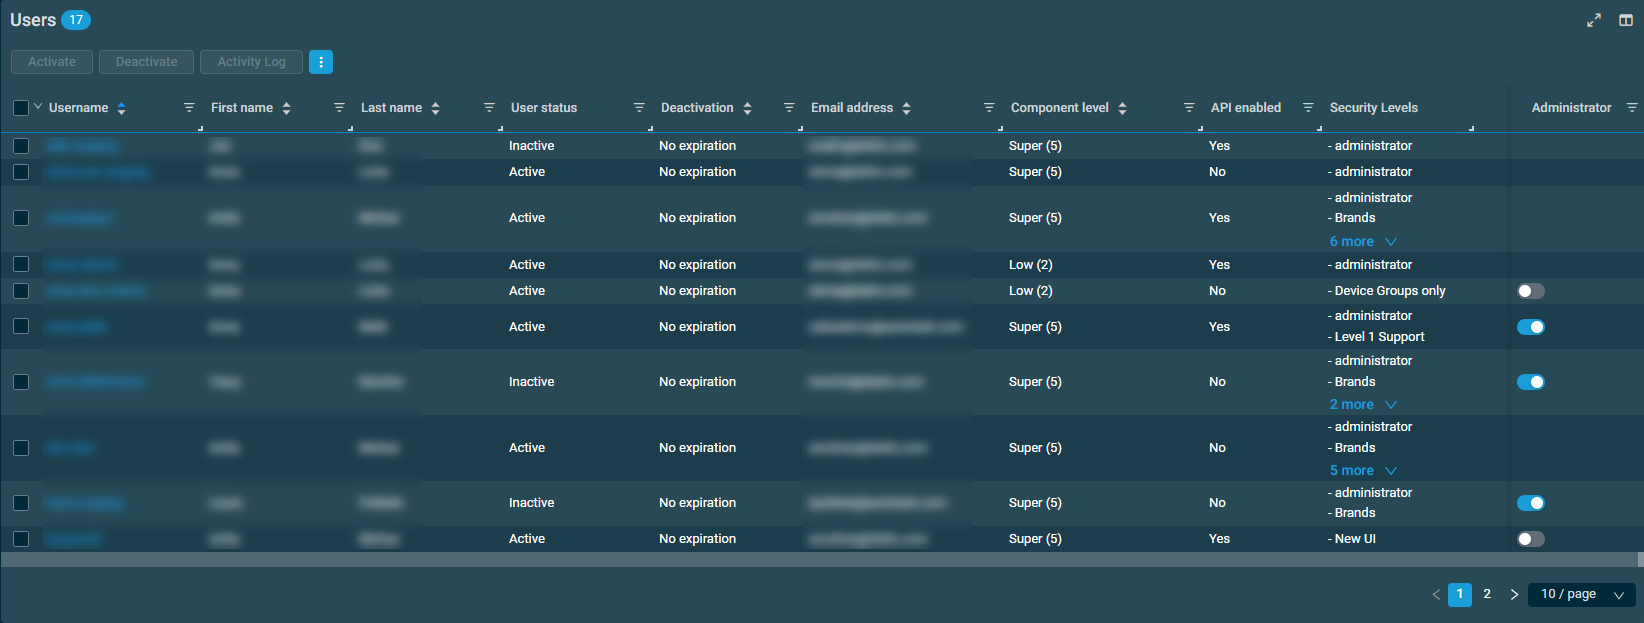
The Column Chooser icon  allows you to select which columns should be visible in the list. Refer to Column Chooser field definitions for descriptions of all of the available fields.
The table density is set to condensed theme by default. To change it to relaxed theme, click the density toggle icon.  The selection will persist across all pages.
The number of results displayed can be specified by selecting the desired number from the pagination control. This selection will persist the next time the page is accessed.
Action buttons
To access all action buttons, click the Row Actions icon.
The action buttons are grayed out or become unavailable if no row is selected in the table or if the action button is not applicable to the selected rows. The check boxes allow you to select one or more rows. Select all rows shown on a page by selecting the check box in the table header. You can also use the drop-down arrow next to the check box in the table header to choose one of the following options: Select none, Select all on page, or Select all rows across all pages. If you choose to select all rows across all pages, the check boxes of the rows will not be selected; however, the page will indicate that all rows have been selected.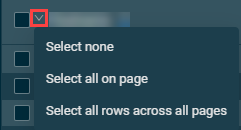
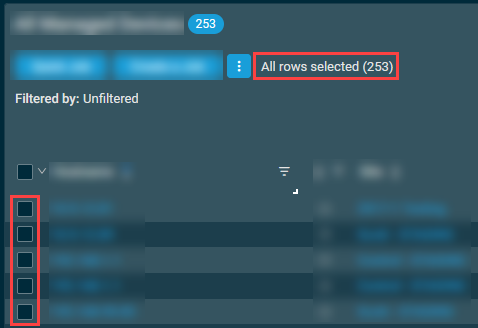
NOTE When all rows are selected across all pages, only certain action buttons are supported, which is indicated in the All Rows column in the table below.
| Action Button | All Rows | Description |
|---|---|---|
| Activate |
|
Changes the user status to Active upon confirmation. A pop-up notification will appear if the action was successful. NOTE This action can also be performed in the user account details. Refer to User Status. |
| Deactivate |
|
Changes the user status to Inactive upon confirmation. A pop-up notification will appear if the action was successful. You cannot deactivate your own user account. NOTE This action can also be performed in the user account details. Refer to User Status. NOTE You can also configure a user account to expire in the future. Refer to Deactivation. |
| Activity Log |
|
Opens the Activity Log page filtered for the selected users. Refer to Activity Log. |
| Export Selected Rows to CSV | In the confirmation dialog box that appears, select whether to show table headers in the file by turning on the toggle for Show table headers in the exported CSV. Click Confirm to download the file or Cancel to close out of the dialog box. Any column selections, filters, and sorting that have been applied to the table will also be applied in the CSV file.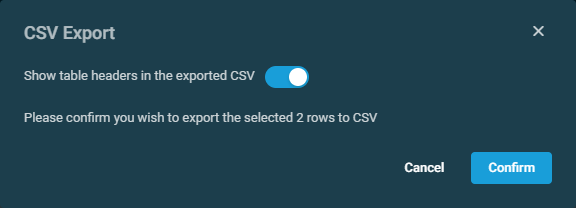 |
|
| Export All Rows to CSV |

|
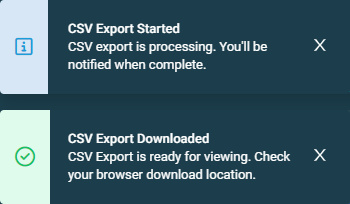
This action button is available only if all rows have been selected across all pages in the table. In the confirmation dialog box that appears, click Confirm to download the file or Cancel to close out of the dialog box. Pop-up notifications will inform you of the start and completion of the CSV export action. Click the X to close the notification; otherwise, the notification will automatically be cleared after five minutes. Any column selections, filters, and sorting that have been applied to the table will also be applied in the CSV file. |
| Uncheck All |
|
Clears all selected rows. The number of selected rows is indicated next to the Row Actions icon. NOTE This action button is not available if all rows have been selected across all pages in the table. To clear all selected rows across all pages, use the Select none option from the drop-down arrow next to the check box in the table header. |
Navigate to the Users page by following the navigation path described in Security and navigation. In the Users table, click the username of a user. At the top of the user page, you will see the username along with the following information: Created, Last logged in, and Last password change.
You can edit the details of the user account and configure further options that are not available on the Create user page. All available actions and configuration options are listed below. Once you have finished editing the user, click Save user. A pop-up notification will appear if the action was successful. Otherwise, click Cancel to return to the Users page.
NOTE This action button is not available when editing your own user account.
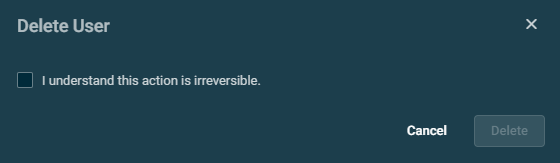
IMPORTANT Deleting a user is irreversible.
- Click Delete.

- If the user has no associated data, the following dialog box will be displayed:
If the user has associated data, the following dialog box will be displayed. Select one of the options highlighted in the screenshot below:
- To reassign the user's associated data to another user, select a user from the drop-down list. Only those users are displayed in the list that have the same or higher component level than the user you are deleting. This is to ensure that the selected user will have the required permission to perform actions on the associated data being assigned to them. To review the user's associated data, refer to Associated Data.
- To delete the user without assigning their data to another user, select the Delete this user's associated data check box. A warning will inform you about the data to be deleted. Refer to Associated Data. Once this option is selected, the option to reassign the user's data will not be available and any name selected previously will be cleared.
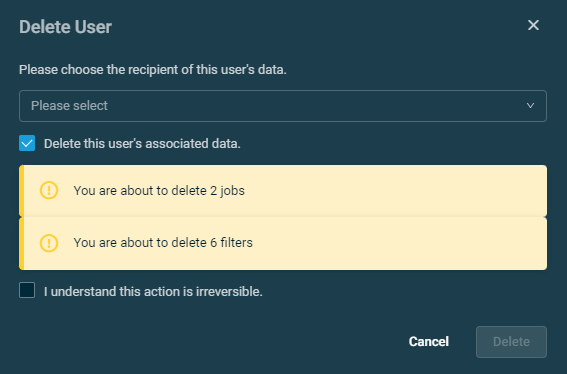
- Select the I understand this action is irreversible check box.
- Click Delete to execute the action or Cancel to close out of the dialog box.
NOTE The Delete button is unavailable until you choose one of the options in step 2 (if applicable) and confirm that you understand that deleting a user is irreversible.

A pop-up notification will appear if the action was successful. If the deleted user's associated data was reassigned, it will be available in the recipient user's account.
NOTE If at the time of deletion, a Datto RMM user account is linked to an Autotask user profile via the Autotask Integration, the link will be removed. The Autotask user can then link their user profile to another Datto RMM user account.
NOTE This action button is only available for users who have logged in to their user account at least once by following the instructions provided in their welcome email.
To reset a user's two-factor authentication (2FA) credentials, click Send 2FA Reset Email.
A pop-up notification will appear if the action was successful. The user will be emailed a verification code, and once logged in to Datto Partner Portal, they can configure 2FA again.
For more information about 2FA and how to reset your own 2FA credentials, refer to Two-factor authentication.
To reset a user's password, click Send Forgot Password Email.
A pop-up notification will appear if the action was successful. The user will be sent a password reset email. For more information about managing passwords and how to reset your own password, refer to Managing passwords.
Refer to Details.
NOTE The Username and Email Address fields cannot be edited.
NOTE The User Status field is not available when editing your own user account.
Refer to Security.
NOTE In the Security levels field, the Administrator security level cannot be removed from your own user account.
NOTE Your own default security level can also be changed in your settings. Refer to My Settings.
This section is only displayed if support access has been enabled for the user. Refer to Support Access.
When support access is enabled, the expiration date and time are displayed. To disable support access, click Disable.
A pop-up notification will appear if the action was successful.
This section is only displayed if single sign-on (SSO) within the Autotask Integration has been enabled. When SSO is enabled, the Status field will indicate if the Datto RMM user account has been linked to an Autotask user profile. If the user account is linked, the Autotask user ID will be displayed as well. For more information, refer to Configure SSO.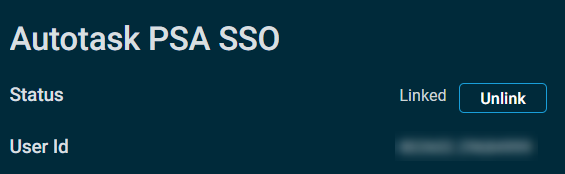
Click Unlink to unlink the Datto RMM user account and the Autotask user profile. A pop-up notification will appear if the action was successful. The Status field will now show that the user account is unlinked.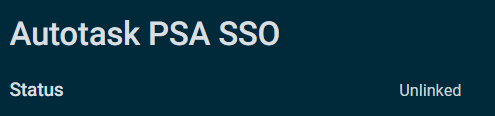
This section is only displayed if access to the Datto RMM API has been enabled for the Datto RMM account. Refer to Enable API Access and Datto RMM API. Once API access is enabled, API keys can be generated on a user-by-user basis.
Click Generate API Keys.
A pop-up notification will appear if the action was successful. The following information will be displayed: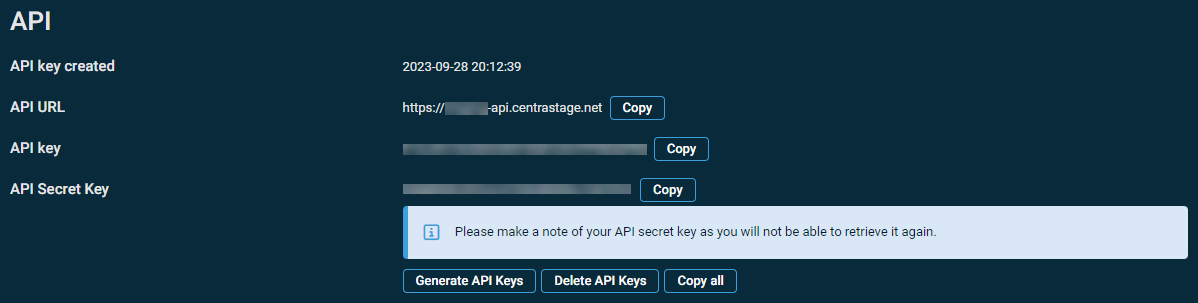
- API Key Created
- API URL
- API Key
- API Secret Key
The API Key and API Secret Key will be used for authentication when making requests via the Datto RMM API. Use the Copy and Copy All buttons to copy the information displayed.
IMPORTANT The API Secret Key will be hidden for security reasons after navigating away from this page. It will not be possible to retrieve it again. However, you can regenerate API keys at any time by returning to the page and clicking Generate API Keys. This will invalidate any keys previously generated. Similarly, clicking Delete API Keys will revoke access altogether. Regenerating and deleting API keys is irreversible, and you must confirm the action by clicking Confirm in the confirmation dialog box.
This section displays data that is associated with the user account. It lists the following items: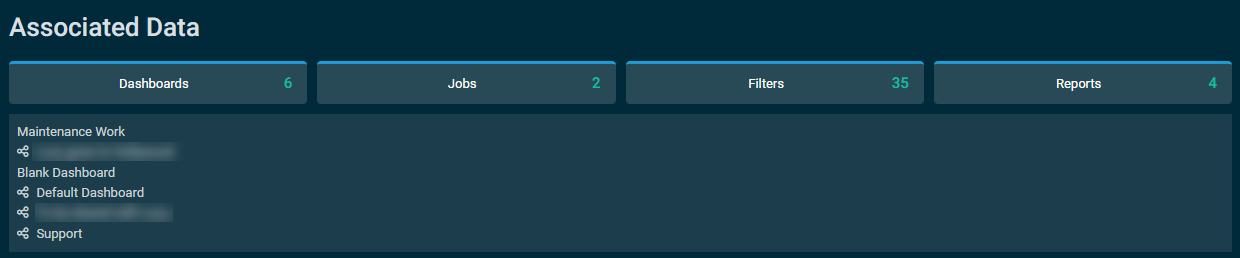
- Dashboards
- Jobs
- Filters
- Reports
A maximum number of 250 results is displayed in each list.
NOTE When deleting a user account, you have the option to assign the user's associated data to another user. Refer to Deleting a user.


