(Deprecated) Autotask Integration - Legacy UI
PERMISSIONS In Datto RMM, default security level of Administrator. In Autotask, security level of API User. Refer to Permissions.
NAVIGATION Setup > Autotask
Refer to Autotask Integration.
IMPORTANT As of the 13.9.0 release, Autotask PSA is no longer configurable in the Legacy UI. Please refer to our guide on the Autotask Integration in the New UI.
Permissions
IMPORTANT You must have a default security level of Administrator in Datto RMM when configuring the integration. If you have more than one security level, ensure Administrator is selected as your default security level. For more information, refer to Add a user in the legacy UI and Creating a user in the New UI.
IMPORTANT You must use an Autotask sync account when running the integration setup wizard, and this Autotask user account must have a security level of API User, and Datto RMM must be selected as the Integration Vendor. Refer to this topic in the Autotask Help system: Adding or editing an API user. Make sure that in the security level settings, the Not required to change password (password does not expire) check box is selected. Refer to this topic in the Autotask Help system: Other security settings. Also ensure that the API user's domain matches the primary domain of your Autotask database.
IMPORTANT Ensure that in Autotask all Protected Data Permissions are enabled for the sync account. You can do this in Autotask by navigating to Autotask PSA menu > Admin > Company Settings & Users > Resources/Users (HR) > Security > Protected Data Permission. For more information, refer to this topic in the Autotask Help system: Manage permission to view protected data.
About the integration
The advanced integration of Autotask and Datto RMM introduces a truly unified business management platform. It includes the following features:
NOTE For more information about the following features in Autotask, refer to this topic in the Autotask Help system: Integration workflows.
- Datto RMM users can be mapped to Autotask resources and roles, and Datto RMM sites can be mapped to Autotask companies. When the integration is enabled, Autotask companies can be mapped to one or multiple Datto RMM sites. The mapping can take place in Datto RMM or Autotask.
- Integrated ticketing no longer synchronizes Datto RMM and Autotask tickets. Instead, the Single System of Record (SSoR) functionality provides direct access from Datto RMM tickets to Autotask and vice versa, with more detailed ticket information. With the integration enabled, the ticket entity lives in Autotask only. Therefore, any Datto RMM ticket history prior to enabling the integration is no longer visible.
- Each monitor type and the end client Agent tickets can be configured to create tickets in Autotask in designated queues with configurable issue, sub-issue, work type, and ticket note defaults. The defaults can be overridden for specific monitors.
- Datto RMM device types can be mapped to Autotask products and configuration item types.
- Datto RMM device user-defined fields (UDFs) can be mapped to Autotask configuration item UDFs.
- Datto RMM alerts can automatically be closed if the Autotask alert ticket is completed using an Autotask workflow rule and extension callout. Workflow rules in Autotask automatically perform certain updates and actions when specific events happen and conditions are met. You have a number of attributes that are specific to Datto RMM and that are available for use in Autotask workflow rules.
NOTE For more information, refer to this topic in the Autotask Help system: Navigating from the Autotask company to the RMM site.
NOTE To learn how to add and edit workflow rules, refer to the workflow rules topics in the Autotask Help system: Workflow rules.
- The single sign-on (SSO) functionality allows you to be automatically logged in to Datto RMM if you are already logged in to Autotask and you click an SSO-enabled link from within Autotask.
- You can make your workflow simpler by having your Autotask alert ticket self-heal or clear automatically when the corresponding Datto RMM alert is resolved. You can also specify when a Datto RMM alert should be considered repeating or related to another alert.
- You can use attributes that are specific to Datto RMM in Autotask workflow rules.
- Datto RMM alert and device dashboard tabs are available in Autotask. The dashboards are configured based on the additional device data that is synced between Datto RMM and Autotask.
- Datto RMM devices can be mapped to billing contracts in Autotask. Datto RMM devices appear in Autotask in real time without a manual device discovery process. We have added an Endpoint Management Configuration Item Mapping page in Autotask where you can assign a contact, a billing contract and, for recurring service contracts, a service or bundle to the device. You can also set the device as Reviewed for Contract (which removes it from the page).
- You can access a number of Datto RMM tools right from Autotask using right-click and context menus.
- You can access and manage Autotask tickets from within a Web Remote session. Refer to Autotask companion in Web Remote.
NOTE For more information, refer to this topic in the Autotask Help system: Mapping discovered devices to a contact and contract.
You can configure the integration in Datto RMM after downloading the Autotask component from the ComStore.
How to...
Download the Autotask component from the ComStore in the legacy UI to configure the integration.
IMPORTANT If you have previously used Datto RMM 's standalone ticketing, note that as soon as you download the Autotask component, your Datto RMM standalone ticketing and ticket history will no longer be accessible. Therefore, you are advised to review and complete any open tickets before enabling the Autotask integration. You can switch back to Datto RMM standalone ticketing by deleting the Autotask component, at which point your Datto RMM ticket history prior to downloading the Autotask component will become available again. For more information, refer to Disable the Autotask integration.
You are also advised to re-configure your monitor settings after configuring the integration. For more information, refer to Manage monitors - Legacy UI in the legacy UI or Monitors in the New UI.
- Log in to the Datto RMM Web Portal (legacy UI).
- Click the ComStore tab.
- Enter Autotask into the search bar at the top and click the Search ComStore button.
- Click on the search result, and click the Add to my Component Library button in the pop-up window. This will add the component to the list of your downloaded components. Click OK.
Once you have downloaded the Autotask component, you can access the Autotask Integration page.
- Click Setup in the Datto RMM Web Portal.
- Click the Autotask tab.

The first steps in the integration setup process are the following:
- Enable the integration.
- Map your Autotask companies and resources to your Datto RMM sites and users.
IMPORTANT Refer to the Permissions section in this document to learn about the required security level settings in both Datto RMM and Autotask.
IMPORTANT We recommend that only one Datto RMM account be synchronized to an Autotask database. Connecting an additional Datto RMM account to the same Autotask database will remove the original link, and the existing integration will no longer function.
- Toggle the Integration Status field to ON and click OK in the confirmation dialog box. This will launch the setup wizard, which opens the Autotask Credentials page.
- Enter your Autotask Username and Password. This will enable the integration between Datto RMM and Autotask.
IMPORTANT You must use an Autotask user account with a security level of API User (a non-billed Autotask resource) to enable the integration. Refer to Permissions. This will help you avoid difficult situations, such as when the resource whose credentials were used for the integration changes their password or leaves the company. For more information about the API User, refer to these topics in the Autotask Help system: API User (system) and The API tracking identifier.
- Click Test connection...
If the credentials are valid, a green check mark will appear.
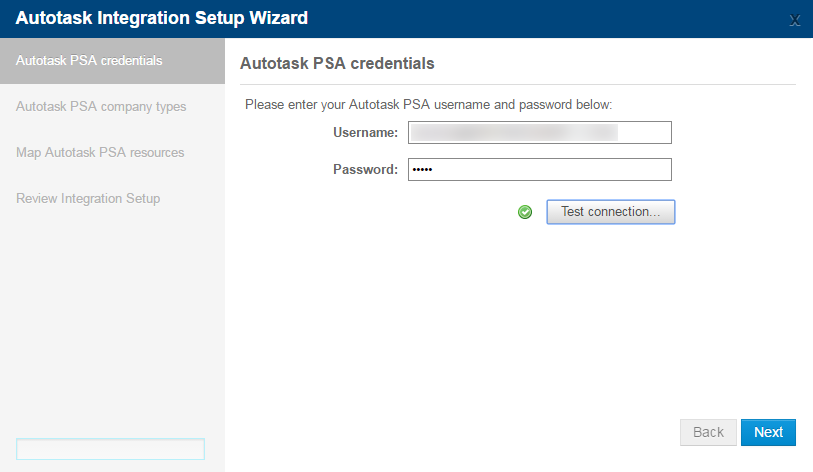
- Click Next.
- On the Autotask PSA company types page, select the Autotask company types you want to retrieve.
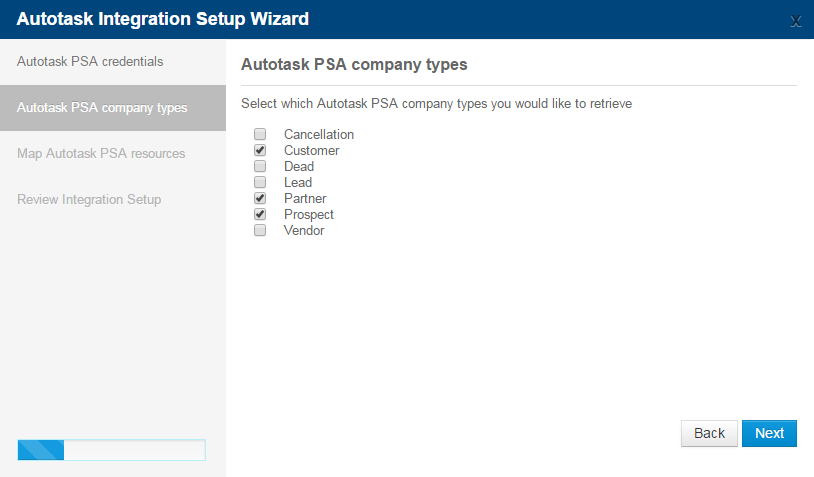
- Click Next.
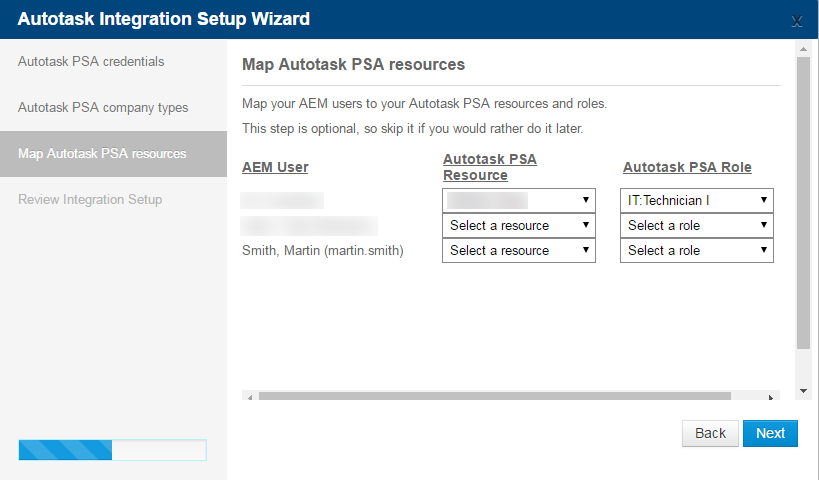
- On the Map Autotask PSA resources page, you can map your Datto RMM users to specific resources and roles in Autotask (optional).
NOTE This is used when a ticket is mapped from Datto RMM to Autotask and gets assigned to a primary resource and role in Autotask.
NOTE You must create your users in Datto RMM before you can map them to Autotask resources. Refer to Add a user in the legacy UI and Creating a user in the New UI.
| Field | Description |
|---|---|
| AEM User | The last name and first name of your Datto RMM user. The username is displayed in brackets. This field is not editable. |
| Autotask PSA Resource | The drop-down menu lists all resources that are currently active in Autotask. Select a name from the list or start typing the name of the resource to narrow the list. The selected resource will be mapped to your Datto RMM user. IMPORTANT Ensure that you do not link a Datto RMM user to an Autotask resource with a security level of API User or Dashboard User. Resources with a security level of API User or Dashboard User cannot log in to Autotask, nor can they be assigned to data, for example, a ticket. For more information, refer to the following in the Autotask Help system: API User (system), Dashboard User (system). |
| Autotask PSA Role | The drop-down menu lists all the roles that the selected resource is associated with in Autotask. Choose one of the Autotask roles that should be mapped to the Datto RMM user. NOTE When you map a Datto RMM user to an Autotask resource, you must select an Autotask role. In Autotask, you cannot assign a resource to a ticket without also assigning a role. |
- Click Next.
- On the Review Integration Setup page, review the setup options you have selected so far.
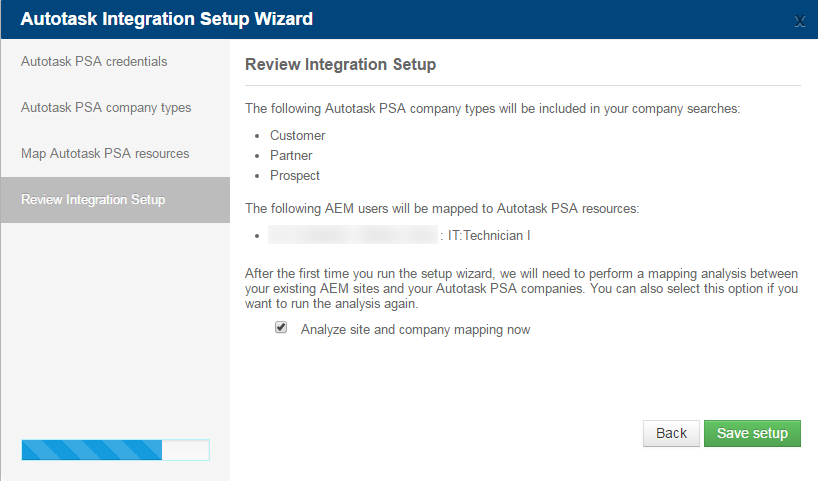
- Check Analyze site and company mapping now.
- Click Save setup and confirm your request at the confirmation dialog box by clicking OK.
The wizard will now compare your Autotask company names to your Datto RMM site names and present a summary of possible matches. At the end of the process, you will see a confirmation dialog box confirming that the analysis has completed.
- Review the mapping rules within the summary of possible mappings between your Datto RMM sites and Autotask companies.
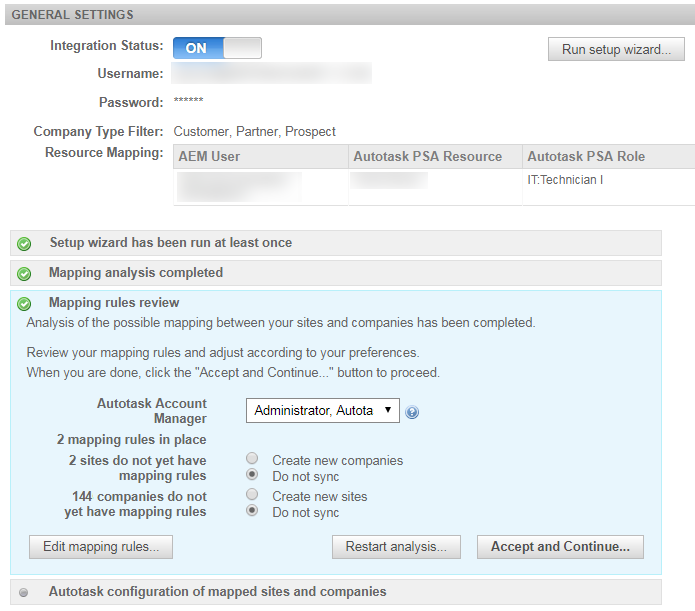
EXAMPLE In this screenshot, you can see that there are two mapping rules in place, that is, two site/company names are identical in Datto RMM and Autotask. However, two Datto RMM sites could not be matched to any of the Autotask companies, and 144 Autotask companies could not be mapped to any of the Datto RMM sites.
- Select an Autotask Account Manager from the drop-down menu. This resource will be assigned as the Autotask Account Manager for any new Autotask companies created by Datto RMM.
- If you would like the system to create new Autotask companies and Datto RMM sites for those with no mappings, select the Create new companies and Create new sites radio buttons and proceed to step 21.
- In some cases, you may wish to manually add new mapping rules on the Edit Mapping Rules page to avoid creating any duplicate companies and sites, as well as to have more control over which companies and sites should or should not be synced. Some of these cases are as follows:
- You think that more mapping rules should have been found, and it has only failed because the company and site names were slightly different.
- You would like the system to create new companies and sites for you, but you would like to make a few exceptions.
- You would like to map multiple Datto RMM sites to the same Autotask company.
- To manually add new mapping rules on the Edit Mapping Rules page, perform the following:
Under Add new mapping rule, click on the Start typing AEM site name... drop-down menu and type the name of a Datto RMM site or select it from the list. Then, map it to an Autotask company name by clicking in the Start typing Autotask PSA company name... field and selecting the correct company.
Select Do not sync in either drop-down menu to specify which companies or sites should not be synced.
You can also opt to Create new site or Create new company by selecting that option in the respective drop-down menu.
TIP If you cannot find a Datto RMM site or an Autotask company in the drop-down menus, then that site or company already has a mapping rule. Use the filters (New, Mapped, Unmapped sites, Unmapped companies) and/or the Search field in the same window under the Add new mapping rule area to search for existing mapping rules. The Unmapped sites and Unmapped companies filters will return sites and companies that are set to Do not sync. You can always delete any mapping rule by clicking the Delete mapping rule icon  on the right of the screen. The site/company will then re-appear in the respective drop-down menu.
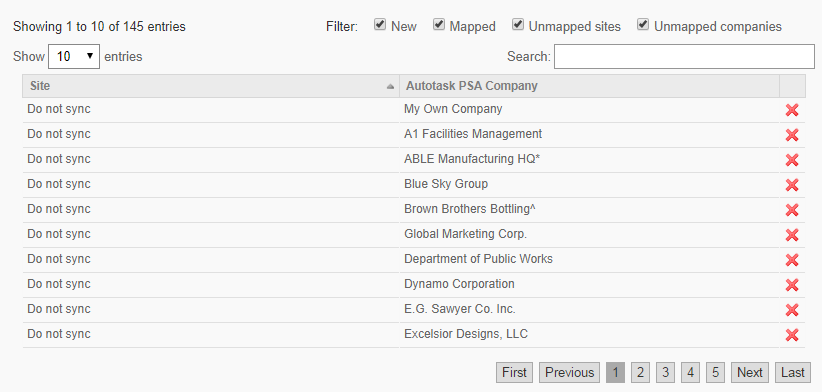
- Once you have found the matching company or site, click the Add mapping rule icon
 on the right of the screen. This will add the new mapping rule to the bottom of the page.
NOTE The Autotask company column will show the Autotask company ID in brackets.
TIP You can map more than one Datto RMM site to the same Autotask company.
- Click Save to save your new mapping rules.
- You will now see an updated number next to your mapping rules on the Autotask Integration page.
- If you would like the system to create new Autotask companies and Datto RMM sites for the missing ones, select the Create new companies and Create new sites radio buttons.
If you would not like to map the rest of the missing companies and sites, select the Do not sync radio button next to them.
- Click Accept and Continue....
- Click OK on the confirmation dialog box. The mapping rules will be applied. A number of progress dialog boxes will appear.
- Select Cancel mapping if you wish to cancel the mapping.
- The current mapping rules will then be displayed on the page.
- A new section called Sync will also be added to the Autotask Integration page.
A few things to note...
- If you need to update the resource to user mapping, follow steps 1-8 of the guide above.
- If you add a new site to your Datto RMM account, you have the option to map it to an Autotask company straight away, and you do not have to re-run the mapping analysis of the integration. Refer to Adding a site - Legacy UI.
- The site-to-company mapping is a manual process, and site or company name changes are not synchronized automatically. For example, if a Datto RMM site is already mapped to an Autotask company and you change the name of either the site or the company, you need to re-run the mapping analysis to see the updated name. The mapping will still be based on the Autotask company ID, but the new name will only appear if you re-run the analysis. Refer to Re-run mapping analysis.
- If you need to create a mapping between a site and a company that were both previously set as Do not sync, you will need to remove the Do not sync mapping rule entries for both the site and the company in order for the change to take effect.
- Changing a Datto RMM site name will not rename the mapped Autotask company and vice versa.
SSO is an authentication process that allows a user to enter one username and password to access multiple (connected) systems.
If you would like to permit users to automatically log in to Datto RMM when clicking an SSO-enabled link from Autotask, do the following:
- Locate the Sync section on the Autotask Integration page.
- Enable the Single Sign-On option by toggling it ON.

TIP Two-Factor Authentication should be enabled in both Autotask and Datto RMM so users are always prompted for a one-time password when they log in to the first application.
NOTE The first time you are logged in to Autotask after enabling the SSO functionality and you click on a link to access Datto RMM , you will be asked to log in to your existing Datto RMM account to set up the link. Going forward, you will automatically be logged in to Datto RMM when clicking an SSO-enabled link from Autotask. When establishing the SSO link, make sure that you link your Autotask database to the correct Datto RMM account; that is, ensure that the Datto RMM login credentials you enter belong to the Datto RMM account integrated with your Autotask database.
To remove the link in Datto RMM, refer to Edit a user in the legacy UI and Editing a user in the New UI.
To learn how to link or unlink your Autotask user profile and Datto RMM user account in Autotask, refer to this topic in the Autotask Help system: Linking or unlinking your Autotask and RMM user profiles.
IMPORTANT We recommend that only one Datto RMM account be synchronized to an Autotask database. Connecting an additional Datto RMM account to the same Autotask database will remove the original link, and the existing integration will no longer function.
The next step in the integration setup process is to configure the ticket integration between Datto RMM and Autotask:
- Click Setup... next to Ticket Integration.
- On the Ticket Defaults page, you can select the default values for the ticket source and priority that will be mapped from Datto RMM to Autotask.

| Field | Description |
|---|---|
| Source | From the drop-down menu, select the source you would like to assign to all alert tickets created in Autotask by Datto RMM. |
| Priority mapping | Select an Autotask ticket priority from the drop-down menu to map it to a Datto RMM alert priority. |
- Click Next.
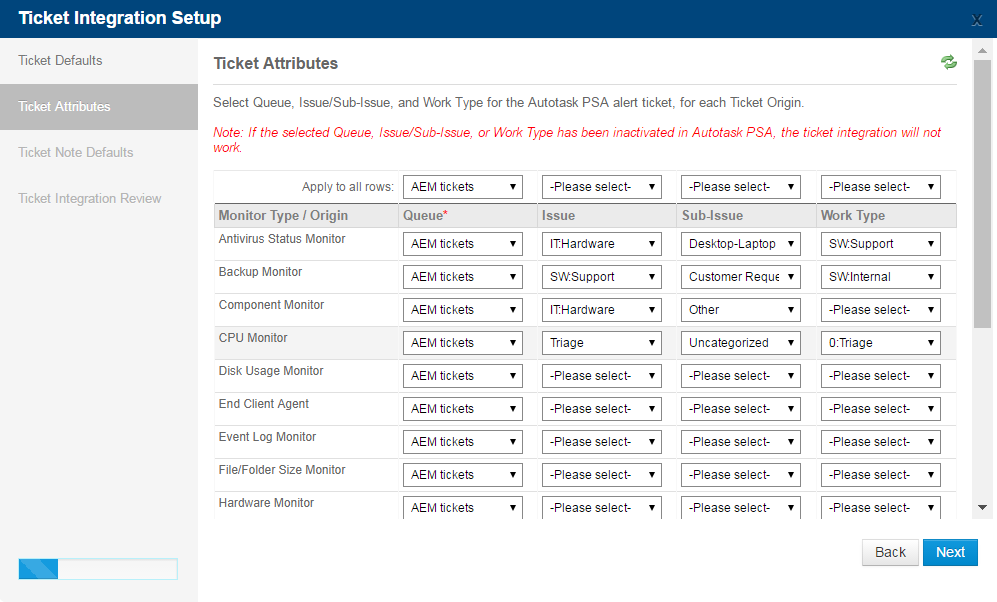
- On the Ticket Attributes page, you can map the queue, issue, sub-issue, and work type to the Autotask alert ticket, for each monitor type, and for the end client Agent tickets.
| Field | Description |
|---|---|
| Apply to all rows | Use this option to apply the same selection of Queue / Issue / Sub-Issue / Work Type to every monitor type / origin. |
| Monitor Type / Origin | Displays all Datto RMM monitor types and the end client Agent tickets (that is, tickets created from a device via the Agent installed). |
| Queue | The drop-down menus list all active queues as configured in Autotask. Select a queue to map it to each monitor type and the end client Agent tickets. When an alert ticket is created in Autotask, it will be assigned the selected queue. This field is required. |
| Issue | The drop-down menus list all active issue types as configured in Autotask. Select an issue type to map it to each monitor type and the end client Agent tickets. When an alert ticket is created in Autotask, it will be assigned the selected issue type. This field becomes active as soon as you select a queue. Selecting an issue type is optional. IMPORTANT If you choose to select an Issue type, you must also select a Sub-Issue type. Otherwise, tickets will be created with neither. |
| Sub-Issue | The drop-down menus list all active sub-issue types for the selected issue type as configured in Autotask. Select a sub-issue type to map it to each monitor type and the end client Agent tickets. When an alert ticket is created in Autotask, it will be assigned the selected sub-issue type. Selecting a sub-issue type is optional. |
| Work Type | The drop-down menus list all active work types as configured in Autotask. Select a work type to map it to each monitor type and the end client Agent tickets. When an alert ticket is created in Autotask, it will be assigned the selected work type. This field becomes active as soon as you select a queue. Selecting a work type is optional. |
IMPORTANT If the selected queue, issue / sub-issue, or work type gets inactivated in Autotask, the ticket integration will not work.
TIP We recommend that you re-run the ticket integration setup after every Datto RMM release to ensure that your monitor types are properly configured.
NOTE In case a new monitor type has been introduced in Datto RMM and you have not re-configured the ticket integration for that monitor type yet, tickets created through that monitor will be assigned to the Monitoring Alert queue in Autotask by default.
- Click Next.
- On the Ticket Note Defaults page, you can configure the default ticket note type and specify its default publish setting.

| Field | Description |
|---|---|
| Default ticket note type | Select a default note type to map it to ticket notes manually created by users via Datto RMM. NOTE Notes automatically created by Datto RMM will use the system note type RMM Note. |
| Default ticket note publish to | From the drop-down menu, select one of the following options: • All Autotask Users: All Autotask users. • Internal Project Team: Internal users only. • Internal & Co-Managed: Internal users and external resources that have been configured with co-managed access and visibility within Autotask. For more information, refer to The Co-managed Help Desk. NOTE Notes automatically created by Datto RMM will be published to internal users only. |
- Click Next.
-
On the Ticket Integration Review page, review the ticket integration options you have selected.
- Click Save settings.
- You will now be directed to the Autotask Integration page where you will see a summary of the ticket integration options you have selected. In addition, Ticket Integration will be automatically toggled ON.
NOTE By default, tickets created from alerts are not assigned to any resource in Autotask.
NOTE If a monitor is configured to create a ticket when an alert is raised but the device cannot get synchronized to Autotask (for example, the contract or contact of the Autotask configuration item is inactive, the device sync is switched off, etc.), Datto RMM will queue the device sync event and will attempt to create a ticket three times (every time a device sync is triggered, approximately once every minute). If the device fails to be synchronized within this time frame, a ticket will still be created for the corresponding Autotask company containing the device name and ID and a link to the device in Datto RMM. In case the Datto RMM site is no longer mapped to an Autotask company, a ticket will be created for the zero account.
TIP If an Autotask configuration item synced with a Datto RMM device has a contact assigned, but that contact is inactive, the ticket creation will fail.
NOTE If the ticket creation fails (for example, because of changes made to credentials, queues, categories, security settings, and so forth), a notification email will be sent to the email addresses set to receive alerts. If no email address listed under Setup > Account Settings > Email Recipients (legacy UI) or Setup > Global Settings > Email Recipients (New UI) has Alerts selected, then the failed ticket email will default to the email address configured under Setup > My Info > Account Email. Refer to Email Recipients in Account Settings - Legacy UI (legacy UI) and Email Recipients in Global Settings (New UI). The notification email will specify the error message and the reason for the error.
TIP You can switch off the ticket integration for individual sites in Site Settings. Refer to the Autotask PSA section in Site Settings - Legacy UI.
TIP For information about Agent ticketing for end users, refer to Integrated ticketing with Autotask.
The next step is to configure the device synchronization between Datto RMM and Autotask.
NOTE In Autotask, devices that are installed for a customer company are called configuration items. As all configuration items are based on a product, Datto RMM devices must be mapped to Autotask at product level.
- On the Autotask Integration page, locate the Sync section and click Setup... next to Device Sync.
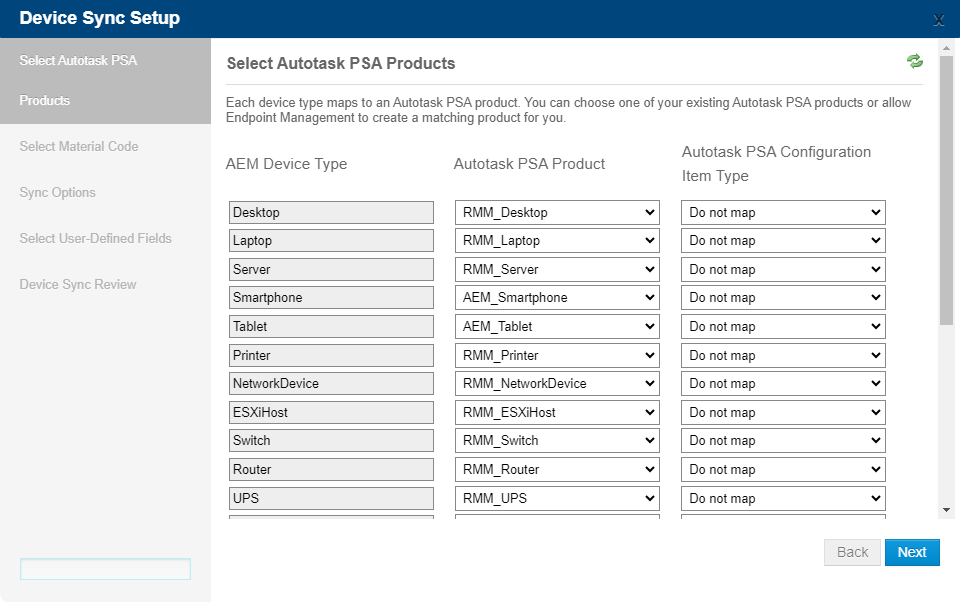
- On the Select Autotask PSA Products page, map the Datto RMM device types to Autotask products and configuration item types.
| Field | Description |
|---|---|
| AEM Device Type | Device type as displayed in Datto RMM. |
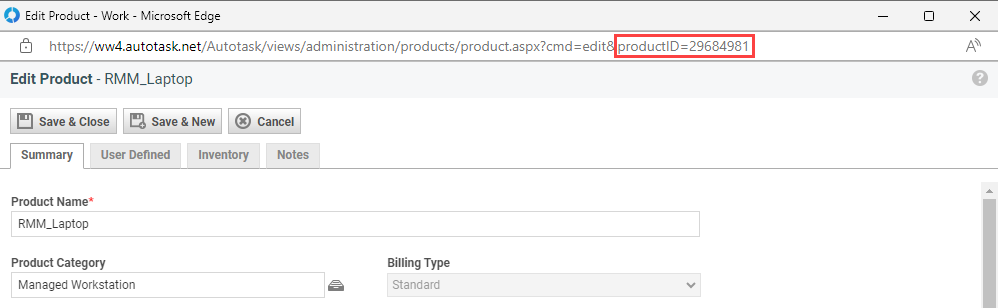
| Autotask PSA Product | Select an existing Autotask product to map to your Datto RMM device type, or allow the system to create a matching product in Autotask for you. TIP We recommend that you allow the system to create a matching product if you do not see the corresponding Autotask product. The new product will have a prefix of RMM_ (for example, RMM_Laptop). This will help to differentiate Datto RMM products from existing Autotask products. NOTE Product Names created by the system (for example, RMM_Laptop, RMM_Desktop, etc.) will not have Product Categories in Autotask by default; the devices will be grouped in an Uncategorized Product Category. To change this, follow these steps in Autotask: navigate to Autotask PSA Menu > Admin > Features & Settings > Products, Services, & Inventory > Products > search for the Product Name (for example, AEM_Laptop) > select the context menu next to the Product and click Edit Product > select the context button next to Product Category > assign a Product Category > Save & Close. This will assign the selected Product Category to both existing and future devices of this Product Name. NOTE For information on how the Product field is synchronized for new and existing configuration items, refer to Device sync logic and frequency. If you have more than 500 Autotask products, you will see empty text fields instead of drop-down menus in the Autotask PSA Product column when you run the Device Sync Setup for the first time. You will be able to enter:• new: Create a new product. • none: If you don't want to sync a device type, enter none in the Autotask PSA Product column and select Do not map in the Autotask PSA Configuration Item Type column. • product ID:product name: Map an existing product (for example, 29684965:Dell Latitude E5550). TIP You can find the product ID in Autotask by navigating to Autotask menu > Admin > Features & Settings > Products, Services, & Inventory > Products > search for a product > Edit Product. |
| Autotask PSA Configuration Item Type | Optionally, select a matching Autotask PSA Configuration Item Type from the drop-down menu for each Datto RMM device type. The drop-down menu contains all configuration item types as configured in Autotask. NOTE In Autotask, a Configuration Item Type is the classification of a configuration item. It also determines which available UDFs you can apply. |
TIP We recommend that you re-run the device sync setup after every Datto RMM release to ensure that each Datto RMM device type is mapped to an Autotask product.
- Click Next.
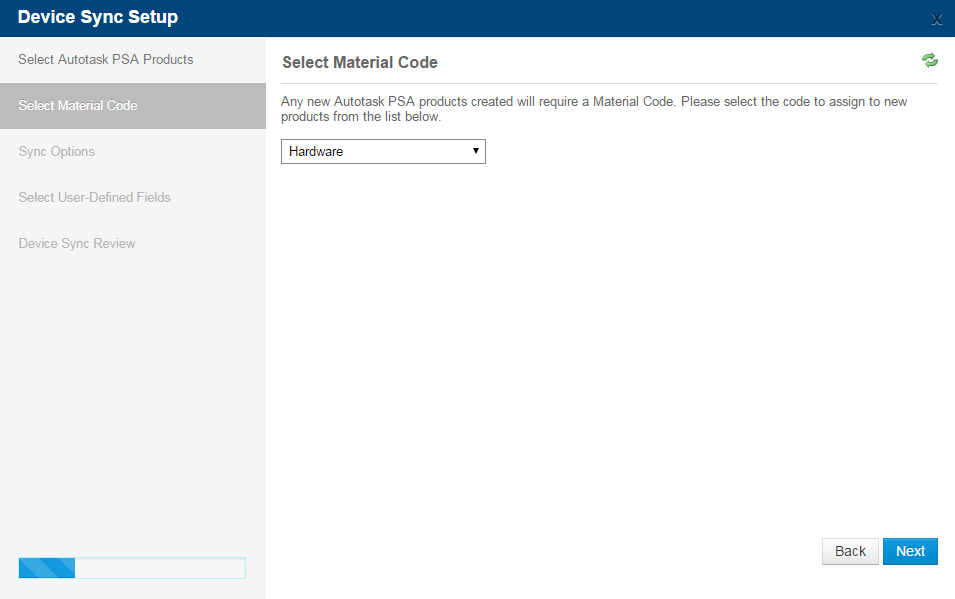
- On the Select Material Code page, select the material code that will be used for all devices mapped from Datto RMM to Autotask.
NOTE Material Code is a required field in Autotask. It is a billing code used for billing products associated with tickets, contracts, or projects.
- Click Next.
- On the Sync Options page, specify how Datto RMM should sync device information to Autotask configuration items. You can select or clear any of the following options:

- Overwrite PSA Reference Name when different from AEM Hostname (selected by default)
- Overwrite PSA Reference Number when different from AEM Device ID (selected by default)
EXAMPLE For example, if at the initial sync Datto RMM finds a matching Autotask configuration item for a Datto RMM device and that configuration item has a Reference Name, the value in the Reference Name field will be overwritten if the check box Overwrite PSA Reference Name when different from AEM Hostname is selected. The same logic will be applied at any subsequent sync.
NOTE If the overwrite options are not selected in Datto RMM and the matching configuration item's Reference Name and Reference Number fields are empty in Autotask, the fields will be populated with the device's hostname and device ID at the initial device sync.
- Click Next.
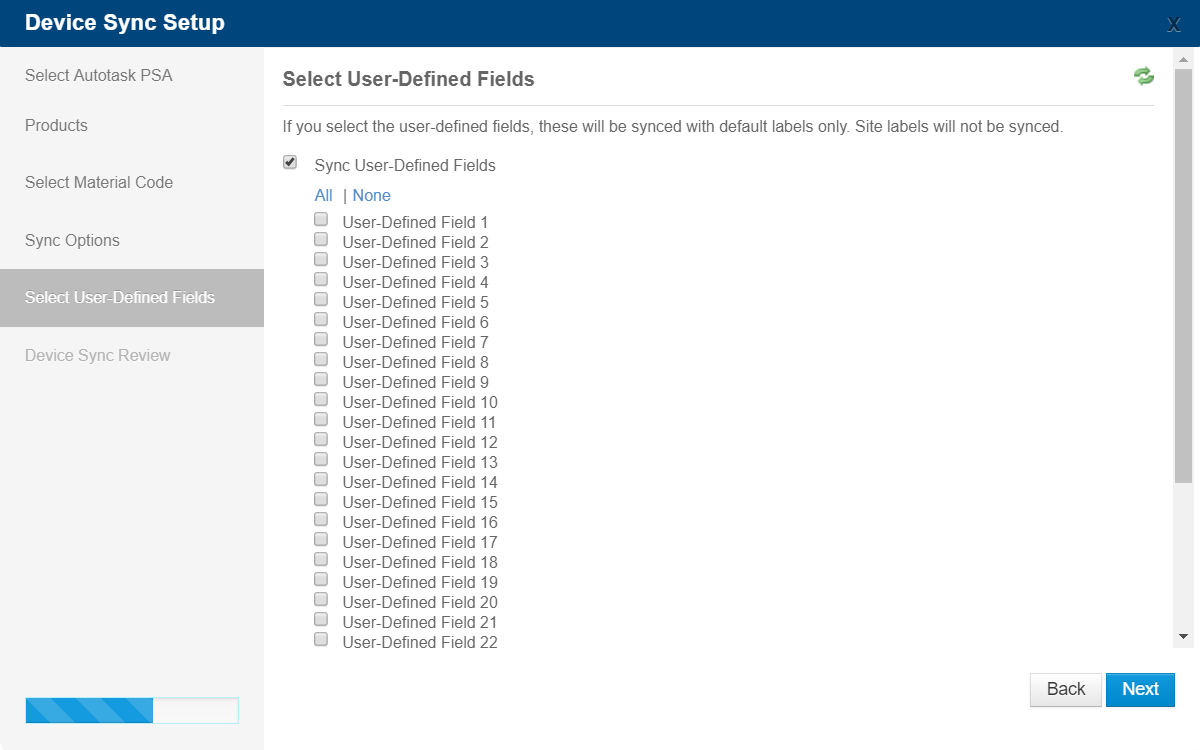
- On the Select User-Defined Fields page, select Sync User-Defined Fields to be able to select the UDFs that you would like to map as Autotask configuration item UDFs. Click All to select all the UDFs. Click None to remove your selections.
NOTE Only account-level UDFs will be synced, either with their default label or with their account label (if they have one). The account labels will appear to the right of the default labels in the wizard.
Site labels (UDF labels at site level) will not be synced and will not be displayed in the wizard.
NOTE If you click the Refresh button  , the screen will return to its last saved state.
- Click Next.
- On the Device Sync Review page, review the product mappings, material code, sync options, and UDFs selected for device synchronization.
- Select Sync my devices now and click Save settings.
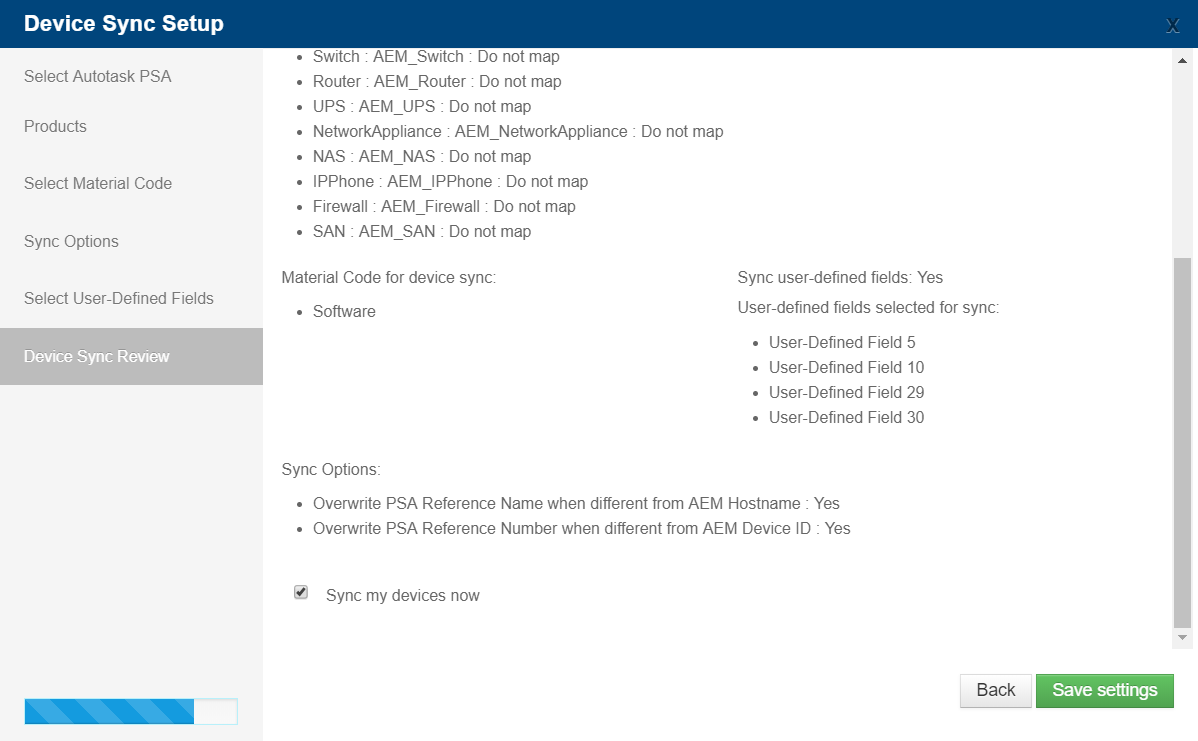
TIP If you check Sync my devices now and save your settings, the wizard will close and the integration page will appear. However, you may also clear the Sync my devices now option and click Sync devices now... directly on the Autotask Integration page.
TIP Only devices with complete audit data are synchronized.
NOTE New and existing devices are synced differently. For information about the device sync logic and its frequency, refer to the next section: Device sync logic and frequency.
- You will now be directed back to the Autotask Integration page, where you will see a summary of the device sync options you have configured.
Device sync logic
Datto RMM will attempt to find a matching Autotask configuration item by applying the following device sync logic:
- Check if the device has been audited or if it meets the audit exclusion criteria.
- If the answer is no, skip the device.
- If the answer is yes, go to the next step.
NOTE The following device types are excluded from the audit requirement: Datto Networking devices, Datto Continuity devices, and network devices added to Datto RMM more than 24 hours ago.
- Check if the device is already mapped to an Autotask configuration item.
- If a match is found, sync the device.
- If no match is found, go to the next step.
- Search for an Autotask configuration item whose native field of AEMDeviceUID matches the Datto RMM device ID.
NOTE The Autotask native field of AEMDeviceUID is not visible in the Autotask UI and it cannot be edited.
If a matching configuration item is found and it's active, map and sync the device. If it's inactive, activate it, then map and sync the device.
If no match is found, go to the next step.
- In the Autotask company mapped to the RMM site or sites, search for an Autotask configuration item that has the same hostname (in Autotask: Reference Name) and serial number as the Datto RMM device.
NOTE For Datto Networking devices, the serial number is populated as the MAC address.
- If only one matching configuration item is found and it's active, populate the Autotask native field of AEMDeviceUID with the Datto RMM device ID, then map and sync the device.
If the configuration item is inactive, activate it, populate the native field of AEMDeviceUID, then map and sync the device. - If more than one matching configuration item is found and they are active, identify the oldest, populate the Autotask native field of AEMDeviceUID with the Datto RMM device ID, then map and sync the device.
If the configuration items are inactive, identify the oldest, activate it, populate the native field of AEMDeviceUID, then map and sync the device. - If no match is found, go to the next step.
- If only one matching configuration item is found and it's active, populate the Autotask native field of AEMDeviceUID with the Datto RMM device ID, then map and sync the device.
- Check if there are multiple devices with the same serial number in the RMM site or sites that are mapped to the Autotask company.
- If multiple matching devices are found, go to step 7.
- If only one matching device is found, go to the next step.
- If no match is found, go to step 7.
- Search for an Autotask configuration item that has the same serial number as the Datto RMM device.
- If a match is found, repeat the same checks as in steps 4.a and 4.b.
- If no match is found, go to the next step.
- Create a new Autotask configuration item, populate the native field of AEMDeviceUID, then map and sync the device.
A few notes to consider
- When a device is moved from one site to another in Datto RMM, and the new site is mapped to an Autotask company, the matching Autotask configuration item will be inactivated in the original Autotask company. In the new Autotask company, either an existing configuration item with a matching AEMDeviceUID will be made active or a new configuration item will be created.
- When a device is moved from one site to another in Datto RMM, and the new site is not mapped to any Autotask company, the formerly linked Autotask configuration item will remain in the original Autotask company and will be inactivated.
- When a device is deleted in Datto RMM, the corresponding Autotask configuration item will be inactivated.
- If an Autotask configuration item has been set to inactive, but the Datto RMM device is still syncing with it, the configuration item will be made active again.
- The Product and Configuration Item Type fields of an Autotask configuration item are only synchronized (applied) when a new configuration item is created. When an existing configuration item is synchronized, the Product and Configuration Item Type fields will not be overwritten.
- If you change the default label of a UDF in Account Settings (legacy UI) or Global Settings (New UI) in Datto RMM, you need to re-run the device synchronization setup to ensure the UDF mapping is updated in Autotask. Refer to Configure device synchronization.
Device sync frequency
New (unsynced) devices will sync immediately after an initial audit has occurred.
For existing (previously synced) devices, a device sync will be triggered once every 24 hours, even when the Sync devices now... option is used. If, at the time of synchronization, the existing mapping is no longer valid (for example, the configuration item has been deleted, details have changed, etc.), the device sync logic will be re-applied.
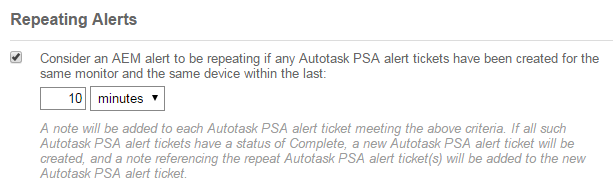
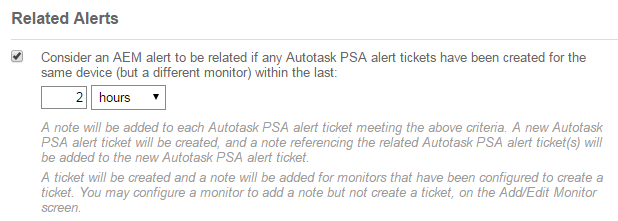
Alert rules allow you to handle Datto RMM alerts and their corresponding Autotask alert tickets. You can configure alert rules that specify when an alert is considered a repeat of a previous alert (the same monitor generates an alert on the same device within a specified time), or a related alert (a different monitor generates an alert on the same device within a specified time). Both events generate a ticket note in Autotask, making you aware of the context for the alert ticket.
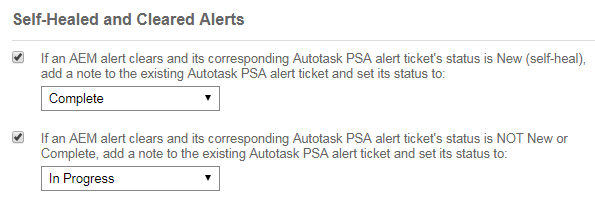
Additionally, if an alert clears, you can specify how to handle the corresponding Autotask ticket if the status is New and if the status is not New or Complete.
- On the Autotask Integration page, locate the Sync section and click Setup... next to Alert Rules.
- Configure your alert rules:
- Click Next.
- On the Alert Rules Review page, review the alert rules you have configured.

- Click Save settings.
- You will now be directed back to the Autotask Integration page where you will see a summary of the alert rules you have set up.
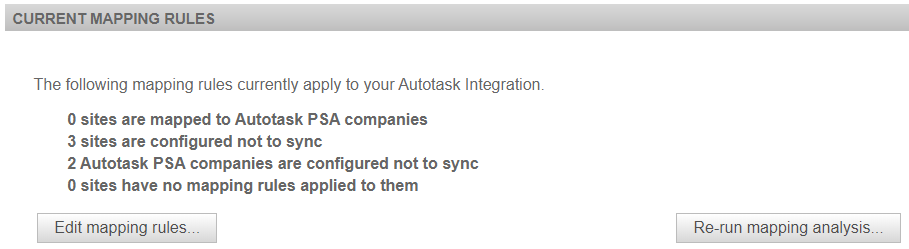
At times, you may want to edit your existing mapping rules or completely re-run your mapping analysis.
- Locate the Current Mapping Rules section on the Autotask Integration page.
- To edit your existing mapping rules, click Edit mapping rules... and follow steps 15-18 of Configure company (site) and resource (user) mapping.
- To run your mapping analysis again, click Re-run mapping analysis.... You can leave the Keep my existing mappings option checked. This will keep your current mapping rules. If you clear the option, all previous mappings will be disregarded.
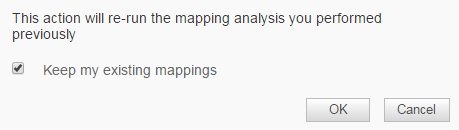
- Click OK. This will update your existing mapping rules between your Datto RMM sites and Autotask companies. For further instructions, refer to steps 14-24 of Configure company (site) and resource (user) mapping.
TIP You can discard the new analysis by clicking on Discard analysis....
You have the option to re-configure the integration with a new Autotask username and password while keeping all other settings intact.
- Click Setup in the Datto RMM Web Portal.
- Click the Autotask tab.
- Under General Settings, click Run setup wizard... and follow these instructions: Configure company (site) and resource (user) mapping.
IMPORTANT We recommend that only one Datto RMM account be synchronized to an Autotask database. Connecting an additional Datto RMM account to the same Autotask database will remove the original link, and the existing integration will no longer function.
You can disable the integration temporarily by setting the integration status to OFF under General Settings.
You can also disable individual settings by setting their status to OFF (Single Sign-On, Ticket Integration, Device Sync) or by removing the alert rules you set up.
Should you decide to turn off the integration altogether and remove all settings and links between Datto RMM and Autotask, you will need to remove the Autotask component from your downloaded components. For further information on how to remove a component, refer to Managing components - Legacy UI.
Select the Sync Exceptions radio button in the upper-right corner of the integration page to see a list of synchronization issues that have occurred in the integration within the past seven days. The error message and its details can help you troubleshoot issues more efficiently.
The page will display the following information: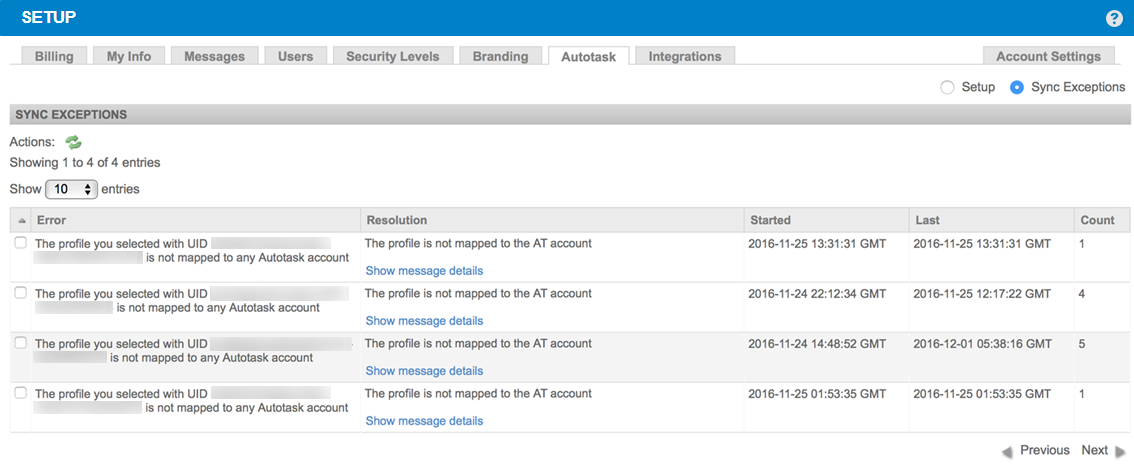
| Field | Description |
|---|---|
| Actions |
Refreshes the current view. |
| Show entries | Allows you to show 10 / 25 / 50 / 100 entries per page. |
| Error | Error message returned by the API. |
| Resolution | Root of the problem. Click Show message details to see further details. Examples of the most common issues include: • Invalid sync account credentials • Inactive Autotask contract • Non-existent or invalid Autotask product • Site not mapped to Autotask • Non-existent Autotask queue • Non-existent or invalid Autotask account • Invalid Autotask resource / role combination • Autotask configuration item not associated with Autotask account • Non-existent Autotask UDF • And more |
| Started | Date and time when the issue first occurred. |
| Last | Date and time when the issue last occurred. |
| Count | Number of instances of the error. |
| Previous / Next | Click Previous / Next to see the previous or next page of results. |
NOTE You can sort the data by clicking on any of the column headers.
Autotask setup
After the initial setup of the integration within Datto RMM, additional settings must be configured within Autotask.
After you have configured the integration in Datto RMM , permissions need to be granted within Autotask to allow your resources to access the additional features from within Autotask.
Refer to this topic in the Autotask Help system: Resource Permissions for the Datto RMM Integration.
After you have enabled SSO in Datto RMM and configured resource permissions in Autotask, you will be able to link your Autotask user profile and your Datto RMM user account.
Refer to this topic in the Autotask Help system: Linking or unlinking your Autotask and RMM user profiles.
Additional features in Autotask
If a monitor is configured to create a ticket when an alert is triggered for a Datto RMM device, and the device had already been mapped to an Autotask configuration item, Autotask will attempt to pull the following information from the configuration item:
- Contact
- Contract
- Service/Bundle
- Service Level Agreement (SLA)
Once the Autotask alert ticket has been created, the following information specific to Datto RMM information will be available:
| Section | Description |
|---|---|
|
The ticket is automatically assigned the AEM Alert ticket category and the Alert ticket type. The Ticket Title will be constructed as follows: [Monitor Alert] ([Monitor Trigger]) for [Hostname] Click View Datto RMM Alert to open the alert in Datto RMM. |
Description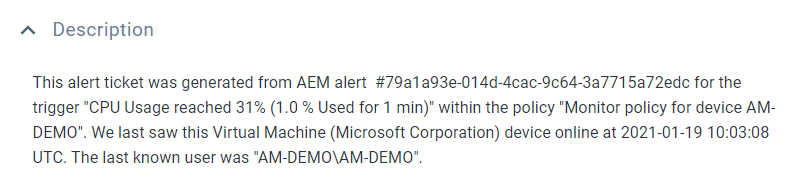 |
The Description will be constructed as follows: This alert ticket was generated from AEM alert #[Alert Number] for the trigger "[Monitor Alert] ([Monitor Trigger])" within the policy "[Policy]". We last saw this [Model] ([Manufacturer]) device online at [Last Updated] UTC. The last known user was "[Last User]". NOTE The Datto RMM date/time format is used in the Ticket Description. |
Activity tab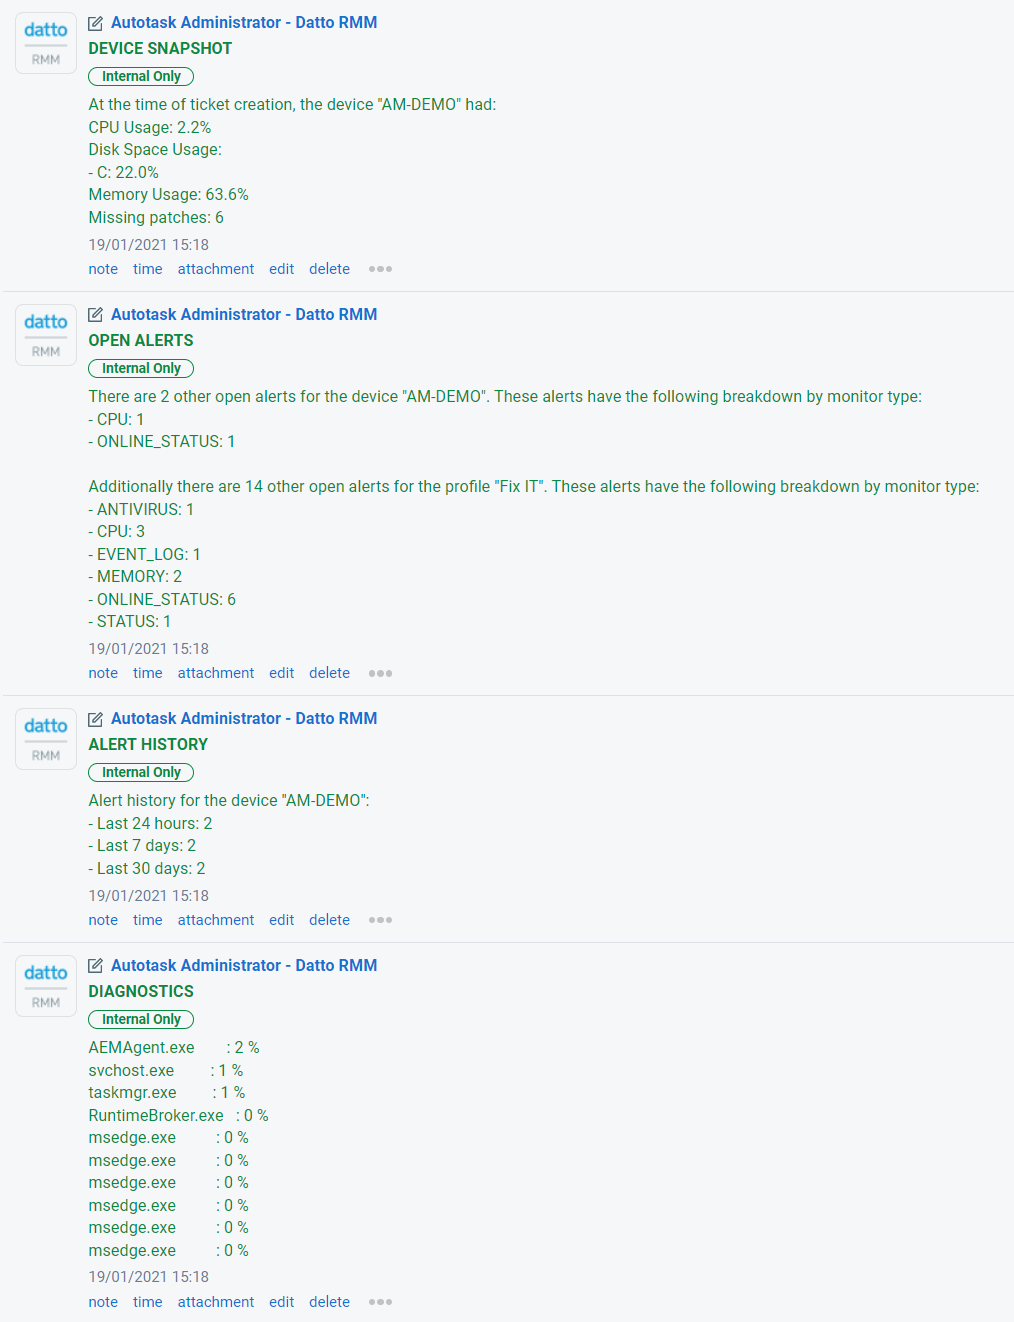 |
When an alert ticket is opened in Autotask, the following notes will be added to it by default: • Device Snapshot: Outlines metrics such as CPU Usage, Disk Space Usage, Memory Usage, Missing Patches. • Open Alerts: Shows other open alerts for the same device and for the same site. • Alert History: Displays the device's alert history in the last 24 hours/7 days/30 days. • Diagnostics: Displays diagnostic information about the device up to 32,000 characters. This note is only added to the alert ticket if diagnostic details are available in the alert. Refer to View and act on alert information. |
Datto RMM Device Insight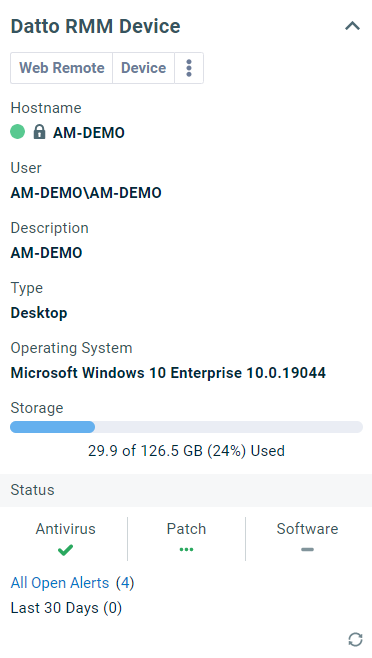 |
The Datto RMM Device Insight displays a variety of details about the device. It also allows you to use Datto RMM tools directly from within the Autotask alert ticket. Refer to Datto RMM and BCDR Device insights and Using Datto RMM and BCDR tools from Autotask in the Autotask Help system. |
Configuration Item Insight |
The Configuration Item Insight displays a variety of details about the configuration item in Autotask. Refer to Ticket insights in the Autotask Help system. |
For more information, click the question mark icon in the upper-right corner of the Autotask page. You will automatically be directed to the appropriate topic in the Autotask Help system.
If your Autotask alert ticket gets completed via a workflow rule, you can use the same workflow rule to trigger an extension callout to resolve your original Datto RMM alert (and all related alerts as well). Or, if the Autotask alert ticket is not completed via a workflow rule, you can create a workflow rule to trigger an extension callout when an Autotask alert ticket is set to complete.
Extension callouts provide data for automatic (round trip) ticket closure for Datto RMM integrations. One of the actions a Service Desk workflow rule can perform in Autotask is to trigger an extension callout. The association of workflow rules with extension callouts allows you to trigger extension callouts when needed, and only when needed.
To have a complete understanding of workflow rules and extension callouts, we strongly recommend that you get familiar with the following topics in the Autotask Help system:
IMPORTANT Automatic Datto RMM alert closure will not occur unless, at the time the Autotask alert ticket is completed, an extension callout has been set up and has been associated with either the workflow rule that closes the ticket or a separate workflow rule that fires when an Autotask alert ticket is completed.
- Log in to Autotask.
- Navigate to Autotask menu > Admin > Extensions & Integrations > Other Extensions & Tools > Extension Callout (Tickets).
- Click New Extension Callout.
- Enter a Name for the extension callout.
- Enter your Datto RMM platform URL in this form: <your-csm-url>/csm/autotask/resolveAlert
EXAMPLE For example, if you are on the Merlot platform, the URL should look like this: https://merlot.centrastage.net/csm/autotask/resolveAlert
- Set the HTTP Transport Method to POST.
- Leave all of the other fields at their default selection. Ensure the Active check box is selected.
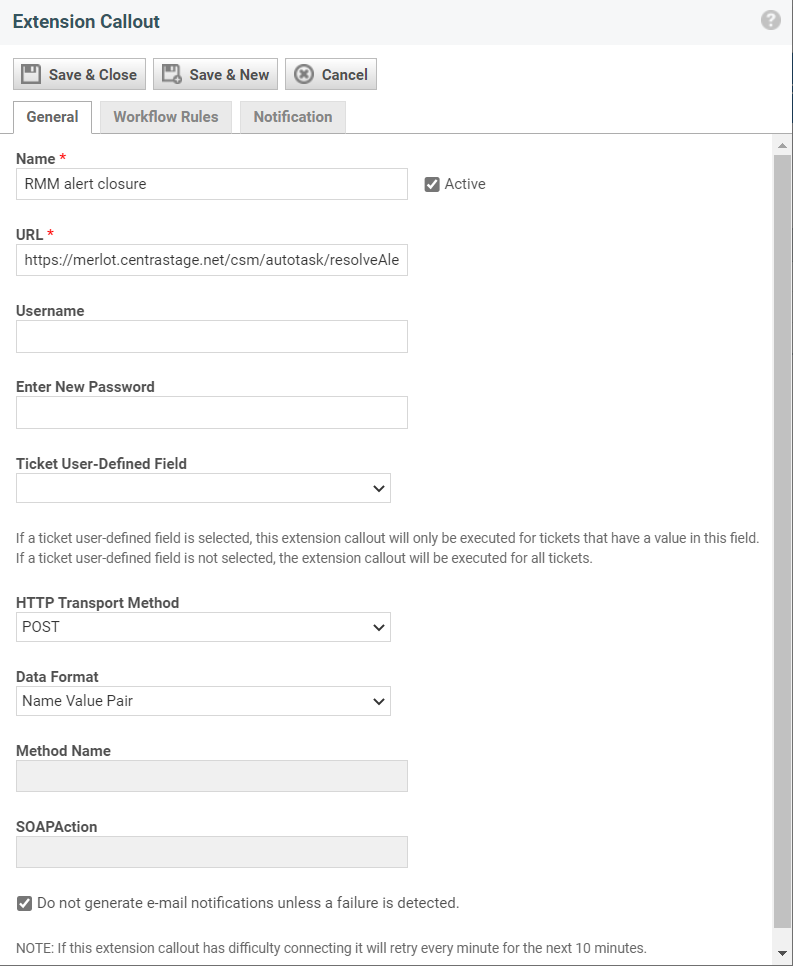
- Click Save & Close.
- Make sure you have an Autotask Service Desk workflow rule that is set up to close your Autotask alert ticket, or a workflow rule that is set up to fire when the Autotask alert ticket is completed. You can create a new rule or edit an existing one.
EXAMPLE In this example, the workflow rule is set up to fire when the status of a ticket that was created from a Datto RMM alert changes to Complete.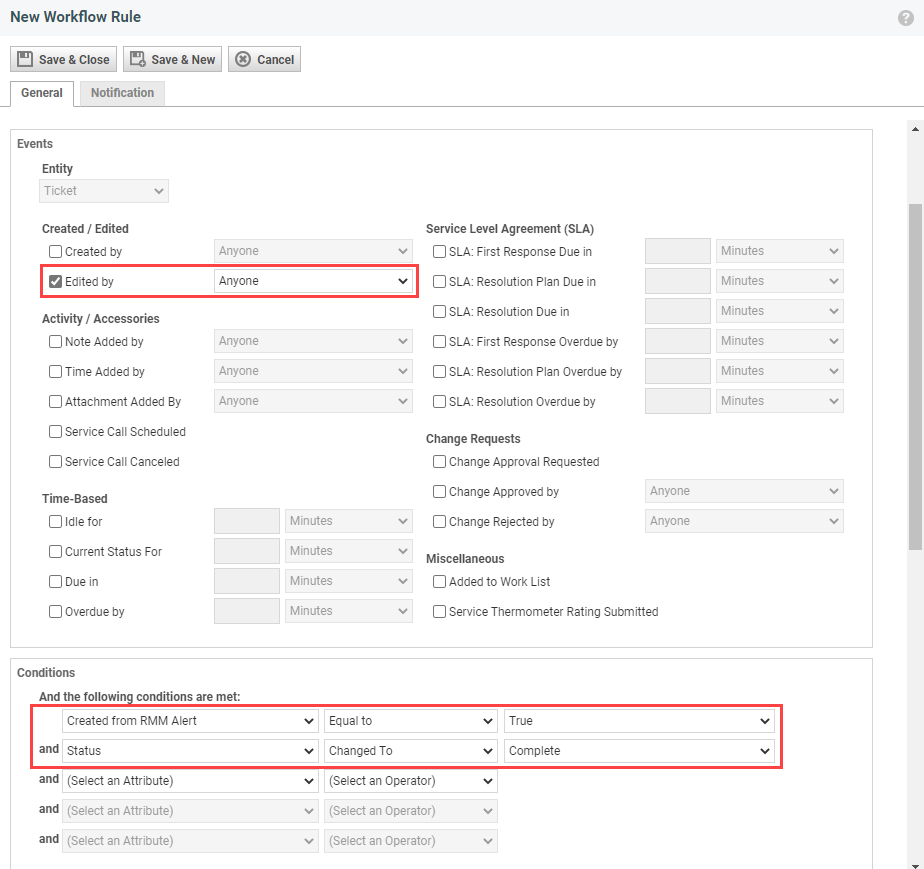
NOTE Only Autotask alert tickets with a status of Complete will be resolved by Datto RMM. If it has any other status when the workflow rule fires, it will be ignored by Datto RMM, and the alert will not be resolved.
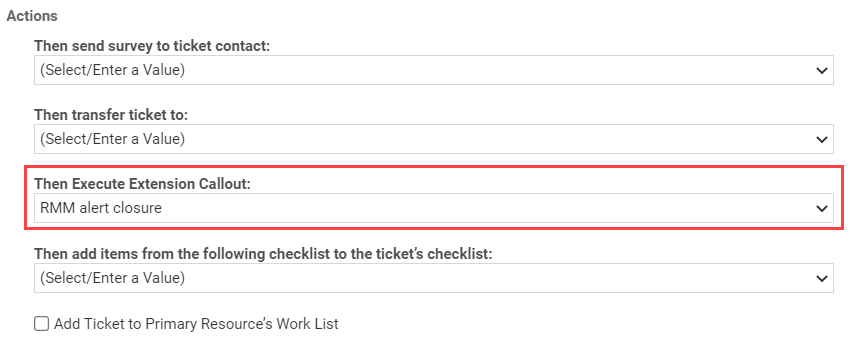
- In the Actions area of the workflow rule, select the correct extension callout from the Then Execute Extension Callout list.
- Click Save & Close.


