Managing components - Legacy UI
PERMISSIONS Refer to COMPONENTS > Components in Security Level Details - Permissions
NAVIGATION Legacy UI > Components tab
Refer to Component Library.
About the Component Library
The Component Library can be found by navigating to the Components tab. It displays a list of all components that you have downloaded from the ComStore or created yourself, and a list of all your component groups. In the left navigation pane, the Component Library is grouped into Component categories.
NOTE Unless otherwise stated, ComStore scripts are owned by Datto and are provided to Datto partners solely for internal use and/or for servicing the clients of Datto partners in conjunction with an active Datto RMM subscription. Any other use or redistribution is prohibited without explicit approval from Datto.
How to...
By default, the Component List page displays all the components in the Component Library. You can filter the list by clicking on one of the component categories or component groups in the left navigation pane.
The Component List page displays the following information:
| Field | Description |
|---|---|
| Actions | • • Schedule a job - Select any components of the categories Applicationsand Scripts, and click Schedule a job. Refer to Job scheduler - Legacy UI in the legacy UI or Scheduled jobs in the New UI. • |
| Show entries | Lets you select to show 10 / 25 / 50 / 100 entries per page. |
| Search | A dynamic search field. As you type, the search results are narrowed to match your search string. |
| Check box | Select any of the components to add them to a component group. Refer to Add or remove components to or from a group. |
| Icon | Icon that identifies the component. |
| Name | The name of the component. |
| Description | The description of the component. Hover over the description to see additional information. |
| Component Level | The component level of the component, which determines which users can access the component. Component levels are as follows: 1 (Basic), 2 (Low), 3 (Medium), 4 (High), and 5 (Super). To learn how to configure which components a user can see, refer to Component Level in Users - Legacy UI (legacy UI) and Component Level in Users (New UI). Users with Manage permission for Components > Components can edit the component level value from the Component List page by clicking the hyperlinked number in the Component Level column and selecting a new component level from the drop-down list. Refer to Security levels - Legacy UI in the legacy UI and Security levels in the New UI. |
| Files | The number of files that are part of this component. |
| Size | The size of the component. |
|
|
Makes the component available to be used in quick jobs and as alert response in monitors in the legacy UI. Only available for the categories Applications and Scripts. Refer to Make a component available for quick jobs and Run the following component. |
|
|
Makes the component available to all end users with the Agent installed on their computer. Only available for the categories Applications and Scripts. Refer to User Tasks. |
|
|
This is the first step when you download a component. The gray icon indicates that the component is available but is not yet ready to download. The yellow icon indicates that the component is being prepared for downloading, that is, packaged as a .cpt file (a proprietary type of .zip file that includes an XML file and possibly additional files such as a batch file or image file that can be recognized as a Datto RMM file type when it is imported into another web portal). Refer to Export a component. |
|
|
Once the file has been zipped up, the icon turns blue. When you click on the icon, the component gets downloaded to your workstation. |
|
|
Opens the Component page. All fields are exact copies of the original, except the Name, which is labeled as "Copy of...". Make any required changes and click Save. |
|
|
Will delete the component from the Component List page. If the component is part of an active job, you will receive a warning. Click OK or Cancel. |
Components that appear on the Component List page can be downloaded to your workstation and deployed to remote devices. If you see a gray Export component ![]() icon, the component has either not yet been downloaded, or was changed and must be rebuilt.
icon, the component has either not yet been downloaded, or was changed and must be rebuilt.
NOTE "Export" and "download" are used interchangeably.
- Click Build now.
A note appears at the top of the page that the component is being built, and the icon turns yellow ![]() . The .zip file that is generated will have a .cpt extension. When the build is complete, the icon will turn blue.
. The .zip file that is generated will have a .cpt extension. When the build is complete, the icon will turn blue.
- Click the blue Download component icon
 .
.
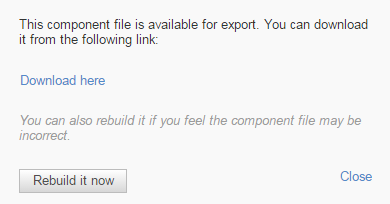
Another dialog box opens that includes a download link.
- Click Download here to download the component.
NOTE If you have previously downloaded the file and think it might have been changed, click Rebuild it now.
- You will be prompted to open or save the file. Note that the file extension might now be .zip.
To learn how to export a component in the New UI, refer to Export.
- Click the Components tab.
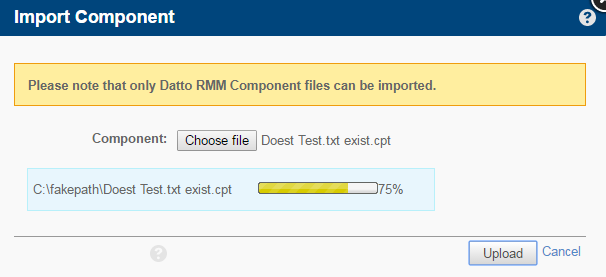
- In the upper-left corner, click Import Component.
- Click Choose file... and locate the component file you want to upload.
NOTE Only Datto RMM Component files (*.cpt) can be imported.
When the upload is complete, the Component page will open.
- Modify the component as required. Refer to Create a component.
- Click Save.
To learn how to import a component in the New UI, refer to Importing a component.
The Community ComStore is a repository for Datto RMM components, policies, and scripts. All Datto RMM users are encouraged to share best practices with the Community so that all users can benefit.
Make sure you are familiar with the Community ComStore ground rules before using the site.
IMPORTANT Components shared in the Community ComStore are only supported by the Community.
By default, components are grouped into categories. Refer to Component categories. You can, however, create component groups, and associate components with them, based on your own criteria. This is helpful if you have components that are frequently viewed or edited.
To create a component group:
- Navigate to the Components tab.
- On the left, under Component Groups, click the plus sign. A pop-up window will open.
- Enter a name for the group.
- Click Save.
Components of the categories Applications and Scripts can be added to component groups. This can be done on the Component List page or within a component group.
When you are on the Component List page:
- On the Component List page, check the component(s) you want to add or remove.
- Click the Add component(s) to group icon
 in the Action row.
 - A pop-up window will allow you to select a group.
If you select No group, the selected component(s) will be removed from all groups they are a member of.
- Click Add.
When you are in a component group:
- In the component group, check the component(s) you want to add or remove.
- Click the Add component(s) to group icon
 in the Action row.
 - A pop-up window will allow you to select a group.
Select a group to move the selected component(s) from the current group to the selected one.
If you select No group, the selected component(s) will be removed from the current group.
- Click Add.
Components that can be edited (for example, custom components and copies of components downloaded from the ComStore) can be made available to some sites but not others. This is known as component site mapping.
IMPORTANT Component site mapping only works for Quick Jobs and User Tasks.
- Click the Components tab.
- Click on the component name you want to edit.
- Scroll to the Sites section and click Selected sites.

- Select the sites you wish to make the component available to and then click Include.
TIP Use the Search field above either the Include or Exclude column to search for your sites. As you type, the search results are narrowed to match your search string.
TIP Use Shift or Ctrl on your keyboard to select multiple sites.
- Once the changes are complete, click Save.


