Devices
PERMISSIONS Refer to Sites > Devices in Permissions.
PERMISSIONS For the Request Audit action button, also refer to Sites > Audit in Permissions.
PERMISSIONS For the Quick Job, Create a Job, Patch Now, Schedule Reboot, Webroot SecureAnywhere, and Windows Defender Antivirus action buttons, also refer to Jobs > Active Jobs in Permissions.
PERMISSIONS For the Create a Report and Quick Report action buttons, also refer to Reports > Active Reports in Permissions.
PERMISSIONS For Device Group actions, refer to Global > Groups and Sites > Groups in Permissions.
NAVIGATION Devices > All
NAVIGATION Sites > All Sites > click the name of a site
NOTE These lists of devices do not include categories at the top of the page nor filtering functionality.
NAVIGATION Dashboards > click the name of a dashboard > click an area of any device widget to drill into a list of devices
NAVIGATION Sites > All Sites > click the name of a site > click the name of a dashboard (left navigation menu) > click an area of any device widget to drill into a list of devices
NAVIGATION Device Filters page > click the name of a filter. To view the various navigation paths you can use to access the Device Filters page, refer to Device filters.
NAVIGATION Groups page > click the name of a group. To view the various navigation paths you can use to access the Groups page, refer to Groups.
NAVIGATION Patches page > click the number of devices (Total Devices column). To view the various navigation paths you can use to access the Patches page, refer to Patch Management.
NAVIGATION Software page > click the number of devices (Total Devices column). To view the various navigation paths you can use to access the Software page, refer to Software.
NAVIGATION Software Management page > click the number of devices (Total Devices column). To view the various navigation paths you can use to access the Software Management page, refer to Software Management.
NAVIGATION Hardware page > click the number of devices (Total Devices column). To view the various navigation paths you can use to access the Hardware page, refer to Hardware.
About
Devices are the endpoints that are managed in your Datto RMM account. All devices are associated with a site. Refer to Sites. The Devices page displays all of your devices or a subset of your devices associated with one particular site, depending on whether you navigate to List of all devices or List of devices in a site, respectively.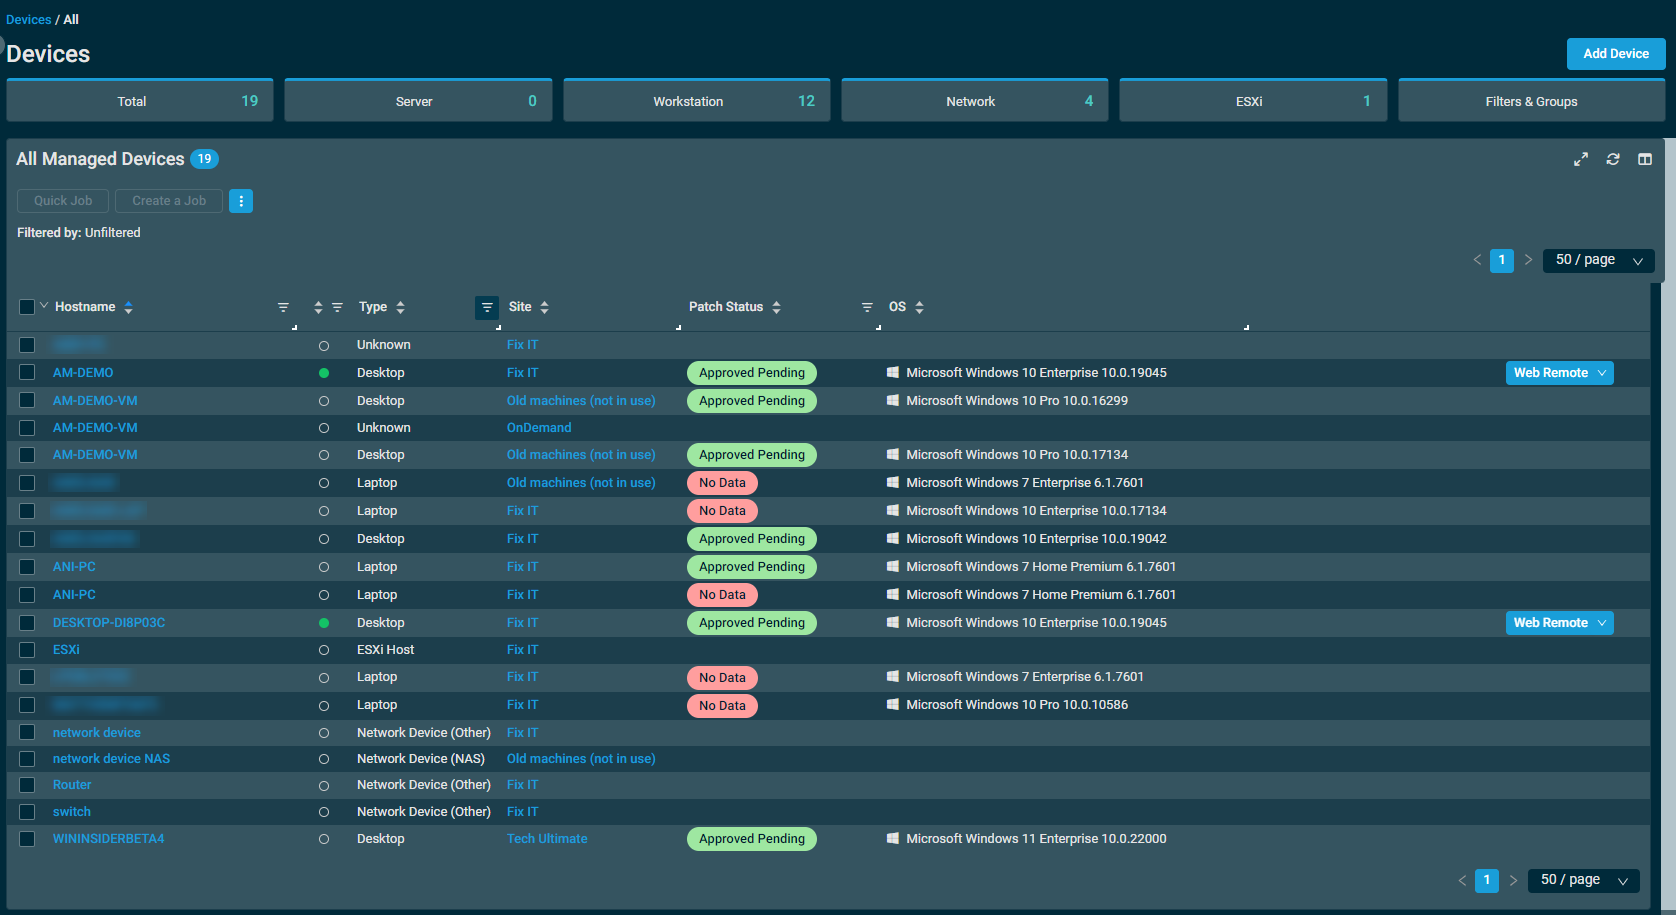
Click Add Device at the top of the page. For more information, refer to Adding a device.
At the top of the page, click any of the following categories to filter the list by that device type:
| Category | Description |
|---|---|
| Total | Displays the total number of devices. This includes servers, workstations, mobile devices, network devices, printers, Datto Networking devices, Datto Continuity devices, and ESXi hosts. |
| Server | Displays the total number of servers. |
| Workstation | Displays the total number of laptops and desktops. |
| Network | Displays the total number of the following network device types: • Datto Access Point • Datto Managed Power • Datto Switch • Network Device (Other) • Network Device (Router) • Network Device (Switch) • Network Device (UPS) • Network Device (Firewall) • Network Device (IP Phone) • Network Device (NAS) • Network Device (Network Appliance) • Network Device (SAN) • Printer |
| ESXi | Displays the total number of ESXi hosts. |
| Filters & Groups | Opens a pane on the right. The pane allows you to view a list of filters or groups depending on what is selected from the drop-down menu at the top of the pane. You may also search for a specific filter or group using the search bar. The search results will be narrowed as you type. NOTE Device Groups are available from the Devices page, while Site Device Groups are available from the site summary page. For more information about the types of filters and groups available, refer to Device filters and Groups. Click View next to a specific filter or group. The pane will close and you will be redirected to the list of devices targeted by that filter or group. To either remove a filter or group or to choose a new one, click Filters & Groups to open the pane. Select a new filter or group, or click Remove next to the one that is currently selected. The pane will close and you will be redirected to the list of devices. You may only select one filter or group at a time. |

Using the Column Chooser
The Column Chooser icon  allows you to select which columns should be visible in the list. Refer to Column Chooser field definitions for descriptions of all of the available fields.
When clicked, the Column Chooser will pop up in a searchable selector window with available columns on the left, and selected columns on the right.
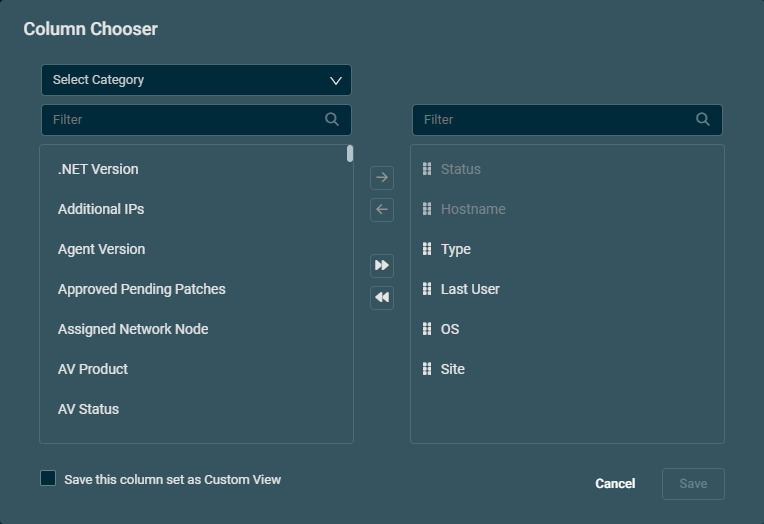
In this window, you can search available and selected columns using their respective Filter fields.
- To add a column to the selected columns, select the column in the available columns on the left, and click the Add Selected button (
 ).
). - To remove a column from selected columns, select the column from the selected columns on the right, and click the Remove Selected button (
 ).
). - To select multiple columns at one, hold Shift while clicking.
- Double-clicking a column moves it from available to selected, and vice versa.
- You can also use the Add All (
 ) and Remove All (
 ) buttons to automatically add or remove all columns from the column chooser.
NOTE The column chooser is limited to showing a maximum of 30 UDFs in one view. When using the Add All button, only the first 30 UDFs are added by default, so ensure that only the UDFs you wish to show in the view are selected.
Additionally, you can optionally enable Save this column set as a Custom View and enter a name for the view. Doing this will create a custom view with these column settings when you save your changes. You can also save your settings as a custom view on the device list directly, refer to .
Once all the columns you want to view have been selected, click Save to return to the device list with your selected column settings.
Adjusting and filtering the device list
The columns can be reordered and resized. The order and size of the columns will persist the next time the page is accessed.
You can filter any columns with the filter icon  . The Filtered by bar displays all applied column filters. If a filter search term includes wildcard characters (for example, underscores and percent signs), they serve as normal characters if they are preceded by a backslash. For details, refer to Wildcard characters. Click the X next to any filter to remove that filter or click Reset Filters to remove all filters. If no filter is applied, the Filtered by bar displays Unfiltered. The filter selection in the columns will persist the next time the page is accessed.
NOTE You can also reset all filters by using the Reset Filters action button. Refer to Reset Filters.
If you want to save your device list configuration for quick access in the future, you can create a Custom View. Refer to Saving multiple list views.
The refresh icon  allows you to reload the data while keeping existing filters when already configured.
The table density is set to condensed theme by default. To change it to relaxed theme, click the density toggle icon.  The selection will persist across all pages.
The number of results displayed can be specified by selecting the desired number from the pagination control. This selection will persist the next time the page is accessed.
If you wish to save specific device list configurations for use in the future, you can create custom views. Column selections, column ordering, column widths, and applied column filters are automatically saved to the Current View.
The following specifications apply to custom views:
- Your saved views apply only to your own user account.
- Up to 10 views can be saved at a time.
- The Default View is created automatically based on the initial list configuration in your user account. This view can be reconfigured, renamed, or deleted.
- Selecting to view a filter or group from the Filters & Groups pane will not cause that selection to be permanently saved to the Current View. Refer to Filters & Groups in List of devices.
- The Current View will persist when viewing any list of devices in your user account. Refer to Security and navigation for all device list navigation paths.
Creating a new custom view
Click the plus sign (+) next to the view selection drop-down menu.
IMPORTANT Changes made to the list configuration are automatically saved to the Current View, so you will want to click the plus sign to create a new view before you begin configuring it.
In the Create a New Custom View dialog box, enter a name for the view in the View Name field and click Save.
Once saved, the newly created view will become the Current View available for configuration.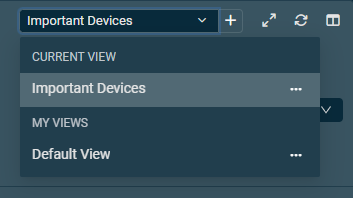
To change your Current View any time, select a different saved view from the drop-down menu.
NOTE You can also create a custom view when using the Column Chooser to select visible columns. Refer to Using the Column Chooser.
Renaming or deleting a view
Hover over the ellipses icon and select Rename or Delete, respectively.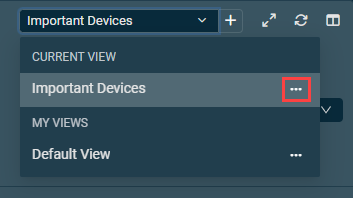
NOTE At least one view must exist at all times. If only one view exists, its Delete option will be missing until another view is created.
NOTE Deleting the Current View causes the next view in the list to become the Current View.
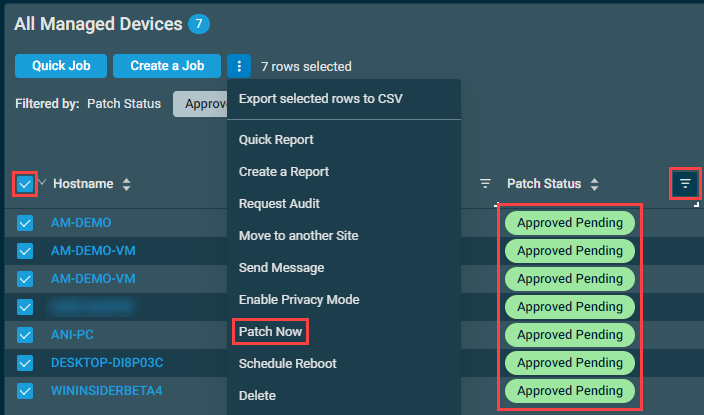
To access all action buttons, click the Row Actions icon.
The action buttons are grayed out or become unavailable if no row is selected in the table or if the action button is not applicable to the selected rows. The check boxes allow you to select one or more rows. Select all rows shown on a page by selecting the check box in the table header. You can also use the drop-down arrow next to the check box in the table header to choose one of the following options: Select none, Select all on page, or Select all rows across all pages. If you choose to select all rows across all pages, the check boxes of the rows will not be selected; however, the page will indicate that all rows have been selected.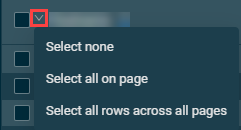
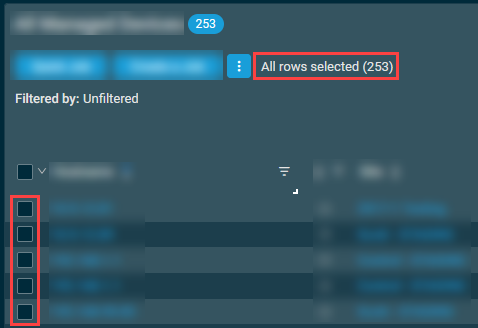
NOTE When all rows are selected across all pages, only certain action buttons are supported, which is indicated in the All Rows column in the table below.
| Action Button | All Rows | Description |
|---|---|---|
| Quick Job |
|
Refer to Quick jobs. NOTE For this action button to be available when all rows are selected across all pages, filtering is limited to the following columns: AV Product, AV Status, Description, External IP, Groups, Hostname, Internal IP, Is Network Node, Last User, Patch Status, Privacy Mode, Reboot Required, Serial Number, Software Status, Status, Type, User-Defined Field (1-300), Warranty Expiration, and Web Port. |
| Create a Job |
|
Refer to Scheduled jobs. NOTE For this action button to be available when all rows are selected across all pages, filtering is limited to the following columns: AV Product, AV Status, Description, External IP, Groups, Hostname, Internal IP, Is Network Node, Last User, Patch Status, Privacy Mode, Reboot Required, Serial Number, Software Status, Status, Type, User-Defined Field (1-300), Warranty Expiration, and Web Port. |

|
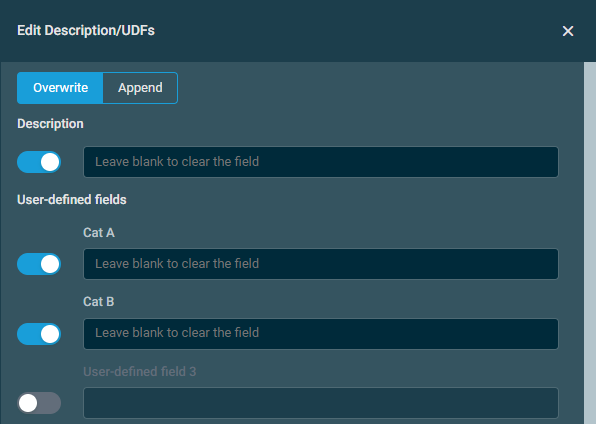
Allows you to edit the Description and/or User-defined field values for one or more devices at the same time.
NOTE Only 30 user-defined fields can be updated at one time.
|
|
| Export Selected Rows to CSV |
|
In the confirmation dialog box that appears, select whether to show table headers in the file by turning on the toggle for Show table headers in the exported CSV. Click Confirm to download the file or Cancel to close out of the dialog box. Any column selections, filters, and sorting that have been applied to the table will also be applied in the CSV file.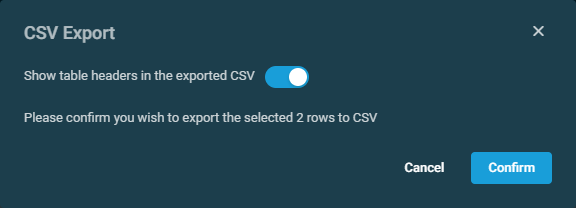 NOTE A maximum of 500 rows can be selected for export. If more than 500 rows are selected for export, the Export Selected Rows to CSV option will become grayed out. NOTE If you need to review more than 500 devices, you will need to export the entire device list and filter the list in your spreadsheet editor of choice. Refer to Export All Rows to CSV. |
| Export All Rows to CSV |
|
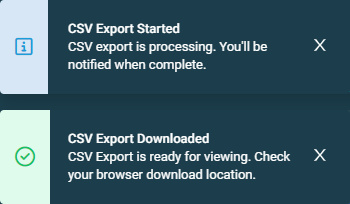
This action button is available only if all rows have been selected across all pages in the table. In the confirmation dialog box that appears, click Confirm to download the file or Cancel to close out of the dialog box. Pop-up notifications will inform you of the start and completion of the CSV export action. Click the X to close the notification; otherwise, the notification will automatically be cleared after five minutes. Any column selections, filters, and sorting that have been applied to the table will also be applied in the CSV file. NOTE This method will allow export of all devices, even if you have more than 500 devices in the device list. |
| Quick Report |
|
Refer to Quick reports. |
| Create a Report |
|
Refer to Reports. |
| Request Audit |
|
NOTE This action button is not available for OnDemand devices. Requests an audit of the selected devices. When a single device is selected, a full audit will be performed. When multiple devices are selected, a delta audit will be performed. NOTE A full audit can also be requested on the device summary page. Refer to Request Audit. IMPORTANT Device audits are rate limited. Only three audits may be performed per device over a five-minute time frame. This rate limiting applies to both full and delta audits. NOTE Audit data is also available at the global and site levels. Refer to Alerts, Global and site-level patches summary lists, Software, and Hardware. |
| Move to Another Site |
|
Refer to Move to Another Site. |
| Send Message |
|
Refer to Send Message. NOTE Receiving messages is only supported by certain devices types. For more information, refer to Action buttons. |
| Enable Privacy Mode |
|
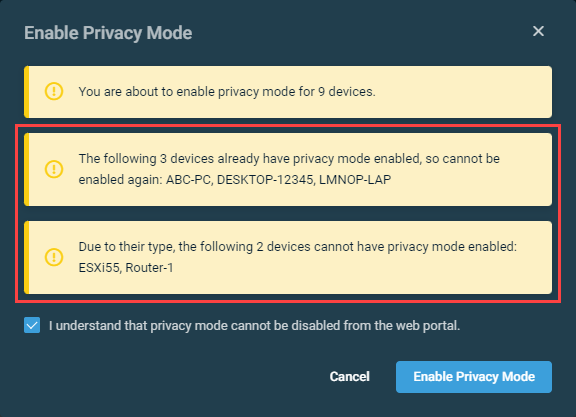
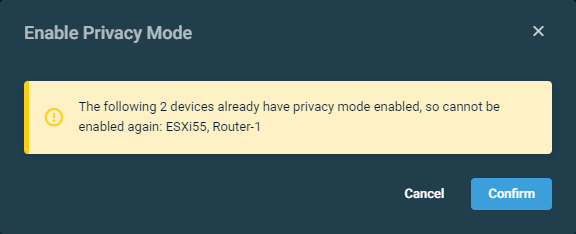
IMPORTANT Privacy Mode cannot be disabled from the web interface. Once enabled, it can only be disabled by the end user on the device itself. For more information, refer to Privacy Mode. Refer to Privacy Mode for information about this action. NOTE The Enable Privacy Mode action button is unavailable if none of the selected devices are a compatible type. Only Windows, macOS, and Linux laptops and desktops are supported for this action.
If completed, a pop-up notification will indicate the number of devices marked to have Privacy Mode enabled. NOTE Once Privacy Mode is enabled, a lock icon will appear next to the device name. Refer to Devices. NOTE You can also enable Privacy Mode on a single device from the device summary page. Refer to Enable Privacy Mode. |
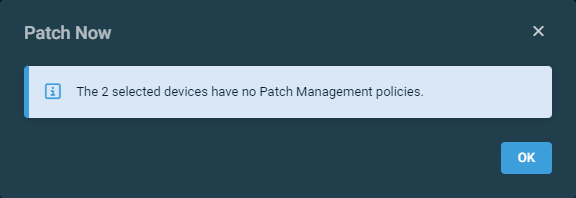
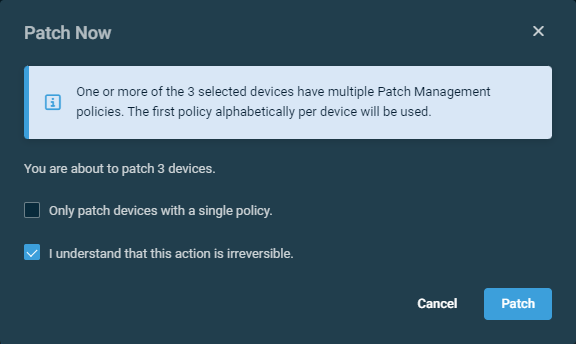
| Patch Now |
|
Allows you to start the installation of approved patches on the selected devices via a Patch Management policy. Patch installation will begin immediately, outside of the schedule configured in the policy targeting the devices. For information about Patch Management, refer to Patch Management and Patch Management policy. NOTE The Patch Now action button is unavailable if a single non-Windows device is selected or if all of the selected devices are non-Windows devices.
NOTE You can also use the Patch Now action button on a single device on the device summary page. Refer to Patch Now. Recommended workflowWhen patching multiple devices using the Patch Now action button, the following workflow is recommended:
|
| Schedule Reboot |
|
Refer to Schedule Reboot. |
| Assign Network Node | Assigns selected devices to a single Network Node. From the drop-down menu, select the site the applicable device belongs to, and then select the device to assign as the Network Node.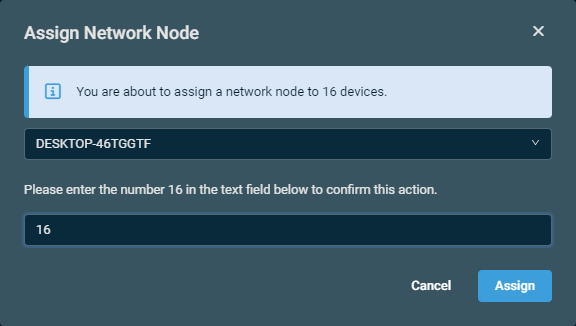 |
|
| Delete |
|
Refer to Deleting a device. |
| Create a Maintenance Mode Window |
|
Places the selected devices in an unscheduled maintenance mode that will prevent alerts from being generated for a specified time frame. Refer to Create a Maintenance Mode Window. |
| End Maintenance Mode Windows |
|
Ends all (both unscheduled and scheduled) maintenance mode windows configured for the selected devices upon confirmation. For information about unscheduled maintenance mode, refer to Create a Maintenance Mode Window. For information about scheduled maintenance mode, refer to Maintenance policy. |
| Webroot SecureAnywhere |
|
This action button is available only if Webroot SecureAnywhere Endpoint Protection is installed on at least one of the selected devices. Opens a submenu that allows you to select and run remote actions on the selected devices. Refer to Webroot SecureAnywhere Endpoint Protection.
NOTE If you select more than one device, the remote action will run only on the devices that have Webroot SecureAnywhere Endpoint Protection installed. |
| Windows Defender Antivirus |
|
This action button is available only if Microsoft Defender Antivirus or Microsoft Defender for Endpoint is installed on at least one of the selected devices. Opens a submenu that allows you to select and run remote actions on the selected devices. Refer to Windows Defender Antivirus.
NOTE If you select more than one device, the remote action will run only on the devices that have Microsoft Defender Antivirus or Microsoft Defender for Endpoint installed. |
| Create a Device Group |
|
Creates a new group that includes the selected devices. Refer to Viewing and managing Device Groups and Site Device Groups. |
| Add to Existing Device Group |
|
Adds the selected device(s) to an existing group. Enter the group name and select it from the drop-down menu, then click Add. Or, click Cancel to close out of the dialog box. NOTE If a Site Device Group is entered and any of the selected devices are not included in the site, a message will be displayed indicating that these devices cannot be added to the Site Device Group. NOTE The Add button will only become available once a group has been specified. |
| Remove from Existing Device Group |
|
Removes the selected device(s) from a group. Enter the group name and select it from the drop-down menu, then click Remove. Or, click Cancel to close out of the dialog box. NOTE The Remove button will only become available once a group the device(s) belong to has been specified. |
| Reset Filters |
|
Resets any of the filters applied in the table. NOTE You can also reset all filters by using the Reset Filters button in the Filtered by bar. Refer to List of devices. |
| Uncheck All |
|
Clears all selected rows. The number of selected rows is indicated next to the Row Actions icon. NOTE This action button is not available if all rows have been selected across all pages in the table. To clear all selected rows across all pages, use the Select none option from the drop-down arrow next to the check box in the table header. |


Various remote support actions are available for online devices from any device list page. A user's security level permissions, the device's operating system, and the device type determine which actions are available. Hover over the V icon next to the remote support button to access all available actions.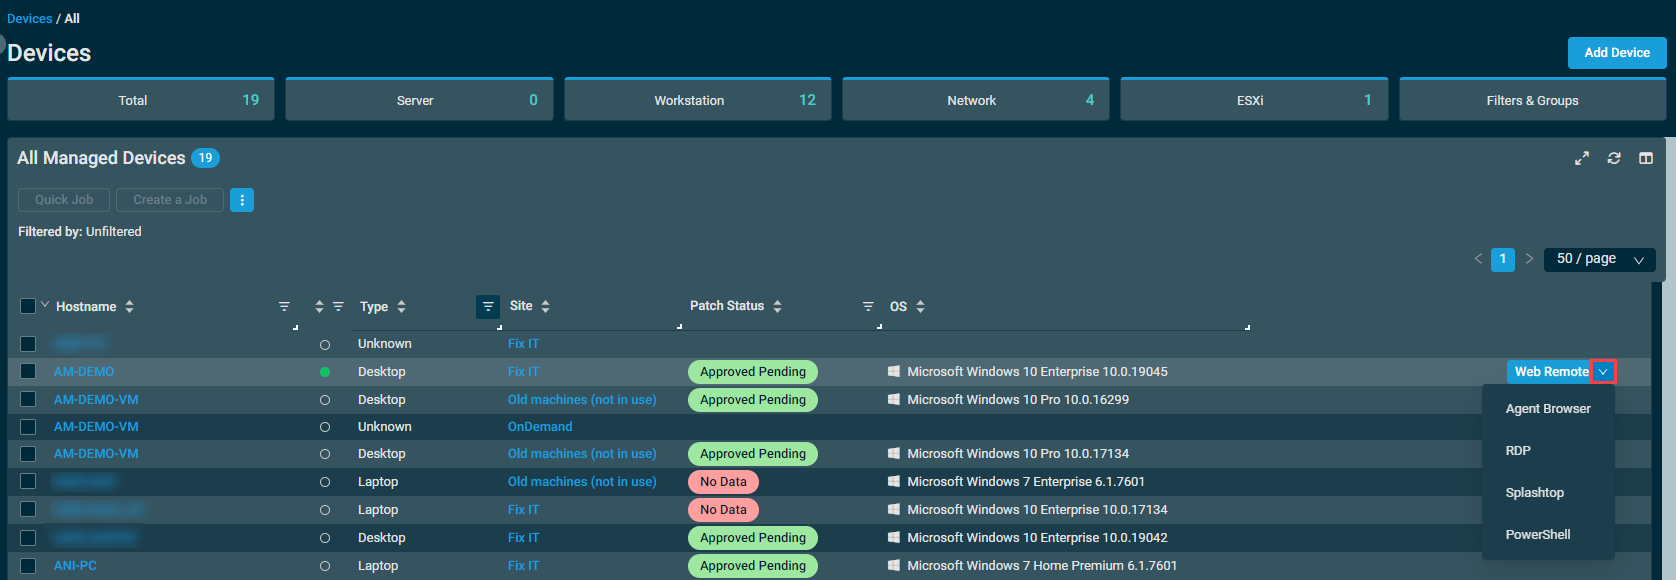
To learn more about each remote support action, refer to Action buttons.


