Managing and monitoring SNMP-enabled network devices and printers - Legacy UI
PERMISSIONS Permission to manage Sites and manage Devices
Network devices
NAVIGATION Legacy UI > Sites > open a Managed site > New Device > Network
Printers
NAVIGATION Legacy UI > Sites > open a Managed site > New Device > Printer
About
At times, you may need to manage and monitor certain devices that you cannot install a Datto RMM Agent on. For example, you may want to know when the data transfer rate of a switch port goes over a certain threshold, or if the battery in your UPS starts discharging, or whether you need to change your printer's toner. In instances when Agent installation is not possible, a fully managed Network Node device can connect to and manage your device using Simple Network Management Protocol (SNMP).
This topic is not intended to serve as a comprehensive SNMP theory tutorial. However, it offers the following:
- It provides some background information for SNMP monitoring in Datto RMM.
- It walks you through the process of adding an SNMP-enabled device as a Managed device to your account.
- It mentions how to monitor your SNMP devices and refers you to the appropriate topic in the Datto RMM Help.
If you are not familiar and comfortable with the concepts, terminology, and technology around SNMP, we strongly recommend some background reading before you start with SNMP monitoring. A number of useful guides on the subject are available, but here are a few examples we recommend:
OIDs
Datto RMM SNMP monitoring relies on object identifiers (OIDs) to define the path through a device's OID tree to a managed object containing data to be monitored. OIDs follow a strict hierarchical pattern much like a computer directory structure. However, OIDs only use numbers to define a path.
EXAMPLE In the following screenshot, an OID of 1.3.6.1.4.1.9 would navigate to the root of the private enterprise node for Cisco. (Source: Network Management Software)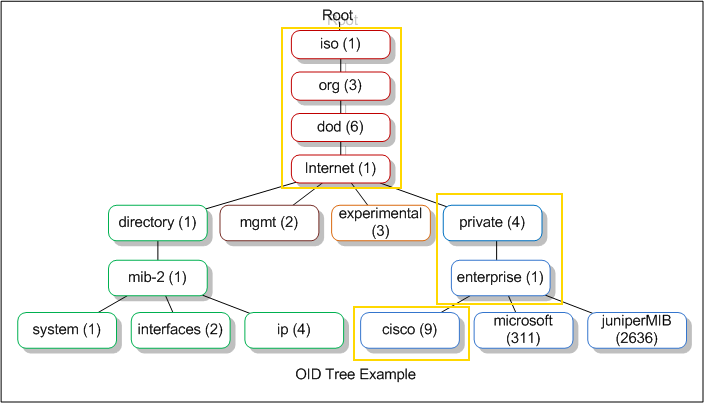
Another way of visualizing the OID tree is in the form of a folder structure that looks similar to a file explorer.
EXAMPLE The highlighted management object in the following screenshot would be referenced using the OID 1.3.6.1.2.1.2.2.1.8. (Source: Network Management Software)
MIB Browser
Datto RMM does not have inbuilt OID browsing functionality, so a third-party tool is required to discover OIDs before configuring SNMP monitoring. iReasoning MIB browser is a popular choice and has a free version with some functional limitations (versus the licensed versions).
Object types
Two types of SNMP managed objects exist:
- Scalar objects define a single object instance. In the examples in the OIDs section above, an OID is used to reference an SNMP management object directly, and it would return a single value.
- Tabular objects define multiple related object instances grouped in tables. Tabular objects can be visualized similarly to a spreadsheet or a database table:

The path to the root of the table is defined using an OID with additional numbers to indicate the row and column for which to retrieve data.
EXAMPLE In the preceding screenshot, if 1.3.6.1.2.1.2.2 is the OID used to reference the root of the table, then adding .4 would indicate row 4 (or index 4), and adding .10 would indicate column 10, making it 1.3.6.1.2.1.2.2.4.10. This would retrieve the value 758125 for ifInUcastPkts highlighted in the table.
Datto RMM SNMP monitoring allows you to monitor both scalar and tabular objects. If the SNMP monitor definition OID is marked as a table, the Datto RMM Agent will check the table from the root to discover all available instances and apply separate monitors for each one discovered.
Each monitored instance will have its own alert status and treat any tickets raised in Autotask or ConnectWise PSA as separate entities if you have either of the integrations enabled.
To learn how to monitor your managed network devices using SNMP, refer to Configure an SNMP Monitor.
How to...
To be able to monitor your SNMP-enabled devices, you need to add them as Managed devices to one of your Managed sites.
One option is to enable a fully managed Network Node device to discover other devices for you. For further information, refer to Network discovery - Legacy UI.
However, if the network scanning of SNMP devices is disabled for your account, or you are unable to find your device in the list of discovered devices, you can add it manually by following these steps:
- Follow either of the navigation paths described in Security and navigation, according to whether you wish to enroll a network device or printer.
- You will be prompted with the Add a Network Device or Add a Network Printer window as per your selection.
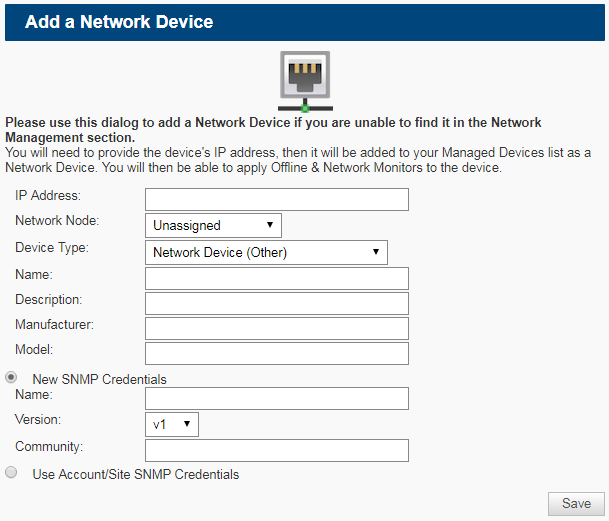

- Fill in the following details:
- Network Device (Firewall)
- Network Device (IP Phone)
- Network Device (NAS)
- Network Device (Network Appliance)
- Network Device (Other)
- Network Device (Router)
- Network Device (SAN)
- Network Device (Switch)
- Network Device (UPS)
- Click Save. The SNMP device is now added as a Managed device to your account.
NOTE For information about manually enrolling other types of devices, refer to Adding a device manually - Legacy UI.
| Field | Description |
|---|---|
| IP Address | Enter the IP address of the device. |
| Network Node | Select a Network Node device that will monitor the device. For more information about Network Nodes, refer to Network discovery - Legacy UI. |
| Device Type | Only available for network devices. Select one of the following device types:
|
| Name | Enter a name for the device. |
| Description | Enter a description for the device. |
| Manufacturer | Enter the name of the manufacturer of the device. |
| Model | Enter the model of the device. |
| New SNMP Credentials | Enter the SNMP credentials of the device. For information on what to enter, refer to the SNMP Credentials section in Account Settings - Legacy UI and Site Settings - Legacy UI in the legacy UI and SNMP credentials in the New UI. |
| Use Account/Site SNMP Credentials | Choose this option if you have SNMP credentials stored at the account or site level. The Site SNMP Credentials will be displayed in addition to the SNMP credentials specified in Account Settings unless this option is disabled in Site Settings. For information on how to store the SNMP credentials for the entire account or at the site level, refer to the SNMP Credentials section in Account Settings - Legacy UI and Site Settings - Legacy UI in the legacy UI and SNMP credentials in the New UI. You can also choose any of the Default SNMP Credentials (v1 and v2c, public) listed here. |
Once a network device has been enrolled, you can start monitoring it. SNMP monitoring is performed through a Network Node.
For information about configuring an SNMP monitor, refer to SNMP Monitor.
For information about creating a Monitoring policy, refer to Create a Monitoring policy - Legacy UI.


