Job results
PERMISSIONS Refer to Jobs > Active Jobs in Permissions.
NAVIGATION Automation > Jobs > click the name of a job
NAVIGATION Device summary page > Activities card > click a job link. To view the various navigation paths you can use to access the device summary page, refer to Device summary.
About
The job results page allows you to review all relevant information about a specific job.
NOTE An edited job name appears on the job results page after the next job is run. For existing Initial Audit jobs, name edits are not reflected. Refer to Editing a job.
The table below lists all available action buttons that can be found at the top of the page. To access all action buttons, click the Job Actions icon at the end of the row. 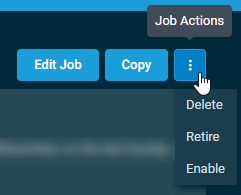
| Action Button | Description |
|---|---|
| Job History | Refer to Job History. |
| Edit Job | Refer to Editing a job. |
|
Copy |
Creates a copy of the job. |
| Delete | Deletes the job upon confirmation. The job will be removed from the list and deleted permanently. |
| Retire | Retires the job upon confirmation. Any job that has at least one future occurrence can be retired. Retiring a job prevents it from running again, and any targeted devices that have not yet run this job will be unable to do so. You can review previous results for this job by filtering on Completed jobs on the Jobs Overview page. Refer to Jobs overview.
NOTE A job cannot be retired if it is already inactive. |
|
Enable/Disable |
Enables or disables the job. |
By default, the last job run is shown in job results, but you can use the Job History drop-down to show the results from a previous run of the same job. 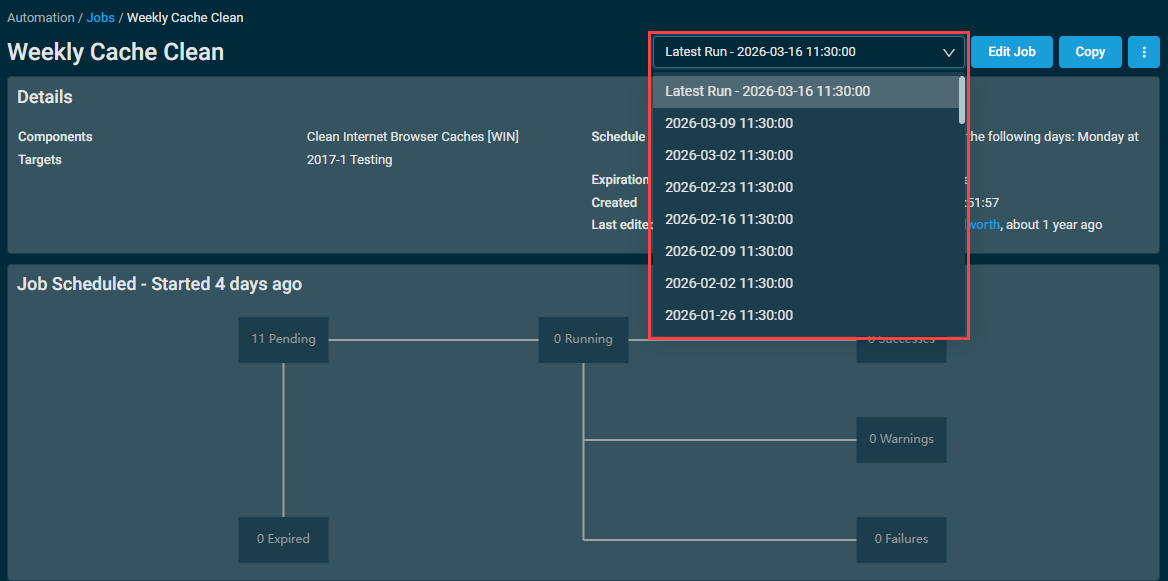
Select which job run you wish to review, and the Details, Job Progress, and Devices sections will update to show information for the selected run.
The Details section displays the following information:
| Field | Description |
|---|---|
| Components | A list of the components included in this job. Refer to Components. For jobs with a longer list of components, click the more link to expand the list. Click Show Less to collapse the list.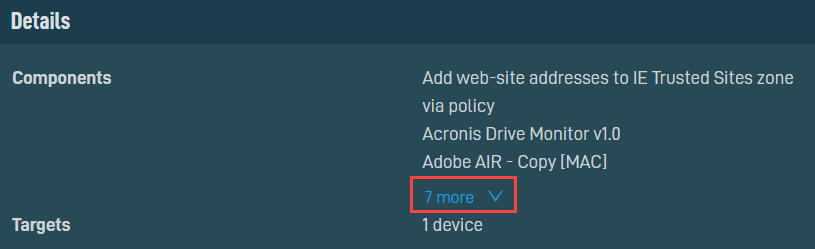 |
| Targets | A list of targets this job will run against. Refer to Targets. |
| Schedule | The schedule for this job. Refer to Schedule. |
| Expiration | Displays when this job will expire. Set to Does not expire by default for Quick Jobs. Refer to Quick jobs. |
| Created | Displays when this job was created. |
| Created by | The user who created this job. NOTE Jobs initiated via a Cooper Bot action will show a user name, but it is not tied to the user who configured the Cooper Bot. |
| Last edited | The user who last edited this job, as well as how long ago the job was edited. |
The progress section displays the job's progress in real time. The devices the job is currently running against or scheduled to run against in the future are grouped by their respective statuses. Refer to Job Status.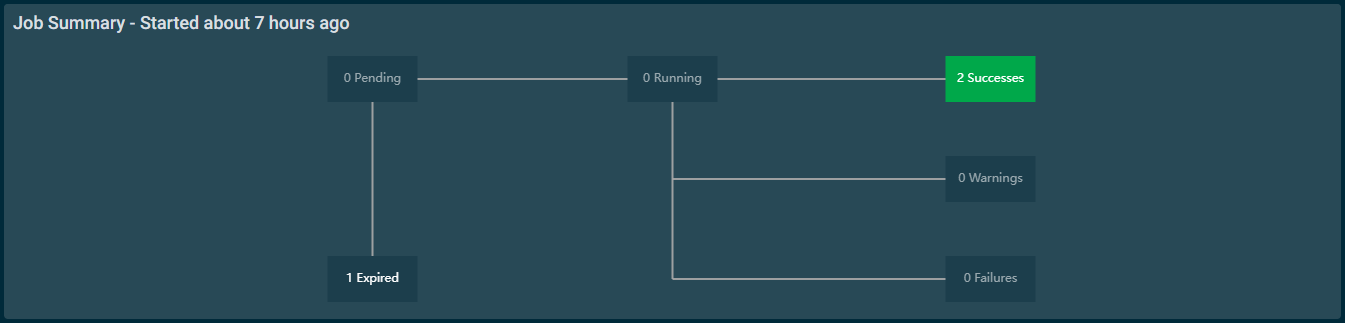
Clicking a status in this section activates the Job Status filter in the Devices section below, which shows all jobs with the selected status. Refer to Devices.
The Devices section displays the list of devices this job ran against.
Action buttons
To access all action buttons, click the Row Actions icon.
The action buttons are grayed out or become unavailable if no row is selected in the table or if the action button is not applicable to the selected rows. The check boxes allow you to select one or more rows. Select all rows shown on a page by selecting the check box in the table header. You can also use the drop-down arrow next to the check box in the table header to choose one of the following options: Select none, Select all on page, or Select all rows across all pages. If you choose to select all rows across all pages, the check boxes of the rows will not be selected; however, the page will indicate that all rows have been selected.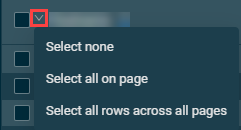
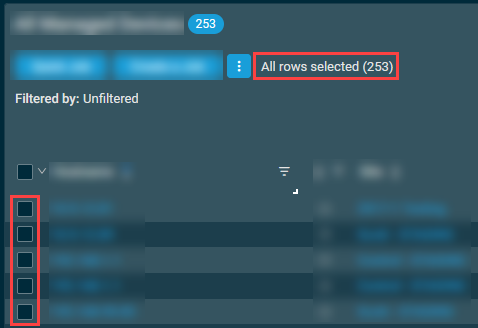
NOTE When all rows are selected across all pages, only certain action buttons are supported, which is indicated in the All Rows column in the table below.
| Action Button | All Rows | Description |
|---|---|---|
| Create a Job |
|
Refer to Creating a job. NOTE For this action button to be available when all rows are selected across all pages, no column filtering can be applied in the table. |
| Quick Job |
|
Refer to Quick jobs. NOTE For this action button to be available when all rows are selected across all pages, no column filtering can be applied in the table. |
| Rerun Job on [number of selected rows] Devices |
|
Allows you to rerun the job on the selected devices without creating a new job schedule. The job will be run immediately. |
| Rerun Job on All Devices |
|
This action button is only available if all rows have been selected across all pages in the table. It allows you to rerun the job on all devices across all pages without creating a new job schedule. The job will be run immediately. |
| Create a Device Group |
|
Creates a new group that includes the selected devices. Refer to Viewing and managing Device Groups and Site Device Groups. |
| Add to Existing Device Group |
|
Adds the selected device(s) to an existing group. Enter the group name and select it from the drop-down menu, then click Add. Or, click Cancel to close out of the dialog box. NOTE If a Site Device Group is entered and any of the selected devices are not included in the site, a message will be displayed indicating that these devices cannot be added to the Site Device Group. NOTE The Add button will only become available once a group has been specified. |
| Remove from Existing Device Group |
|
Removes the selected device(s) from a group. Enter the group name and select it from the drop-down menu, then click Remove. Or, click Cancel to close out of the dialog box. NOTE The Remove button will only become available once a group the device(s) belong to has been specified. |
| Export Selected StdOut/StdErr |
|
Launches a dialog box that lets you configure export options for StdOut (standard output) and StdErr (standard error) messages pertaining to jobs that ran on the selected devices: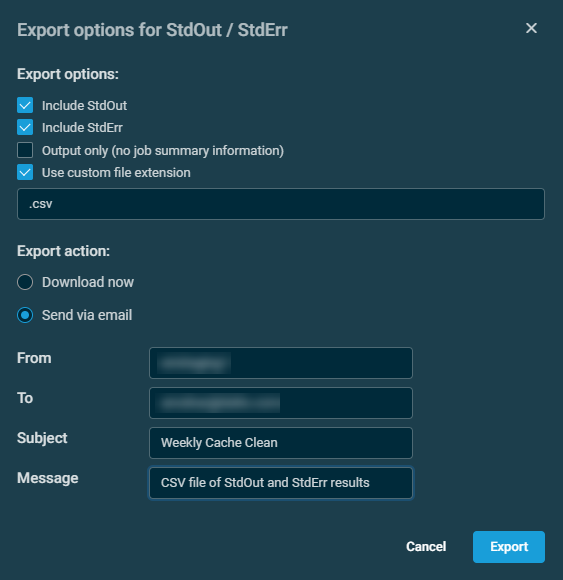
NOTE If a job includes more than one component with output, multiple files will be downloaded. To ensure all files are downloaded successfully, configure your web browser to allow pop-up windows. NOTE The From field is pre-populated with the current user's username. The Subject field is pre-populated with the job name. Each email text field is required and can be edited. NOTE The email link to download the output file expires after seven days. Once you have completed configuration, click Export, or click Cancel to return to the list of devices. Pop-up notifications will inform you of the start and completion of the StdOut/StdErr export process, including when the results are available to view from your browser download location. NOTE StdOut/StdErr email notifications can also be configured when creating a job. Refer to Automatically Email StdOut/StdErr Options. |
| Export Selected Rows to CSV | In the confirmation dialog box that appears, select whether to show table headers in the file by turning on the toggle for Show table headers in the exported CSV. Click Confirm to download the file or Cancel to close out of the dialog box. Any column selections, filters, and sorting that have been applied to the table will also be applied in the CSV file.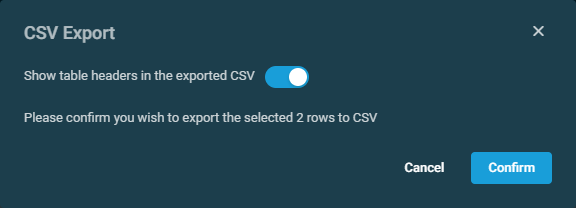 |
|
| Export All Rows to CSV |

|
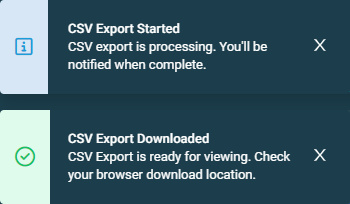
This action button is available only if all rows have been selected across all pages in the table. In the confirmation dialog box that appears, click Confirm to download the file or Cancel to close out of the dialog box. Pop-up notifications will inform you of the start and completion of the CSV export action. Click the X to close the notification; otherwise, the notification will automatically be cleared after five minutes. Any column selections, filters, and sorting that have been applied to the table will also be applied in the CSV file. |
| Uncheck All |
|
Clears all selected rows. The number of selected rows is indicated next to the Row Actions icon. NOTE This action button is not available if all rows have been selected across all pages in the table. To clear all selected rows across all pages, use the Select none option from the drop-down arrow next to the check box in the table header. |

The table displays the following columns:
| Field | Sortable? | Description |
|---|---|---|
| Hostname |
|
The name of the device. Click the link to go to the device summary page for this device. Refer to Device summary. To narrow the list, click the filter icon  , enter a term, and click Apply. To see the full list, click Reset. , enter a term, and click Apply. To see the full list, click Reset. |
| Status |
|
Displays whether the device is online or offline. Click the filter icon and click Online or Offline to filter by the status of the devices. To see the full list of devices, click All. |
| Site |
|
The site this device belongs to. Click the link to go to the site summary page. Refer to Site summary. To narrow the list, click the filter icon , enter a term, and click Apply. To see the full list, click Reset. |
| Component Results | The results of the components that ran as part of the job. The job may have succeeded on some devices and failed on others; all of the results will be listed grouped by their respective statuses. For longer lists, click the more link to expand the list. Click Show Less to collapse the list.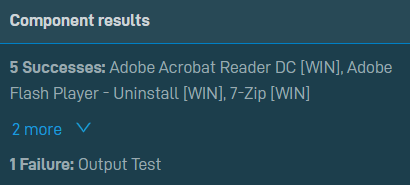 |
|
| Ran On |
|
How long ago this job was last scheduled to run. |
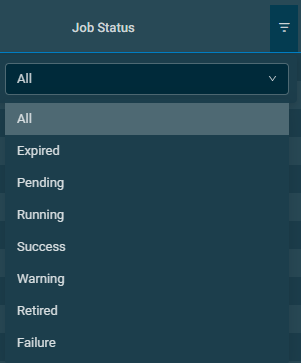
| Job Status |
The overall result of the job. As with the component results, the job may have succeeded on some devices and failed on others; however, the logic for this field is such that the most negative status of all the component results is displayed. For example, if a job has two component results, one of which is a success and the other is a warning, the overall status that will be displayed is Warning. Click the filter icon
|
|
| StdOut/StdErr |
|
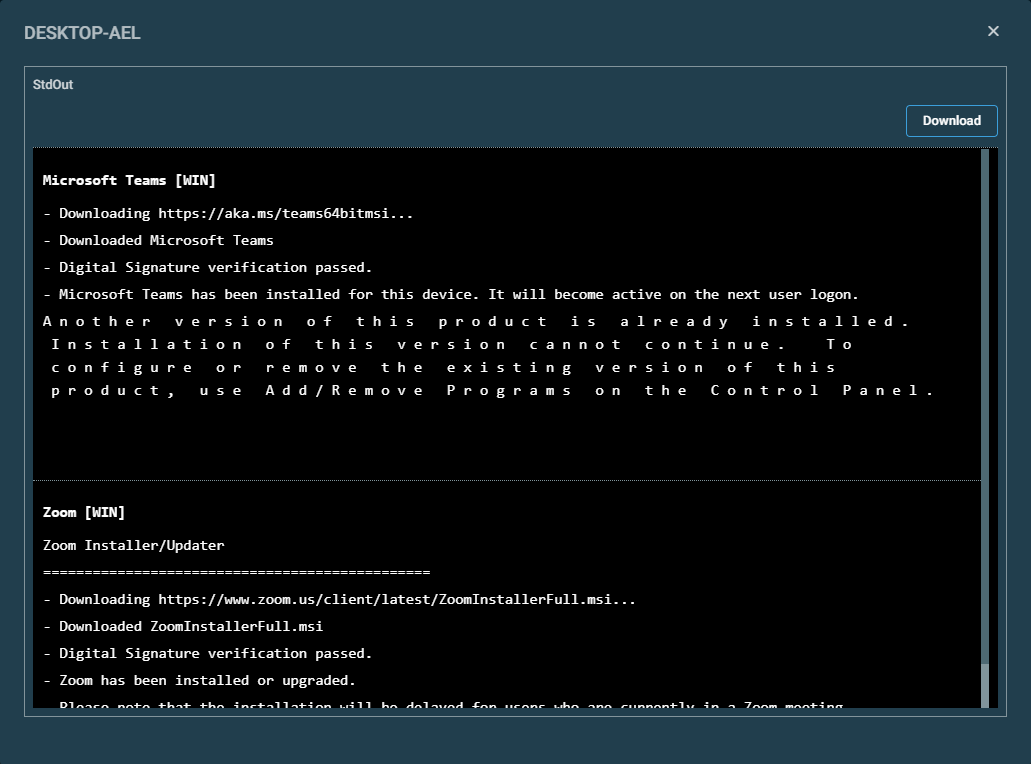
Click the link to view the StdOut (standard output) or StdErr (standard error) results. StdOut/StdErr output that exceeds 1,048,576 (1,024*1,024) characters will be truncated. Click the Download button to download the associated file. NOTE If a job includes more than one component with output, multiple files will be downloaded. To ensure all files are downloaded successfully, configure your web browser to allow pop-up windows.
|
You can filter any columns with the filter icon . The Filtered by bar displays all applied column filters. If a filter search term includes wildcard characters (for example, underscores and percent signs), they serve as normal characters if they are preceded by a backslash. For details, refer to Wildcard characters. Click the X next to any filter to remove that filter or click Reset Filters to remove all filters. If no filter is applied, the Filtered by bar displays Unfiltered. The filter selection will not persist the next time the page is accessed as the table will return to the default view (unfiltered).
The table density is set to condensed theme by default. To change it to relaxed theme, click the density toggle icon.  The selection will persist across all pages.
The number of results displayed can be specified by selecting the desired number from the pagination control. This selection will persist the next time the page is accessed.


