Device Summary card
Refer to Security and navigation in Device summary.
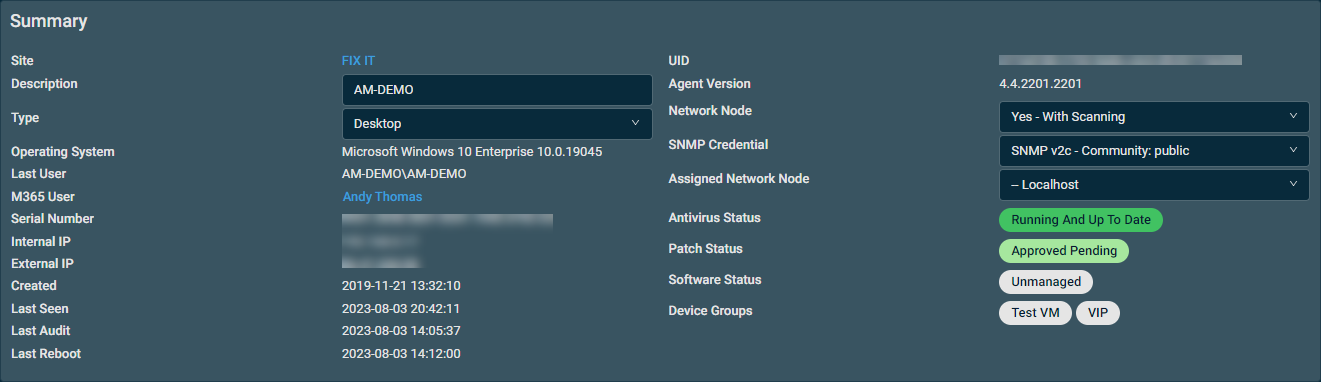
The Summary card displays different fields depending on the device type.
NOTE The Summary card is part of the device summary page. Refer to Device summary.
The following table breaks down what information is shown in the Summary card, based on the device type.
| Field | Server/Laptop/Desktop | Network Device | Printer | Datto Networking | Datto Continuity | ESXi | ||||||
|---|---|---|---|---|---|---|---|---|---|---|---|---|
| Access Point | Switch | Managed Power | ALTO | SIRIS | vSIRIS | Datto Backup for Microsoft Azure | Datto Endpoint Backup with Disaster Recovery | |||||
| Site |

|

|
|
|
|
|
|
|
|
|
|
|
| Click the site name to open the site's Devices page | ||||||||||||
| Description |
|
|
|
|
|
|
|
|
|
|
|
|
| Click in the field to update the device's description. The change is saved automatically. Editing this field is not available for Datto Networking devices. NOTE This field has a limit of 255 characters. NOTE You can also have the Agent update the device's Description field. The process is identical to the one used for UDF data update. For more information, refer to Populate UDF information by the Agent. |
||||||||||||
| Manufacturer |
|
|
|
|||||||||
| Model |
|
|
|
|
|
|
|
|
||||
| Network devices: Only displayed for Cisco devices. | ||||||||||||
| Type |
|
|
|
|
|
|
|
|
|
|
|
|
|
The field displays the type of the device. To override the device type, click the drop-down menu to select a different type from the list. The following device types can be selected for Agent devices:
The following device types can be selected for network devices:
The following device types cannot be overridden:
|
||||||||||||
| Operating System |
|
|
|
|
||||||||
| Last User |
|
|
|
|||||||||
| M365 User |
|
|||||||||||
| If available, click the hyperlinked user name to open the Microsoft 365 user details page. Refer to User details in Microsoft 365 Integration. | ||||||||||||
| Serial Number |
|
|
|
|
|
|
|
|||||
| Network devices: Only displayed for Cisco devices. Dell devices: Click the serial number to navigate to the manufacturer's support page. Linux devices: The field is populated with the system UUID value (dmidecode -s system-uuid) instead of the physical device serial number. This unique identifier prevents serial number duplication when managing multiple virtual Linux machines with the same hypervisor-assigned default serial number. |
||||||||||||
| Internal IP |
|
|
|
|
|
|
|
|
|
|||
The field is editable for the following device types:
The field cannot be empty and must contain a valid IP address. If an invalid IP address is entered, an error message will be displayed. Upon entering a valid IP address, click outside of the text box or press Enter or Esc on your keyboard to save the update. In the confirmation dialog box that appears, click Cancel to preserve the original IP address or Update to change the IP address. NOTE If multiple internal IP addresses are present, Datto RMM will display the one the Datto RMM Agent is connected through. |
||||||||||||
| External IP |
|
|
|
|
|
|
|
|
||||
| Created |
|
|
|
|
|
|
|
|
|
|
|
|
| Last Seen |
|
|
|
|
|
|
|
|
|
|
||
| Only displayed for offline devices. Datto Continuity devices may still display as online since these devices check in every 10 minutes. |
||||||||||||
| Last Audit |
|
|
|
|
|
|
||||||
| Last Reboot |
|
|
|
|||||||||
| UID |
|
|
|
|
|
|
|
|
|
|
|
|
| The unique identifier of the device, which is automatically created upon adding the device to your Datto RMM account. | ||||||||||||
| Agent Version |
|
|
|
|
|
|
||||||
| PSA Device ID |
|
|
|
|
|
|
|
|
|
|
|
|
|
This field shows the Autotask PSA device ID of the device. NOTE This field is displayed only if the device's site has been synced to a company in Autotask. The following actions are available:
NOTE Force sync to Autotask Device is available only for devices that are already mapped to an Autotask asset. |
||||||||||||
| Network Node |
|
|
|
|||||||||
The field indicates whether the device has been nominated as a Network Node. The drop-down menu lists the following options:
For more information, refer to Network configuration and discovery. |
||||||||||||
| SNMP Credential |
|
|
|
|
|
|
|
|
|
|||
| Click the drop-down menu to select a set of SNMP credentials from the list. Global SNMP credentials will be displayed in addition to site-level SNMP credentials. You can also choose any of the Default SNMP Credentials (v1 and v2c, public) listed here. In case the SNMP credentials set in Account Settings or Site Settings are deleted, the Default SNMP Credentials will be used automatically. For information on how to store SNMP credentials, refer to SNMP credentials. | ||||||||||||
| Assigned Network Node |
|
|
|
|
|
|
||||||
The field displays two drop-down menus for the following values:
You can assign any of the Network Nodes from any of the sites to the device. Click the first drop-down menu to select the site, and click the second drop-down menu to select a Network Node from the selected site. |
||||||||||||
| Antivirus Status |
|
|
|
|||||||||
|
Refer to Antivirus status. The highlight legend is as follows:
|
||||||||||||
| Patch Status |
|
|
|
|||||||||
Only available for Windows devices. Refer to Patch Management. The highlight legend is as follows:
|
||||||||||||
| Software Status |
|
|
|
|||||||||
Only available for Windows and macOS devices. Refer to Software status. The highlight legend is as follows:
|
||||||||||||
| Device Groups |
|
|
|
|
|
|
|
|
|
|
|
|
| Displays the groups this device belongs to. If the device belongs to more than five Device Groups, click View More to display all of the groups. The groups are listed in alphabetical order. Click a group to open a pane to the right to edit, delete, or manage device membership for this group. Refer to Groups. | ||||||||||||
| Reboot Required |
|
|
|
|||||||||
| Displays Yes if the device needs to be rebooted and No if it does not. Refer to How does Datto RMM determine if a reboot is needed? |
||||||||||||
| (Deprecated) Local Cache |
|
|
|
|
|
|
||||||
| With the 10.0.0 release, the local cache functionality has been deprecated as part of Datto's continued commitment to security. References to the local cache remain in the UI at present, but will be removed in the future. | ||||||||||||
| ESXi Credential |
|
|
|
|
|
|
||||||
| Click the drop-down menu to select a set of ESXi credentials from the list. Global ESXi credentials will be displayed in addition to site-level ESXi credentials. For information on how to store ESXi credentials, refer to ESXi credentials. If no ESXi credentials are stored at either the global or site level, the field will indicate that there are no associated ESXI credentials for the device. |
||||||||||||
| NIC Vendor |
|
|
|
|
|
|
|
|||||
| SNMP Name |
|
|
|
|
|
|
|
|||||
| SNMP Description |
|
|
|
|
|
|
|
|||||
| SNMP Location |
|
|
|
|
|
|
|
|||||
| SNMP Contact |
|
|
|
|
|
|
|
|||||
| SNMP Uptime |
|
|
|
|
|
|
|
|||||
| Object ID |
|
|
|
|
|
|
|
|||||
| MAC Address |
|
|
|
|
|
|
|
|
|
|
||
| Warranty Expiration |
|
|
|
|
|
|
|
|||||
|
This field displays the date the device's warranty expires or is blank if no date is set. If the date is in the past, the word Expired is highlighted in red underneath the date. This field is not populated automatically. Click in the field to update the date. Enter the date manually (YYYY-MM-DD) or choose it from the calendar. The change is saved automatically. NOTE Alternatively, you may consider using a third-party integration to populate this field. NOTE If the Autotask Integration is enabled, manual edits to the Warranty Expiration date will be synchronized to Autotask; however, removing the Warranty Expiration date in Datto RMM will not be synchronized to Autotask. If the Warranty Expiration date in Datto RMM is edited through an automatic method (for example, via a third-party integration), the change will only be synchronized if the Warranty Expiration field is empty in Autotask. NOTE If the ConnectWise PSA Integration is enabled, the Warranty Expiration date will only be synchronized to ConnectWise PSA if it is not in ConnectWise PSA at the time of the initial synchronization. If a Warranty Expiration date has already been set within ConnectWise PSA, it will not be updated upon subsequent device synchronization with Datto RMM. NOTE For Datto Continuity devices, this field is not editable from within Datto RMM. |
||||||||||||
| Printed Page Count |
|
|
|
|
|
|
||||||
| Firmware Version |
|
|
|
|
|
|
|
|
||||
| Uptime |
|
|
|
|
|
|
|
|
||||
| Gateway IP |
|
|
|
|
|
|
||||||
| Surge Protection Active |
|
|
|
|
|
|
||||||
| Client Company Name |
|
|
|
|
|
|||||||
| Local Storage Used |
|
|
|
|
|
|||||||
| Local Storage Available |
|
|
|
|
|
|||||||
| Offsite Storage Used |
|
|
|
|
|
|||||||


